Hybrid Integration
In my last post about Skype for Business / Office 365 Skype for Business Online/Teams migration article I discussed the steps of how to create a hybrid environment between Skype for Business on-premises and went through the troubleshooting of each issue I have been through. In this article I am going to discuss the migration of users from on-premises to the cloud through UI and PowerShell.
Migrating users
This article will assume that you are planning to migrate users from Skype for Business Frontend 2015 Server and that you already have a hybrid configuration in place. If so then you’re going to fulfill the following prerequisites:
To check the currently installed PowerShell run the following cmdlet
$PSVersionTable

After you Download and install PowerShell 5.1 you might need to restart the server. In which case the PowerShell will show that it is updated to the required version.

After Installing the Skype Online Connector Module, We will be able to connect right after launching PowerShell
To do so type:
Import-Module SkypeOnlineConnector

Connecting to Office 365 (Teams Online or Skype for Business Online)
The process of connecting to Office 365 Online PowerShell sounds easy but with MFA enforced in your environment you’ll have a nightmare mix of errors when you try so.
I have came through a lot of errors trying to force the use of PowerShell with MFA user authentication but eventually came to realize that Microsoft still does not support MFA for some cmdlets like Move-CsUser for instance.
So In short, to connect you’ll need to have a global or Teams admin user with MFA disabled to do so.
To create a new Skype Online Session enter:
– Make sure you start the regular PowerShell as admin and not Skype for Business Management Shell.
If you run these commands from SfB Management Shell you’ll get an error

So first, We will import the Skype Online connector Module
Import-Module SkypeOnlineConnector

Then get the OverRidePowershell URI using the command:
Get-CsOnlinePowerShellEndPoint

Next, We will connect and authenticate to our tenant using the following cmdlet
$sfbsess = New-CsOnlineSession -Username User@domain.onmicrosoft.com -OverRidePowerShellUri https://admin4a.online.lync.com/OcsPowershellOAuth –Verbose

Moving Users to Teams
To Move users to Office 365, You need to first provide credentials of the User with MFA disabled and then use the command Move-CsUser
An Example:
$Creds = Get-Credential

Moving User
Move-CsUser –Identity user@domain.com –target “sipfed.online.lync.com” –hostedMigrationOverRideUri https://admin4a.online.lync.com/HostedMigration/hostedmigrationservice.svc –ProxyPool “YourFEPool.Domain.local” –Credential $Creds

Let’s check the status of the migrated user, The hosting provider attribute is what we care about as it tells us where the user is homed at.

Checking the user from Teams Portal
Users seems to be licensed, online and can now login using the Microsoft Teams app.

Bulk Enable Users and assign Tel URI numbers to them
In case you have a big number of users that you want to enable them online
# Please provide your O365 admin credential
$creds = Get-Credential
-PSSession (New-CsOnlineSession $cred) -AllowClobber
$csv = Import-csv “C:\Users\Mohammed\users.csv”
ForEach ($user in $csv) {
Write-host now enabling $user.alias
Move-CsUser –Identity $user.alias –target “sipfed.online.lync.com” –hostedMigrationOverRideUri https://admin4a.online.lync.com/HostedMigration/hostedmigrationservice.svc –ProxyPool “YourFEPool.Domain.local” –Credential $creds
}
The CSV File will look like this
Alias
user@domain.com
user2@domain.com
Moving User back to On-premises (From Office 365 to SfB 2015 )
On Frontend Server Launch PowerShell as Administrator then:
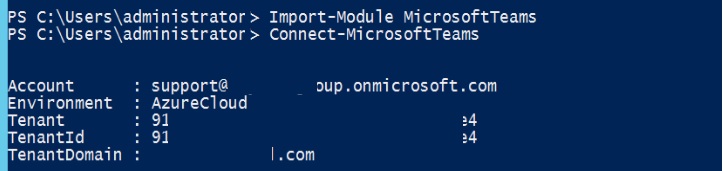
A- Import-Module MicrosoftTeams
B- Connect-MicrosoftTeams
After you connect you’ll get the following result:
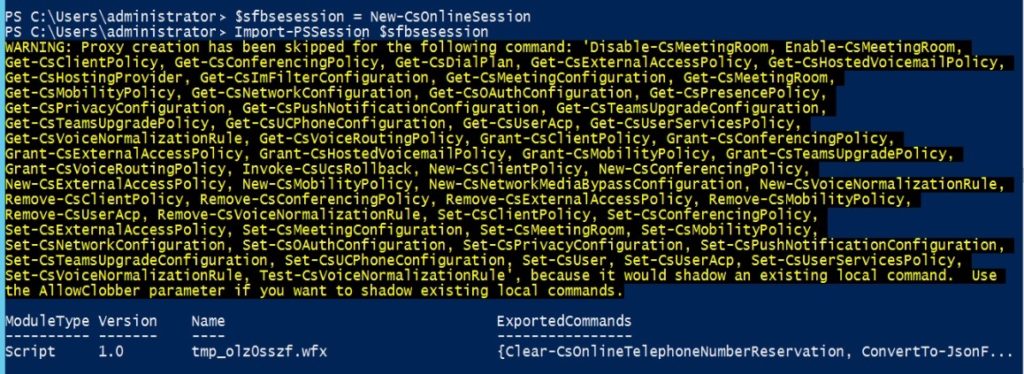
Now that you’re connected to your tenant, Try to create a Skype for Business session with the following commands
C- $sfbsession = New-CsOnlineSession
D- Import-PsSession $Sfbsession
You should get the following result
Type the following command to move the user back to On-premises environment:
Now last and most important note is that since I am using Skype for Business 2015 Server, I have to use the parameter -UseOAuth which uses modern authentication.
Move-csuser -Identity User@domain.com -target PoolHostname.Domain.Local -UseOAuth -Verbose
This should get it to work finally

Errors you might face
Error 1:
When you have your on-premises user enabled for dialin you will probably get the following error if you try to migrate them to Skype for Business online or teams.
Move-Csuser :: HostedMisrat ion fault: Error=(511), Description=(The user could not be moved because he or she is enabled for dial-in conferencing on-premises, but has not been an assigned an Audio Conferencing license in Office 365. Users must be licensed before they can be moved to Teams or Skype for Business Online.)
If you are sure do want to use migrate this user without an Audio Conferencing license, specify the
“BypassAudioConferencingCheck” switch. ) At line: 1 char: 1
![clip_image001[4]](https://www.moh10ly.com/wp-content/uploads/2021/01/clip_image0014_thumb.png "clip_image001[4]")
The Solution is to either provide an audio conferencing license or as it is showing in the error itself as it says use the switch -BypassAudioConferencingCheck to ignore that.
Error 2:
When trying to import the session, I got the following error
the runspace state is not valid for this operation for PowerShell Online.
![clip_image001[6]](https://www.moh10ly.com/wp-content/uploads/2021/01/clip_image0016_thumb.png "clip_image001[6]")
Solution: To overcome this problem you’ll need to use the overridePowershellUri Parameter in the New-CsOnlineSession in order to connect to Skype online powershell.
To get your tenant’s PowerShell URI use the cmdlet Get-CsOnlinePowerShellEndPoint
What you need to use is the AbsoluteUri
![clip_image001[8]](https://www.moh10ly.com/wp-content/uploads/2021/01/clip_image0018_thumb.png "clip_image001[8]")
Error 3:
When you try to import the SkypeOnlineConnector module and then run the New-CsOnlineSession cmdlet from Skype for Business Management Shell you’ll get the following error after authenticating.
Sign in
Sorry, but we’re having trouble signing you in.
AADSTS50011: The reply URL specified in the request does not match the reply URLs configured for the application: ‘7716031e-6f8b-45a4-b82b-922b1af0fbb4’. More details: Reply address did not match because of case sensitivity.
Troubleshooting details
If you contact your administrator, send this info to them.
Copy info to clipboard
Request Id: f0f97265-4669-4e4f-bcf7-609469e92f00
Correlation Id: 829c8a2b-f697-416f-bfa6-4a794a229a13
Timestamp: 2021-01-10T23:00:10Z
Message: AADSTS50011: The reply URL specified in the request does not match the reply URLs configured for the application: ‘7716031e-6f8b-45a4-b82b-922b1af0fbb4’. More details: Reply address did not match because of case sensitivity.
Advanced diagnostics: Disable
If you plan on getting support for an issue, turn this on and try to reproduce the error. This will collect additional information that will help troubleshoot the issue.

Solution:
Run the cmdlets from Windows PowerShell as admin not Skype for Business Management shell.
Error 4
Get-CsOnlinePowerShellAccessInformation : Unable to get response from https://admin4a.online.lync.com/OcsPowershellOAuth.
At C:\Program Files\Common Files\Skype for Business Online\Modules\SkypeOnlineConnector\SkypeOnlineConnectorStartup.psm1:160 char:20
+ … pAuthInfo = Get-CsOnlinePowerShellAccessInformation -PowerShellEndpoi …
+ ~~~~~~~~~~~~~~~~~~~~~~~~~~~~~~~~~~~~~~~~~~~~~~~~~~~~~~~~~
+ CategoryInfo : NotSpecified: (:) [Get-CsOnlinePowerShellAccessInformation], Exception
+ FullyQualifiedErrorId : System.Exception,Microsoft.Rtc.Management.OnlineConnector.GetPowerShellAccessInformationCmdlet

Error 5
Move-CsUser
[Y] Yes [A] Yes to All [N] No [L] No to All [S] Suspend [?] Help (default is “Y”): y
move-csuser : The underlying connection was closed: An unexpected error occurred on a send.
At line:1 char:1
+ move-csuser -identity user@domain.com -target D2-POOL01.clou …
+ ~~~~~~~~~~~~~~~~~~~~~~~~~~~~~~~~~~~~~~~~~~~~~~~~~~~~~~~~~~~~~~~~~~~~~
+ CategoryInfo : InvalidOperation: (CN=user …domain,DC=net:OCSADUser) [Move-CsUser], WebException
+ FullyQualifiedErrorId : MoveError,Microsoft.Rtc.Management.AD.Cmdlets.MoveOcsUserCmdlet
Solution:
1- Make sure you have the proper Powershell version.
2- Make sure you enable TLS1.2 as default, for a quick solution use this PowerShell script
[System.Net.ServicePointManager]::SecurityProtocol = [System.Net.SecurityProtocolType]::Tls12;
3- Use MFA enabled account by following these steps to login and move user.
A- Import-Module MicrosoftTeams
B- Connect-MicrosoftTeams
After you connect you’ll get the following result:
Now that you’re connected to your tenant, Try to create a Skype for Business session with the following commands
C- $sfbsession = New-CsOnlineSession
D- Import-PsSession $Sfbsession
You should get the following result
Now last and most important note is that since I am using Skype for Business 2015 Server, I have to use the parameter -UseOAuth which uses modern authentication.
This should get it to work finally
References:
https://docs.microsoft.com/en-us/microsoftteams/upgrade-to-teams-on-prem-overview
https://social.technet.microsoft.com/wiki/contents/articles/34339.skype-for-business-online-enable-your-tenant-for-modern-authentication.aspx
https://docs.microsoft.com/en-us/skypeforbusiness/hybrid/move-users-from-on-premises-to-skype-for-business-online
https://docs.microsoft.com/en-us/microsoftteams/teams-powershell-install
https://docs.microsoft.com/en-us/skypeforbusiness/troubleshoot/hybrid-move-sfb-online/move-csuser-hostedmigration-fault-507
https://docs.microsoft.com/en-us/powershell/module/skype/move-csuser?view=skype-ps


![clip_image001[4]](https://www.moh10ly.com/wp-content/uploads/2021/01/clip_image0014-1.png "clip_image001[4]")


![clip_image001[4]](https://www.moh10ly.com/wp-content/uploads/2021/01/clip_image0014.png "clip_image001[4]")
![clip_image001[6]](https://www.moh10ly.com/wp-content/uploads/2021/01/clip_image0016.png "clip_image001[6]")
![clip_image001[8]](https://www.moh10ly.com/wp-content/uploads/2021/01/clip_image0018.png "clip_image001[8]")