Tag Archives: Security

Reset passwords for Active Directory Users

Reset and manage your Active Directory users' Passwords

Active Directory is one of the most esential and important tool in any company whether small or big. In most cases big companies have uncountable amount of tools to maintain and protect users and their credentials however almost most of those companies are not prepared to the time when their systems have been compromised or to say the least their servers have been hacked or encrypted by ransomware which is something we hear very often nowadays like the case with Louisiana Hospital that was attacked by Ransomware exposing the data of 270000 patients. 

Realistic scenario

What if your users passwords were compromised and you’re not sure who is still safe or not but you need to act as fast as possible? 

To act fast, I created a script that would generate a complex 32 Char long password with 4 different Non Alphanumeric Characters using the System.Web.Security.Membership  class. here’s an example of this password:

81Q:#_#E-QVZ-(1m&VS1LKpbzwR+8Em%

The script details

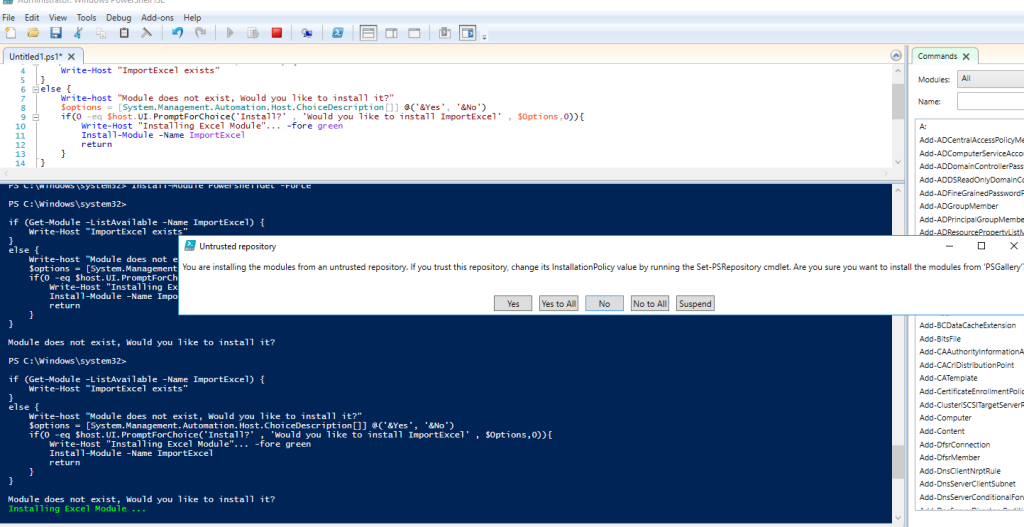
The script will first check if you have the Powershell Get and ImportExcel Module installed, if not it’ll ask you to install it or not. 

You will need to amend few things

1- The path to reflect where you want to save the Logs, CSV and Excel sheet. as of now it’s in c:\SyncReports. 

2- Importing users, In the script I am grabbing users directly from a specific OU in AD. so you’ll need to decide how you want to do it. I have added another line in case you’re planning to 

3- The password reset command is setup with -whatif parameter for you to test this before you run it. so just remember to remove it when you’re done with the changing and testing.

I have added mailbody and send-message command to send the excel as an attachment along with the excel password protection. 

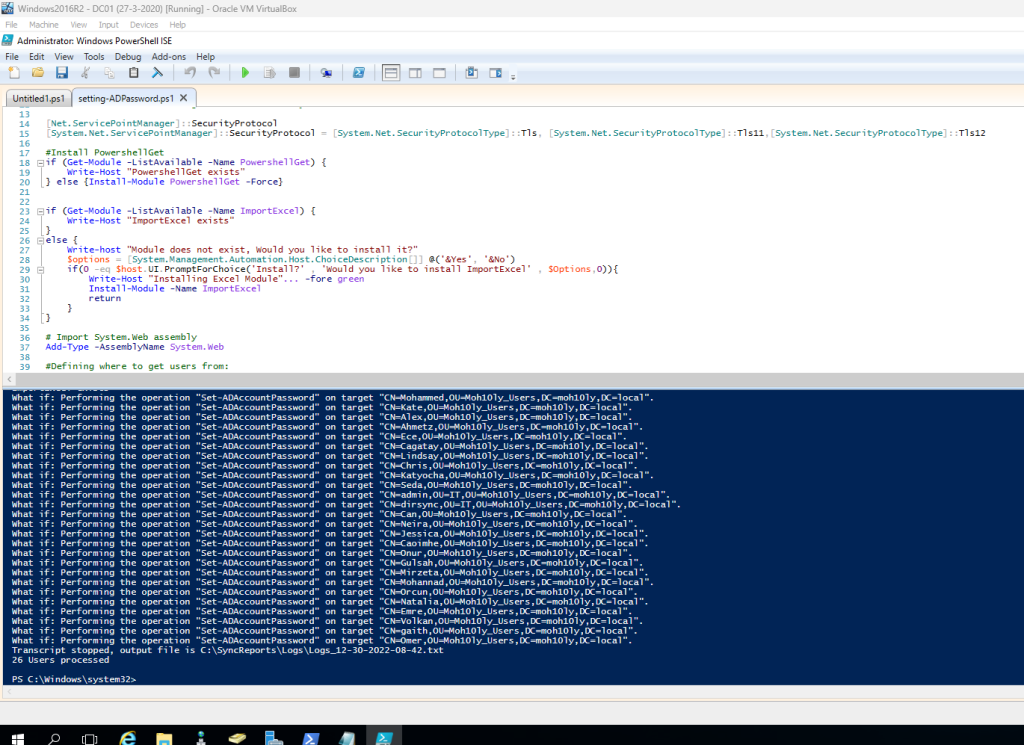
Running the script will result in the following

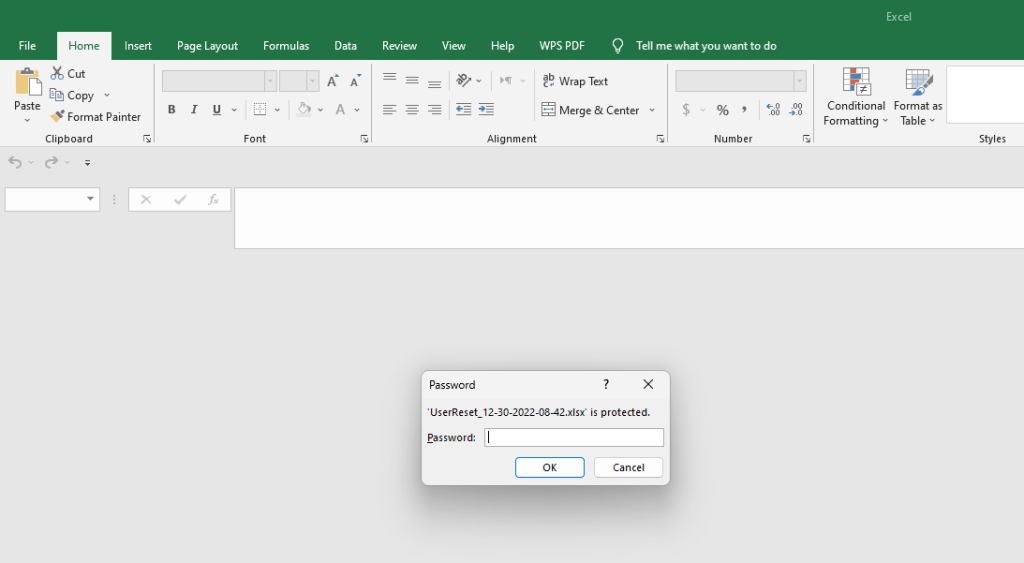
Once you get the Excel sheet and try to open it, you will realize that it’s password protected. The password should be in the email body that’s sent in the script.

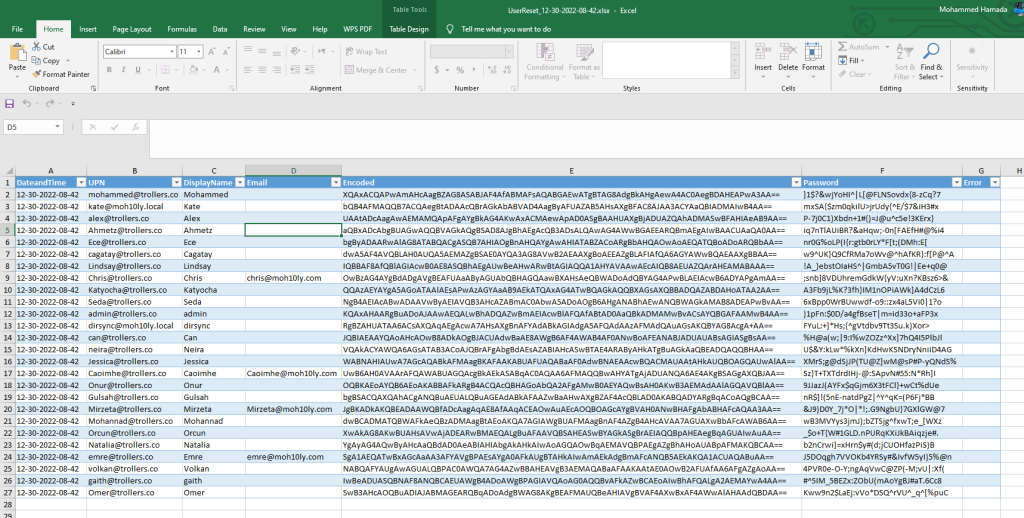
Excel sheet result will be looking as follows:

The script
The script 90%
#This script will generate randdom complex passwords for all AD users

#Using Time class and start reporting
$TimeStamp = [datetime]::Now.ToString(“MM-dd-yyyy-HH-mm”)
Start-Transcript -Path C:\SyncReports\Logs\Logs_$TimeStamp.txt -IncludeInvocationHeader

#Generate report
$Report = [System.Collections.Generic.List[Object]]::new()

#Check if Excel Module is installed, if not it’ll ask to install it

##Check Protocol and Setting Secure Connectivity

[Net.ServicePointManager]::SecurityProtocol
[System.Net.ServicePointManager]::SecurityProtocol = [System.Net.SecurityProtocolType]::Tls, [System.Net.SecurityProtocolType]::Tls11,[System.Net.SecurityProtocolType]::Tls12

#Install PowershellGet and ImportExcel Modules
if (Get-Module -ListAvailable -Name PowershellGet) {
    Write-Host “PowershellGet exists”
} else {Install-Module PowershellGet -Force}
if (Get-Module -ListAvailable -Name ImportExcel) {
    Write-Host “ImportExcel exists”
}
else {
    Write-host “Module does not exist, Would you like to install it?”
    $options = [System.Management.Automation.Host.ChoiceDescription[]] @(‘&Yes’, ‘&No’)
    if(0 -eq $host.UI.PromptForChoice(‘Install?’ , ‘Would you like to install ImportExcel’ , $Options,0)){
        Write-Host “Installing Excel Module”… -fore green
        Install-Module -Name ImportExcel
        return
    }
}

# Import System.Web assembly
Add-Type -AssemblyName System.Web

#Defining where to get users from:
$Users = Get-ADUser -SearchBase “OU=Moh10ly_Users,DC=moh10ly,DC=local” -Filter * -Properties *
#$Users = Import-Csv “C:\SyncReports\Users.csv”
foreach ($User in $Users){
       
        $UID = $User.UserPrincipalName
        $ObjectProp = Get-ADUser -Filter {(Mail -like $UID) -or (UserPrincipalName -like $UID)} -Properties *

        #Generate New Password
        $NewPassword=[System.Web.Security.Membership]::GeneratePassword(32,4)
        $Password= ConvertTo-SecureString $newPassword -AsPlainText -Force
        $TEXTO = “$newPassword”
        $ENCODED1 = [Convert]::ToBase64String([Text.Encoding]::Unicode.GetBytes($TEXTO))
       
        $Name = $ObjectProp.Name
        $SAM = $ObjectProp.SamAccountName

        if($SAM){
 
                   
                         $ReportLine = [PSCustomObject][Ordered]@{
                            DateandTime                 = $TimeStamp
                            UPN                         = $ObjectProp.UserPrincipalName
                            DisplayName                 = $ObjectProp.Displayname
                            Email                       = $ObjectProp.Mail
                            Encoded                     = $ENCODED1
                            Password                    = $newPassword
                            Error                       = $ObjectProp.Exception.Message
                            }
                           
                            $Report.Add($ReportLine)
           
            #Wait for Email to send
            #Start-Sleep -Seconds 15

            #Resetting user’s password
            Set-ADAccountPassword -Identity $User.SamAccountName -NewPassword $Password -WhatIf

        }
    else {$Error = Write-Host -f Red “$($User) Couldn’t be found”    
    #send-mailmessage -from “admin@skybirdtravel.com” -to “admin@skybirdtravel.com” -subject “Password reset didn’t work for $($User.UserprincipalName) on $TimeStamp” -body “$Error” -Priority High -smtpServer mailcleaner.cloudapphost.net}
    }
}
Stop-Transcript
Write-Host (“{0} Users processed” -f $Users.count)
#$Report | Out-GridView
$ExcelPassword =[System.Web.Security.Membership]::GeneratePassword(32,4)
$Report | Select-Object UPN,Displayname,Email,Encoded,Password | Export-Csv -NoTypeInformation “C:\SyncReports\UserReset_$TimeStamp.csv”
$Report | Export-Excel “C:\SyncReports\UserReset_$TimeStamp.xlsx” -WorksheetName Users -TableName Users -AutoSize -Password “$ExcelPassword”
$Exported = “C:\SyncReports\UserReset_$TimeStamp.xlsx”
$MailBody = “
            <html><body>
            <font color=’006400′> Dear Team, Please find attached the list of users and their passwords encoded … `
            The file is protected with password // $ExelPassword // If any issue you can send an email to support@domain.com .</font>
            <body><html>
            “
$CC = @(‘info@moh10ly.com’)

#Get-ChildItem $Exported | send-mailmessage -from “admin@domain.com” -to “report@domain.com” -Cc $CC -subject ” User Passwords List for the date $date” -body “$MailBody” -Priority High -smtpServer relay.domain.com -BodyAsHtml

Finally:

I have added this script to github, so feel free to comment or add your contribution if needed.

https://github.com/moh30ly/powershell/blob/main/ADPasswordChange

Get Report of Active Directory Locked Accounts and Machine they logged in from

Story:

I got some clients  that have reported some of their users being locked out and not able to discover how is this happening or which device its getting locked on.

Symptoms:

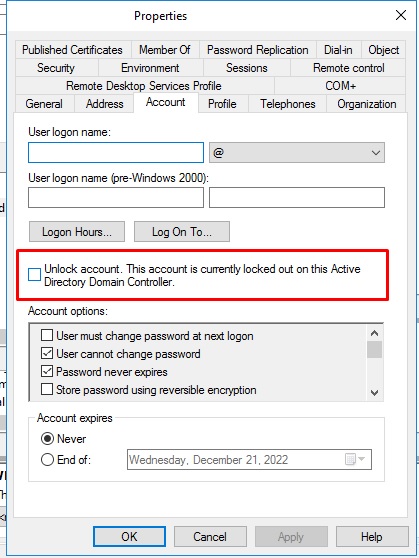
The user lock happens after you setup your GPO policy to get user locked after failing to login for X times with the correct password.

When user gets locked, they either can’t login or get prompted to re-enter their password in Outlook for example not knowing they have been locked. 

Hard to Find Out:

There’s no easy way to figure out what’s really happening and why the user got locked out specially if the account is being used on multiple devices e.g. (Phone, iPad, Desktop ..etc). Unless you have an auditing or an AD monitoring software that will log all auditing attempts to an external party and tell you where exactly the user is coming from, it’s a not an easy task to find out where is this taking place.  

Solution: 

1- Enabling Relevant Logs

In order for this to work, you’ll need to enable some Auditing logs on the Default Domain Controller Group Policy

Go to  >> Computer Configuration >> Windows Settings >> Security Settings >> Advanced Audit Policy Configuration >> Audit Policies >> Account Management >> Double Click on Audit User Account and enable both Success and Failure.

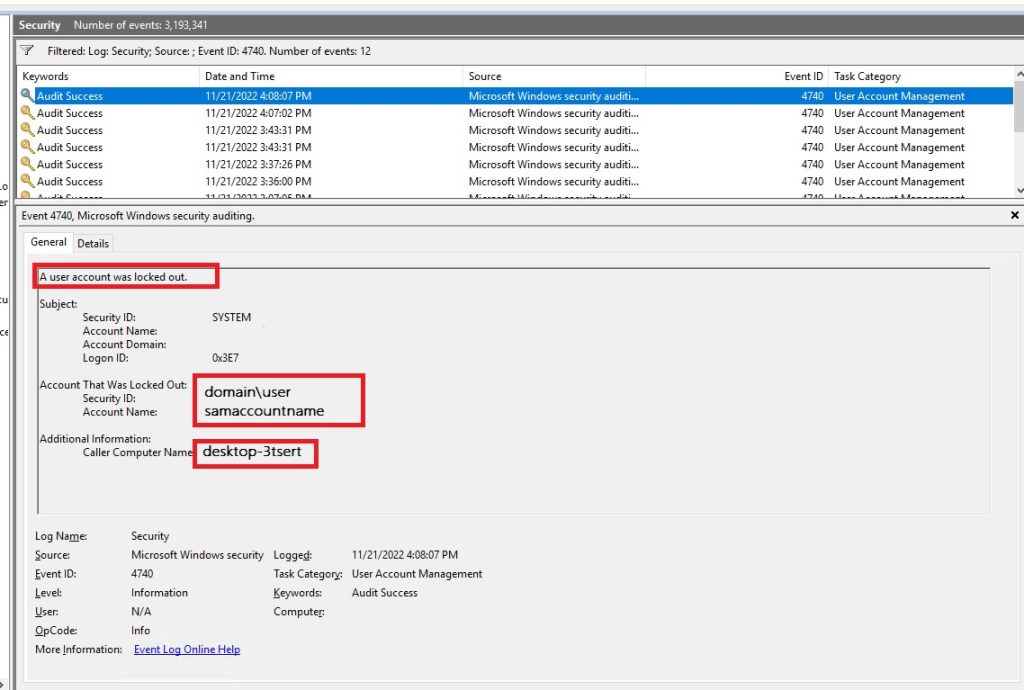
Once you applied this policy, you’ll need to force update your DCs , Sign out and back in and you’ll start noticing that in Event Viewer / Security the event 4740 and 4625 will start appearing .

The event 4740 will show you the locked user and the machine it tried to login from. 

The event 4625 will show you the path to the process/application that tried to login with your account. 

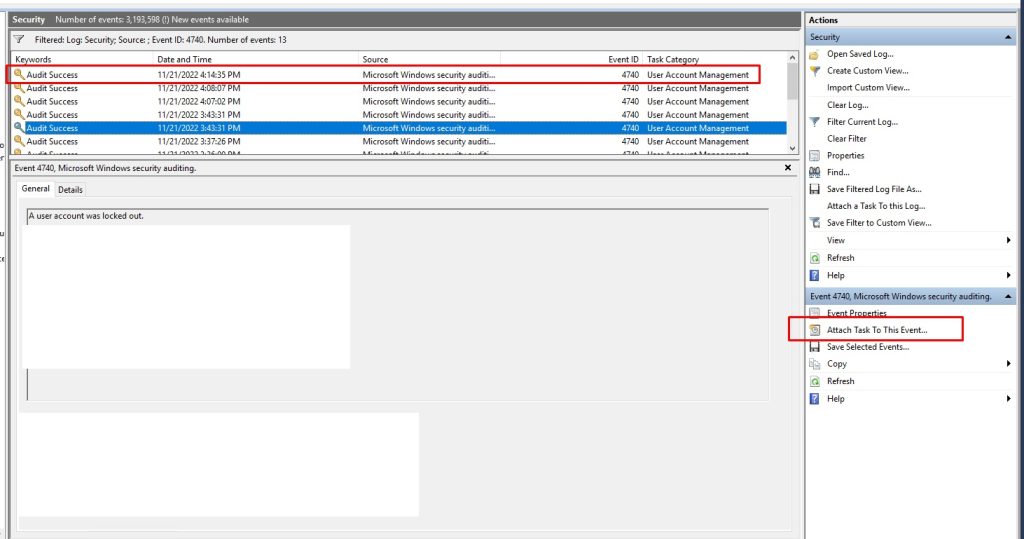
So to make this more benefitial I ended up writing a script that will get triggered by Task Scheduler in the case of Event 4740 being reported.

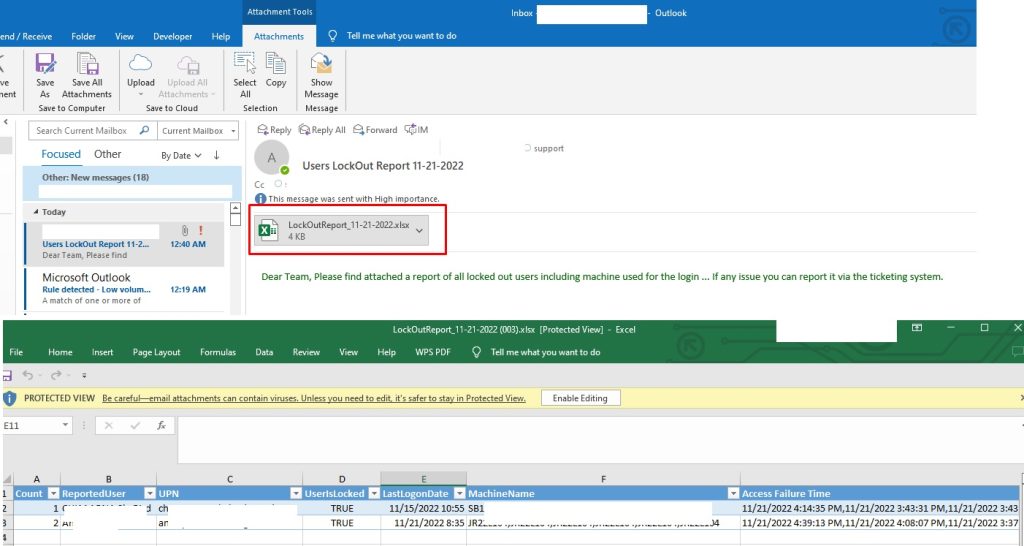
The script will search AD for any locked account. will scan the Logs for the user’s event and find the machine the user tried to login from and generate a report with all these details then send it to a target email in Excel forma after converting it using ImportExcel module.

Note that you must have a local SMTP Server for the email to be sent. If not you can just get the CSV and send it manually. 


2- Finding the relevant event

3- Finally The script

The script is simple so feel free to modify it, improve it or share it with others. 

Almost done
Script below 80%

#Report NTLM Authentication Failure for users
$ReportTime = ([datetime]::Today).ToString(“MM-dd-yyyy”)

#Generate report
$Report = [System.Collections.Generic.List[Object]]::new()

$LockedAccount = (Search-ADAccount -LockedOut -UsersOnly)
$i = 0
foreach ($User in $LockedAccount){

$i ++
Write-Progress -Activity “Gathering Logon info” -Status “Checking Login info for: $($User.Name)” -PercentComplete (($i / ($LockedAccount | Measure-Object).Count) * 100)
if($User.LockedOut){

$Event = Get-WinEvent -FilterHashtable @{ logname = ‘Security’; id = 4740 } -MaxEvents 500 | Select-Object TimeCreated,
@{ Name=’TargetUserName’; Expression={$_.Properties[0].value}},
@{ Name=’LogonMachine’; Expression={$_.Properties[1].value}} | Where {$_.TargetUserName -eq $User.SamAccountName}
}

$ReportLine = [PSCustomObject][Ordered]@{
Count = $i
ReportedUser = $User.Name
UPN = $User.UserPrincipalName
UserIsLocked = $User.LockedOut
LastLogonDate = $user.Lastlogondate
MachineName = $Event.LogonMachine -join ‘,’
‘Access Failure Time’ = $Event.TimeCreated -join ‘,’
‘Report Date’ = $ReportTime
}
$Report.Add($ReportLine)
}

$MailBody = “
<html><body>
<font color=’006400′> Dear Team, `
Please find attached a report of all locked out users including machine used for the login … `
If any issue you can report it via the ticketing system.</font>
<body><html>

#Eexport in CSV
$Report | Export-csv “C:\Reports\LockOutReport_$ReportTime.cscv” -NoTypeInformation

#Eexport in Excel Format
$Report | Export-Excel “C:\Reports\LockOutReport_$ReportTime.xlsx” -WorksheetName LogonFailure -TableName LogonFailure -AutoSize

$Exported = “C:\Reports\LockOutReport_$ReportTime.xlsx”

$CC = @(‘User2@domain.com’)
#
Get-ChildItem $Exported | send-mailmessage -from “system@domain.com” -to “user1@domain.com” -cc $cc -subject “Users LockOut Report $ReportTime” -body “$MailBody” -Priority High -smtpServer relay.domain.com -BodyAsHtml

Link to Github:


https://github.com/moh30ly/powershell/blob/main/ActiveDirectoryLockOutNotification

4- Attach Task to an Event

5- Get The Report

Securing and Testing your Exchange Server with Pfsense HAProxy

– Using the CVE-2021-26855 Payload

After the recent vulnerabilities that hit Exchange Servers On-premises I found sometime to install KaliLinux and try to check what kind of information would I get from the patched servers.

I downloaded the payloads and tried to run it against couple of clients that I have patched the servers for luckily no authentication was made.

image

– Using Nikto scanner

By using Nikto command from Kali Linux I could see what  Information could Exchange expose using

The command line is nikto –h mail.domain.com and the result of the scan would be exposing the Server’s name, local IP address, OWA Version,  ASP Net platform and version.

image

Since I have my Exchange Server published via HAProxy 1.8 on Pfsense then I had to tweak HAProxy to strengthen the ciphers, make sure that HSTS is in place and deny the headers that expose the server’s sensitive information.

The result is pretty good as it also has affected the server’s score on ssllabs.com

Prior to the tweaking  my owa scan result on SSL Labs would get an A

image

– Pfsense’s HAProxy Settings before

Before upgrading Pfsense to the latest version HAProxy was on 1.6 and the ssl/tls settings were also different as they were setup through the Advanced SSL options on the frontend however, now this is no longer supported and you’ll have to remove that and set it up on the “Global Advanced pass thru” in the General setting page.

ssl-default-bind-options ssl-min-ver TLSv1.2

tune.ssl.default-dh-param 2048

ssl-default-bind-ciphers ECDHE-RSA-AES128-GCM-SHA256:ECDHE-ECDSA-AES128-GCM-SHA256:ECDHE-RSA-AES256-GCM-SHA384:ECDHE-ECDSA-AES256-GCM-SHA384:DHE-RSA-AES128-GCM-SHA256:DHE-DSS-AES128-GCM-SHA256:kEDH+AESGCM:ECDHE-RSA-AES128-SHA256:ECDHE-ECDSA-AES128-SHA256:ECDHE-RSA-AES128-SHA:ECDHE-ECDSA-AES128-SHA:ECDHE-RSA-AES256-SHA384:ECDHE-ECDSA-AES256-SHA384:ECDHE-RSA-AES256-SHA:ECDHE-ECDSA-AES256-SHA:DHE-RSA-AES128-SHA256:DHE-RSA-AES128-SHA:DHE-DSS-AES128-SHA256:DHE-RSA-AES256-SHA256:DHE-DSS-AES256-SHA:DHE-RSA-AES256-SHA:!aNULL:!eNULL:!EXPORT:!DES:!RC4:!3DES:!MD5:!PSK

image

Right after you save this, you will still need to change another settings on the Frontend to protect your server’s information from being exposed.

In the HAProxy settings Go to Frontend > Scroll down all the way to “Advanced pass thru” and paste the following:

image

# Remove headers that expose security-sensitive information.

rspadd X-Frame-Options:\ SAMEORIGIN
rspidel X-FeServer:.*$
rspidel ^Server:.*$
rspidel ^X-Powered-By:.*$
rspidel ^X-AspNet-Version:.*$
rspidel X-WsSecurity-Enabled:.*$
rspidel X-WsSecurity-For:.*$
rspidel X-OAuth-Enabled:.*$
rspadd X-Xss-Protection:\ 1;\ mode=block
rspadd Strict-Transport-Security:\ max-age=31536000;includeSubDomains;preload
rspadd Referrer-Policy:\ no-referrer-when-downgrade
rspidel Request-Id:.*$
rspidel X-RequestId:.*$
rspadd X-Content-Type-Options:\ nosniff


In the below result, I have got almost everything protected well except for the OWA version which can be a bit problematic. In the next article I am going to try and mitigate this so the server can be protected in the expected manner.

image

image

– The Result

Now the server is showing a totally different result and the Nikto scan is not revealing anything anymore.

SSLabs

image

https://securityheaders.com/

The reason why I got B on security headers is due to the fact that Content-Security-Policy header will malfunction the ECP and OWA Login pages. Permission Policy is new feature and I couldn’t find anything about it on HAProxy.

image

I hope this helps

Refences:

https://securityheaders.com/

https://www.ssllabs.com/

https://www.haproxy.com/documentation/aloha/12-0/traffic-management/lb-layer7/http-rewrite/

https://www.net7.be/blog/article/xss_csrf_http_security.html

Exchange Server backdoor investigation tools

The Story

After the disastrous exploit that was found in Microsoft Exchange Servers lots of corporations started immediately patching their servers with the latest Cumulative update and Security patches. The question is would those patches be enough if the server is already hacked or have a backdoor installed already?

image

What are those 0-day exploits ?

The vulnerabilities recently being exploited were CVE-2021-26855, CVE-2021-26857, CVE-2021-26858, and CVE-2021-27065 which are part of alleged “State-sponsored Chinese group” according to Microsoft.

Let’s get into details of those exploits one by one:

CVE-2021-26855 is a server-side request forgery (SSRF) vulnerability in Exchange which allowed the attacker to send arbitrary HTTP requests and authenticate as the Exchange server.

CVE-2021-26857 is an insecure deserialization vulnerability in the Unified Messaging service. Insecure deserialization is where untrusted user-controllable data is deserialized by a program. Exploiting this vulnerability gave HAFNIUM the ability to run code as SYSTEM on the Exchange server. This requires administrator permission or another vulnerability to exploit.

CVE-2021-26858 is a post-authentication arbitrary file write vulnerability in Exchange. If HAFNIUM could authenticate with the Exchange server then they could use this vulnerability to write a file to any path on the server. They could authenticate by exploiting the CVE-2021-26855 SSRF vulnerability or by compromising a legitimate admin’s credentials.

CVE-2021-27065 is a post-authentication arbitrary file write vulnerability in Exchange. If HAFNIUM could authenticate with the Exchange server then they could use this vulnerability to write a file to any path on the server. They could authenticate by exploiting the CVE-2021-26855 SSRF vulnerability or by compromising a legitimate admin’s credentials.

How to proceed ?

Microsoft released couple of tools that could diagnose your servers and check if you already have been infected with a backdoor or any of these nasty malware and also remove those infected files or clean them and ask you for a restart if it’s required.

Tools:

  1. MSERT (Microsoft Safety Scanner) detects web shells, Download here .
  2. Health Checker (Scans your server for any vulnerabilities and whether you have updated Server CU and installed patches). Download here
  3. Exchange WebShell Detection (A simple PowerShell that is fast and checks if your IIS or Exchange directory has been exploited). Download here
  4. Scan your exchange server for proxy logon:
    https://github.com/microsoft/CSS-Exchange/tree/main/Security
  5. Microsoft very recently created a mitigation tool for Exchange on-premises that would rewrite url for the infected servers and recover the files that were changed. You can download the tools from this github link.

    https://github.com/microsoft/CSS-Exchange/tree/main/Security

    Copy the Test-ProxyLogon code into Notepad
    Save As “Test-ProxyLogon.ps1” with the quotes in your C:\Temp folder
    Run in Exchange Management Shell: .\Test-ProxyLogon.ps1 -OutPath C:\Temp

Scan Result

Scan result should show you the following if your servers has been exploited already.

This will remove the infections and asks for a restart.

clip_image001

References:

https://www.microsoft.com/security/blog/2021/03/02/hafnium-targeting-exchange-servers/

https://www.bleepingcomputer.com/news/security/microsoft-exchange-updates-can-install-without-fixing-vulnerabilities/

https://github.com/dpaulson45/HealthChecker?mkt_tok=eyJpIjoiTURRMk5HRTFaV1V6TkRrMCIsInQiOiJcL3ZOTkRUVzdXdkJmTm5ibUIzTExKTDVxXC9ObFAxTmZLanFRZ0xpcDkxMW5raVE0dlRwV2FhVFFmWlVUVFZaZUdFM1NlcEFNTEZ6dTh5aWlqcVBpV3J2R2IxbGJxMmNUZ1ppYjJyZklnMjZFZngrM2tBUnNsM1JKcHJsSU1ib3BTIn0%3D#download

Zammad throws error csrf token verification failed! Apache 2.4.41 Ubuntu 20.4

Symptoms:

Right after a fresh installation of Zammad you implement Let’s Encrypt and you are unable to login to your Zammad portal due to the following error.

CSRF token verification failed!

Cause:

When you install Zammad, it’ll automatically create a zammad.conf file under the path /etc/apache2/sites-enabled.

Until this moment your web page should be functioning normal, the problem starts when you implement the Let’s Encrypt certificate which creates another .conf file that would corrupt the web server and cause the error you’re having.

Solution:

To solve this problem simply, change the extension of the zammad-le-ssl.conf file into something else other than .conf and restart apache or nginx.

Solution 2:

You need to uncomment the “ServerTokens Prod” part in your configuration file if the solution 1 doesn’t work.

Solution 3:

Beneath the SSO Setup you need to make sure to change the RequestHeader set X_FORWARDED_PROTO ‘http’ to https as in the below line.

After you apply all those, you need to restart both apache and zammad services.

Here’s a working configuration of Zammad


# security - prevent information disclosure about server version
ServerTokens Prod

&lt;VirtualHost *:80>
    ServerName support.cloud-net.tech
    Redirect permanent / https://support.cloud-net.tech
&lt;/VirtualHost>

&lt;VirtualHost *:443>
    SSLEngine on
    SSLProtocol all -SSLv2 -SSLv3
    SSLCipherSuite EECDH+AESGCM:EDH+AESGCM:AES256+EECDH:AES256+EDH

    SSLCertificateFile /etc/letsencrypt/live/support.cloud-net.tech/fullchain.pem
    SSLCertificateKeyFile /etc/letsencrypt/live/support.cloud-net.tech/privkey.pem
    SSLOpenSSLConfCmd DHParameters /etc/ssl/dhparam.pem

    ## don't loose time with IP address lookups
    HostnameLookups Off

    ## needed for named virtual hosts
    UseCanonicalName Off

    ## configures the footer on server-generated documents
    ServerSignature Off

    ProxyRequests Off
    ProxyPreserveHost On

    &lt;Proxy 127.0.0.1:3000>
      Require local
    &lt;/Proxy>

    ProxyPass /assets !
    ProxyPass /favicon.ico !
    ProxyPass /apple-touch-icon.png !
    ProxyPass /robots.txt !
    ProxyPass /ws ws://127.0.0.1:6042/
    ProxyPass / http://127.0.0.1:3000/

    # change this line in an SSO setup
    RequestHeader unset X-Forwarded-User
    RequestHeader set X_FORWARDED_PROTO 'https'

    # Use settings below if proxying does not work and you receive HTTP-Errror 404
    # if you use the settings below, make sure to comment out the above two options
    # This may not apply to all systems, applies to openSuse
    #ProxyPass /ws ws://127.0.0.1:6042/ "retry=1 acque=3000 timeout=600 keepalive=On"
    #ProxyPass / http://127.0.0.1:3000/ "retry=1 acque=3000 timeout=600 keepalive=On"

    DocumentRoot "/opt/zammad/public"

    &lt;Directory />
        Options FollowSymLinks
        AllowOverride None
    &lt;/Directory>

    &lt;Directory "/opt/zammad/public">
        Options FollowSymLinks
              Require all granted
    &lt;/Directory>
&lt;/VirtualHost>

Hope this helps

Secure Zammad with LetsEncrypt Certıfıcate on Ubuntu 20.4 Apache

The Story

after installing Zammad ticketing system I tried to implement Let’sEncrypt certificate to secure the system but there was nothing available on the internet except an old article about implementing this on Ubuntu 16 with Nginx (see article here).

In my case I was using apache and no Nginx in place, and after installing Zammad it was using pretty fine on Http but needed to redirect http to HTTPS after implementing the certificate.

Zammad: Intuitive Service Desk with connection to i-doit | i-doit

Solution:

I first Installed Certbot for apache and then I took a backup of all my Zammad configuration and made sure not to alter the default Zammad directory.

So I created a dummy folder called /var/www/support and a file called /var/www/support/index.html within that folder and provided them the appropriate permissions.

sudo apt install certbot python3-certbot-apache

 sudo mkdir /var/www/support

sudo chown -R $USER:$USER /var/www/support

sudo chmod -R 755 /var/www/support

sudo nano /var/www/support/index.html


Edit the index.html file with the following to make sure that it works

<html>
             <head>
                         <title>Welcome to Your_domain!</title>
             </head>
             <body>
                       <h1>Success! The your_domain virtual host is working!</h1>
           </body>
</html>

image

image

Edit Zammad’s Default Config File

Please make sure you take a move the original copy of Zammad file to another location using the following command

sudo mv /etc/apache2/sites-enabled/zammad.conf /etc/apache2/sites-enabled/zammad.bak

Then we’ll replace the file with this configuration but since we moved the original file to .bak then we’ll have to recreate it with our intended configuration.

Edit a new zammad.conf file and copy the configuration below

sudo vi /etc/apache2/sites-enabled/zammad.conf

Configuration starts below this:

#

# this is the apache config for zammad

#

# security – prevent information disclosure about server version

#ServerTokens Prod

<VirtualHost *:8080> # I changed the default port of Zammad to 8080 to allow Letsencrypt to connect on 80 and create the certificate

# replace ‘localhost’ with your fqdn if you want to use zammad from remote

ServerName localhost:8080

## don’t loose time with IP address lookups

HostnameLookups Off

## needed for named virtual hosts

UseCanonicalName Off

## configures the footer on server-generated documents

ServerSignature Off

ProxyRequests Off

ProxyPreserveHost On

<Proxy 127.0.0.1:3000>

Require local

</Proxy>

ProxyPass /assets !

ProxyPass /favicon.ico !

ProxyPass /apple-touch-icon.png !

ProxyPass /robots.txt !

ProxyPass /ws ws://127.0.0.1:6042/

ProxyPass / http://127.0.0.1:3000/

— INSERT — 10,38 Top

DocumentRoot “/opt/zammad/public”

<Directory />

Options FollowSymLinks

AllowOverride None

</Directory>

<Directory “/opt/zammad/public”>

Options FollowSymLinks

Require all granted

</Directory>

</VirtualHost>

<VirtualHost *:80>

ServerName support.cloud-net.tech

DocumentRoot /var/www/support

ErrorLog ${APACHE_LOG_DIR}/error.log

CustomLog ${APACHE_LOG_DIR}/access.log combined

</VirtualHost>

– ————————-

In the above configuration we did two things:

1- Replacing the original Zammad listening port instead of 80 to 8080

2- Created a new virtual host that points to our dummy folder /var/www/support

Save the file and exit from vi

Make sure you restart Apache after this

sudo systemctl restart apache2

Enable the new site configuration

sudo a2ensite zammad.conf

Lets create the certificate

In the below commands , the first one will drive you through the process of getting the certificate.

The second checks the status of the configuration of the auto renewal script certbot and third command tests the renewal of the certificate.

1- sudo certbot –apache

2- sudo systemctl status certbot.timer

3- sudo certbot renew –dry-run

As you can see in the below screenshot the command also asks you if you’d like to redirect all http traffic to HTTPS. You should want to say Y to that.
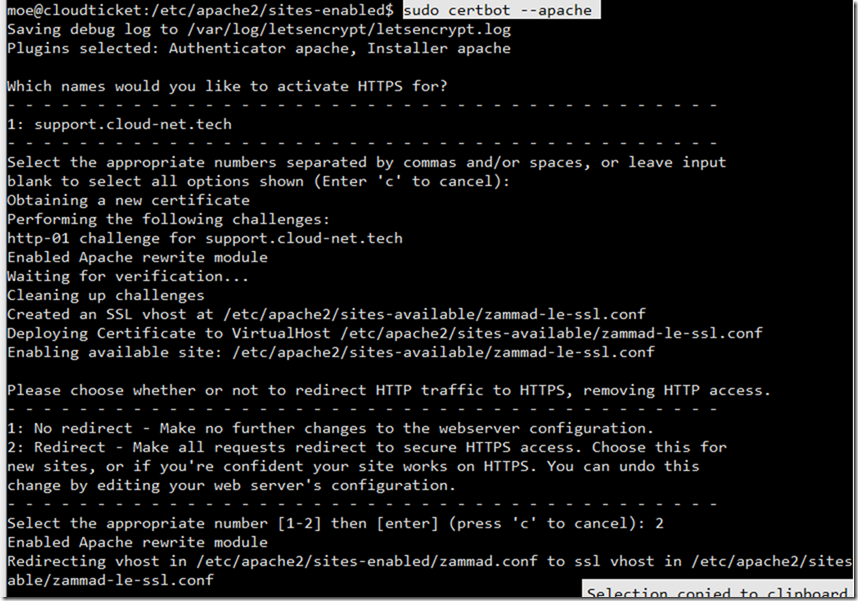
clip_image001

clip_image001[4]

When you accept creating Redirection rule from HTTP to HTTPs the main Zammad config will get that configuration which wont work in that case because we already changed the default zammad port to 8080.

So you’ll need to get into that zammad.conf that you created again and enter the redirection portion

image

# this is the apache config for zammad
#


# security – prevent information disclosure about server version
#ServerTokens Prod


<VirtualHost *:8080>
     # replace ‘localhost’ with your fqdn if you want to use zammad from remote
     ServerName support.cloud-net.tech:8080


    ## don’t loose time with IP address lookups
     HostnameLookups Off


    ## needed for named virtual hosts
     UseCanonicalName Off


    ## configures the footer on server-generated documents
     ServerSignature Off


    ProxyRequests Off
     ProxyPreserveHost On


    <Proxy 127.0.0.1:3000>
         Require local
     </Proxy>


    ProxyPass /assets !
     ProxyPass /favicon.ico !
     ProxyPass /apple-touch-icon.png !
     ProxyPass /robots.txt !
     ProxyPass /ws ws://127.0.0.1:6042/
     ProxyPass /
http://127.0.0.1:3000/


    # change this line in an SSO setup
     RequestHeader unset X-Forwarded-User


     DocumentRoot “/opt/zammad/public”


    <Directory />
         Options FollowSymLinks
         AllowOverride None
     </Directory>


    <Directory “/opt/zammad/public”>
         Options FollowSymLinks
         Require all granted
     </Directory>


RewriteEngine on
RewriteCond %{SERVER_NAME} =support.cloud-net.tech
RewriteRule ^
https://%{SERVER_NAME}%{REQUEST_URI} [END,NE,R=permanent]

<VirtualHost *:80>
     ServerName support.cloud-net.tech
RewriteEngine on
RewriteCond %{SERVER_NAME} =support.cloud-net.tech
RewriteRule ^
https://%{SERVER_NAME}%{REQUEST_URI} [END,NE,R=permanent]
</VirtualHost>

image

Note:

You need to make sure that you have enabled port 443 on your Firewall and changed the main protocol of Zammad to HTTPs

To do so you’ll need to get into the Zammad portal > Settings > System > Http Type and change that to HTTPS.

image

That’s it, my example here worked as expected and now my traffic is automatically getting redirected to https.

image

Hope this helps anyone looking for such configuration.

Please consider donating to this Bitcoin account if you like this article or website.

image

Secure Your DNS Traffic with the outside world

DoH in Microsoft Windows OS

Until this moment Microsoft Windows OS doesn’t support DNS over HTTPS, The feature will most likely be implemented in future builds but no body knows when is that however, You can still take a peak into the feature which is in preview mode/

No alt text provided for this image

Benefit of using DoH on an OS level

The benefit of using DoH on an Operating System level would provide more certainty that your DNS queries leave your computer without being read by any other party even if that is your ISP.

A simple DNS nslookup query using Wireshark on your computer would show you how serious this topic is. After installing Wireshark you’ll be able to see that all of your dns queries are in clear text and can be read by anyone until it gets to the destination website/server.

Demonstration of DNS lookup without DoH

After installing Wireshark, I fire up Powershell or CMD and try to nslookup google.com and it’ll show what I just queried for.

No alt text provided for this image

So how to make sure that your DNS queries don’t leave your computer in clear text format? and since Microsoft OS is not DoH ready yet what can you do?

In my case, I am already using encrypted DNS on firewall level as I have Pfsense acting as a router and it already supports DoH but still not pretty satisfied :).

DNSCrypt as a solution

Since the foundation of DoH I have been looking for a solution that would work on Microsoft Windows OS and luckily someone already created this great project called Simple DNSCrypt which not just enables the encryption of DNS queries on your OS but also enables this to work as a service.

No alt text provided for this image

Installing DNSCrypt would create a Windows based Service which would start automatically when your OS boots and logs into Windows.

The service is called DNSCrypt Client Proxy

Add alt textNo alt text provided for this image

DNSCrypt has a simple interface, You can pick up the DNS Server where to forward queries to and it works with proof.

Right after the installation of this tiny app, launch it as an administrator and configure it as in the below screenshot. You can choose to install the service or not.

Add alt textNo alt text provided for this image

Right after you enable it (By clicking on your Network Card box) that will start protecting your DNS queries. Let’s go ahead with a little demo

I am going to start Wireshark after enabling DnsCrypt and do a google dns lookup , As you can see below on wireshark it’s not returning any dns queries.

No alt text provided for this image

When you install Simple DNSCrypt it changes your Preferred DNS configuration to localhost so that all queries is passed through the app in DNS over HTTPS which doesn’t allow even Wireshark to see it as DNS.

So that makes it pretty secure and not even your firewall will see it.

If you have any question please don’t hesitate to ask me

Official DNScrypt website https://simplednscrypt.org/

Support the project founder https://github.com/bitbeans/SimpleDnsCrypt

Mimecast trust cert hacked in Microsoft supply chain

image

The Threatpost.com and other cyber security news published articles claiming that A Mimecast-issued certificate used to authenticate some of the company’s products to Microsoft 365 Exchange Web Services has been “compromised by a sophisticated threat actor,” the company has announced.

Office 365 Products and Services Explained

Mimecast provides email security services that customers can apply to their Microsoft 365 accounts by establishing a connection to Mimecast’s servers. The certificate in question is used to verify and authenticate those connections made to Mimecast’s Sync and Recover (backups for mailbox folder structure, calendar content and contacts from Exchange On-Premises or Microsoft 365 mailboxes), Continuity Monitor (looks for disruptions in email traffic) and Internal Email Protect (IEP) (inspects internally generated emails for malicious links, attachments or for sensitive content).

A compromise means that cyberattackers could take over the connection, though which inbound and outbound mail flows, researchers said. It would be possible to intercept that traffic, or possibly to infiltrate customers’ Microsoft 365 Exchange Web Services and steal information.

Reference:

https://threatpost.com/mimecast-certificate-microsoft-supply-chain-attack/162965/

https://www.crn.com/news/security/hackers-compromise-mimecast-certificate-for-microsoft-authentication

How to bypass NET::ERR_CERT_INVALID on Chrome

Locked out of accessing my firewall

After I changed my Antivirus software I used to access a remote firewall publicly on the internet. This firewall has a local selfsigned certificate that no web browser trusts.

Although I added the root certificate to my root store but still none of the browsers would allow me to access it and result in the below error:

Your connection is not private
Attackers might be trying to steal your information from myapp.domain.com (for example, passwords, messages, or credit cards). Learn more
NET::ERR_CERT_INVALID
myapp.domain.com normally uses encryption to protect your information. When Brave tried to connect to myapp.domain.com this time, the website sent back unusual and incorrect credentials. This may happen when an attacker is trying to pretend to be myapp.domain.com, or a Wi-Fi sign-in screen has interrupted the connection. Your information is still secure because Brave stopped the connection before any data was exchanged.

You cannot visit myapp.domain.com right now because the website sent scrambled credentials that Brave cannot process. Network errors and attacks are usually temporary, so this page will probably work later.

On Chrome

image

On Firefox

image

I searched the web for many work arounds but none of them almost worked including this one which says you can use “Thisisunsafe” or “badidea” on chrome but it did not work.

https://medium.com/@dblazeski/chrome-bypass-net-err-cert-invalid-for-development-daefae43eb12

Using Fiddler

Since I use fiddler to sniff packets and troubleshoot issues on my computer, I remembered that Fiddler has the feature of decrypting traffic (MITM). Fiddler inserts its own root certs and force the traffic to go through it first which makes all the websites trusted even in the case of this error ::ERR_CERT_INVALID

Solution:

So to make this work even temporarily so you can access whatever page you lost access to. All you have to do is:

  • Install Fiddler
  • Let Fiddler Decrypt traffic: To do this go to Tools> Options > HTTPS and select “Capture HTTPS Connects and Decrypt Traffic”
  • Accept and import the root certificates.
  • Click Ok
  • Start Capturing traffic by clicking on the left corner icon image

image

  • Now try to browse the page you couldn’t access previously and you’ll get a prompt to accept its certificate. Click Yes if you’re sure of the page and continue.

image

Here we go, I got back access to my Pfsense but notice you’ll only be able to access the URL if the capturing is on.

The moment you turn Capturing off the page will not be accessible again.

clip_image001

Onboarding Linux Client (DEEPIN) to Microsoft Azure Threat protection ATP using ubuntu repository

Installing Microsoft Azure Threat Protection (ATP) on Linux Devices

While playing with ATP on some windows devices, I was in the mood of trying the new Deepin 20 desktop flavor which is a famous Chinese Linux OS based system.

Microsoft doesn’t indicate anywhere that installation of ATP on a Linux client is possible but Linux server is mentioned in the official ATP installation documents.

How to Install?

After I installed the Deepin OS, I was really impressed by the new beautiful Linux design so I plan to use it and have it secure with ATP.

image

Prerequisites:

  1. Configure the Linux software repository for Ubuntu and Debian
  2. Application Installation
  3. Download the onboarding Package
  4. Client Config

1-Configure the Linux software repository for Ubuntu and Debian

You will need to install the required libraries, install Gpg, apt-transport-https and update repository metadata using the following commands one by one.

  • sudo apt-get install curl

image

  • sudo apt-get install libplist-utils

image

image

  • sudo mv ./microsoft.list /etc/apt/sources.list.d/microsoft-ubuntu.list
  • sudo apt-get install gpg

image

image

image

After successfully installing all the libraries, I will go ahead and install the application

2- Application Installation

From the Linux client Terminal using sudo power user run the following script

sudo apt-get install mdatp

image

Once finished, You can go back to the ATP portal and download the Linux Onboarding package on the linux server/client you want to onboard

3- Download the onboarding Package

Since I am doing a single deployment not bulk, then I will go to the Microsoft Defender Security Center’s setting page and download the Linux package from the device management section.

image

The steps for the onboarding is already mentioned on that page so after you download the script you’ll know exactly what to do next.

The file is 9kb python in size

image

Copy the file to your Linux Desktop

image

4- Client Config

From the terminal type in chmod a+x MicrosoftDefenderATPOnBoardingLinuxServer.py and hit enter

Note: python must be installed on this linux dervice.

Then type python /MicrosoftDefenderATPOnBoardingLinuxServer.py

image

This will run pretty quick and will assign your Linux server/client with your Organization ID.

To see the Organization ID type:

mdatp –health orgId

image

Few minutes later you’ll be able to see the installation completion and the status through this command

Check if WDATP is functioning as expected

mdatp –health healthy

image

Check if WDATP agent is enabled

mdatp –health realTimeProtectionEnabled

image

Let’s check on our ATP portal and see if the machine is showing there.

Note: It might take 5-15 mins to update the definitions of WDATP when onboarding.

image

Running a detection Test:

curl -o ~/Downloads/eicar.com.txt https://www.eicar.org/download/eicar.com.txt

image

In few seconds the file has disappeared

image

Checking for threats

mdatp –threat –list –pretty

image

Let’s see this on the ATP Portal

image

image

This is just a test malware not a real one therefore it wont harm your machine at all.

Hope this helps you with your deployments

Ref:

https://docs.microsoft.com/en-us/windows/security/threat-protection/microsoft-defender-atp/linux-install-manually

Deepin 20 Beta version

https://www.deepin.org/en/2020/04/15/deepin-20-beta/