If you’re using a Proxy server in your firewall or in your network and have AD Connect or/and Pass Through Auth agents installed on any of your servers, you will need to configure those agents to make sure they can see the proxy because setting up the proxy in your Internet Explorer or in your WinHTTP settings is not enough.
Azure AD Connect
For ADConnect to work behind Proxy better to use this miiservers.exe.config file which is located in
You will have to add the Proxy config in the last section of the File like in this screenshot
For PTA: you have to update this file
After setting up the Proxy on both servers/agents, You might have to restart the server as sometimes restarting services is not enough.
Please let me know if you have any issues or addition to the article.
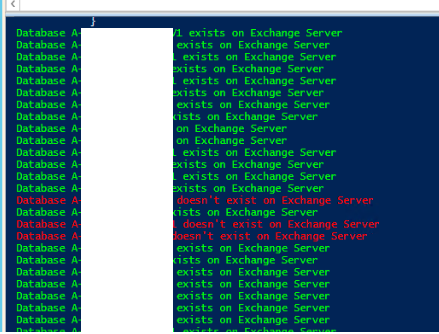
Let’s assume that you work for a company that has Exchange 2016 and has big amount of databases (50-100 DB).
You constantly delete databases to clear white space or for whatever reason but don’t usually keep on deleting folders or lost track of which database is deleted in your DB Folder.
Real Life Scenario
In the following PowerShell script I am going to demonstrate how to check which of the folders in my D drive (Database drive) has an existing Database and which do not have.
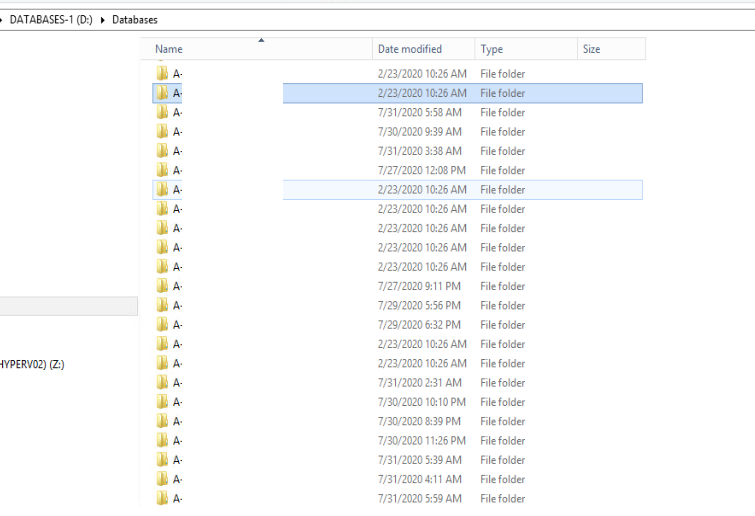
Databases Folder path
OutPut:
Script
The below script gets all folders in the drive path D:\Databases to check if they exist or not.
# Get deleted database that still has remaining non deleted folders

Add-PSSnapin Microsoft.Exchange.Management.PowerShell.SnapIn

$databases = Get-ChildItem D:\Databases\*  -Directory | select Name


foreach ($database in $databases)

{

        $DB = $database.Name

        if ((Get-MailboxDatabase -Identity $db -ErrorAction Ignore ))

            {

            write-host "Database $($db) exists on Exchange Server" -ForegroundColor Green

            }

                else

                {

                Write-Host "Database $($db) doesn't exist on Exchange Server " -ForegroundColor Red

                }

}
I did not add the part to delete the folder through the script as it is still a risky thing to automate and would rather do the deletion manually after double confirming it’s totally gone.
For more about Exchange Server related articles please visit Exchange section here
In my earliest article about Lync with Asterisk Now (FreePBX) I have written step by step guide on how to integrate Lync and FreePBX but since Skype for Business came out and the new version of Free PBX 13.0.84 I thought it would be good idea to try the integration between both of them ..
In Skype for Business server I am using the latest CU version 6.0.9319.0.
The steps are very similar to the original article except with some UI changes..
In the following article I will be only showing the main steps which I have taken to integrate Skype for Business with FreePBX and will show the steps that have been done on the FreePBX side only not on the Skype for Business server as it is very similar to the original article.
Integration of AsteriskNow (FreePBX 13.0.84) and Skype for Business Server
Creating Trunk for Skype for Business
First I will start by creating a new trunk for S4B and configure it. To configure the trunk (Skype for Business trunk for outgoing calls from Asterisk to S4B)
Click on Connectivity >> Trunks and follow the below screenshots.
Under the SIP settings (Outgoing) tab type the followinghost=10.10.124.120 transport=tcp port=5060 insecure=very type=friend context=from-internal promiscredir=yes qualify=yes canreinvite=yesIn the incoming tab make sure you delete everything and then submit changes
Configure the Trunk with an outbound route
While creating the Outbound route, this route must be associated with the Trunk that I have created earlier in the trunk sequence as in the below screenshot..
In my case the pattern NXXX should be enough as it’ll route the call to my S4B’s 4 extension users (5000)
==========================================
Click on Connectivity >>> Inbound routes
Click add inbound route
==========================================
Now the most important is the SIP settings
Configuring Asterisknow to accept TCP calls from S4B
From the Settings menu ->> click on Asterisk SIP settings then choose Chan SIP settings and do the same configuration like the one below
Scroll further down to the “Advanced General Settings”
Enter the two “Other SIP settings” fields below and submit changes.
Conference with 2 Extensions on Asterisk now with s4B
I can call from S4B to Asterisk extensions and vice versa without any issues.
So Exchange 2016 preview version came on MSDN and I decided to give it a try along with the DAG …
Previously in Exchange 2013 I used to have an issue with the fast search on DAG as in some cases it used to stop and cause the original database and copy to report not healthy.
Here I wanted to Install exchange 2016 on new windows edition along with configuring DAG and observe the database’s indexing status.
So to start, I used the available Microsoft Technet related to Exchange 2016.
I’ll launch Powershell as adminsitrator an start by installing the requested software
Before moving on you will have to fulfill the Software Prerequisites which is attached below.. It’s the same as in Exchange 2013.
Now I will start the Exchange Installation from the Setup, You can follow the setup till the end as in the following screenshots:
Now I will create DAG and replicate DBs and notice FastSearch logs
Since this is a LAB and I only have 2 nodes (DAG must have an odd number for Failover), so I am going to use the DC server as my FSW (Which is highly not recommended for Production Environment).
In order for the FSW on DC to work, you will have to add your DC to the Exchange Trusted Subsystem group
Here I added the DC as a member of the group
Normally file server feature is already added to the server by default, but to make sure I’ll run the following command
It’s already there
Now I’ll go back to Exchange servers and add a second NIC for Replication..
I usually rename each NIC so I know which is which, the default NIC belongs to the MAPI traffic and the other one is the replication NIC.
I will configure the Replication NICs on both exchange servers to disable the “Register this connection’s addresses in DNS”
Checking ping between Exchange servers on the Replication NIC
Now I will create the CNO Object (Cluster Name Object) in the Active directory for the DAG
I will disable the object
Double click on the DAG object and go to Security tab and add Exchange servers
Now configure the security for the Exchange members to full
Apply and close…
Now on the DC I will create the FSW’s folder and give it full permission to the Trusted Subsystem group and exchange servers
Click apply and go back to EAC and I’ll start configuring the DAG
Microsoft says that one of the enhancements that have been added to Exchange 2016 is that DatabaseAvailabilityGroupIpAddresses is no longer required when creating a DAG.
By default, the failover cluster will be created without an administrative access point, as this is the recommended best practice.
So in this case we won’t need to assign any IP address to the DAG…
I’ll click on save and see what happens
Navigating to the administrators group on AD, The Exchange subsystem group is not added so I’ll add it.
Now I will add Exchange servers as members to the DAG
Upon adding the Exchange members to DAG I got the following error
A server-side database availability group administrative operation failed. Error The operation failed. CreateCluster errors may result from incorrectly configured static addresses. Error: Windows Failover Clustering isn’t installed on ‘EXCH2K16.test.com’.. [Server: EXCH2K16.test.com] error A server-side database availability group administrative operation failed. Error The operation failed. CreateCluster errors may result from incorrectly configured static addresses. Error: Windows Failover Clustering isn’t installed on ‘EXCH2k1602.test.com’.. [Server: EXCH2k1602.test.com]
So I checked the following, 1- Firewall 2- CNO’s security settings.
Error occurs due to firewall being enabled on the DC (Where the FSW is )
I disabled the firewall and gave full permission to the Exchange trusted system to the DAG object
After that I signed out of Exchange servers, signed back in.. Deleted DAG and recreated it… that didn’t work either
Tried using Exchange management shell but it didn’t work too
Checking the log coming in the description, I find out the log is complaining about not finding DAG while trying to resolve it.
Also the log says that it has installed Failover cluste rbut still the cluster can’t find FQDN called DAG.
So I will have to configure DAG in the dns and give it an IP of my first Exchange server
Checking DAG resolving from Exchange server
As the log says, restart is required after installing failover cluster so I’ll restart Exchange servers and then retry to add Exchange servers to the dag.
After restarting the server, It seems that things are working
The second server gave the following error
The Microsoft Exchange Replication service does not appear to be running on “EXCH2k1602”. Make sure that the server is operating, and that the services can be queried remotely.
Apparently the error is correct, After restarting the server it turned out that most of the second Exchange server’s services were not working..
To be honest I didn’t ask myself why did not the services started since I am using a preview version of Exchange 2016 and Windows as well so I manually started all the services.
Interestingly while checking services, I noticed new services e.g. (DAG Management, Compliance Audit, Notifications broker)
After starting the services, now I tried to add the second server again to the DAG.
So eventually, DAG doesn’t need an IP address but still a DNS value needs to be created for the NCO object and needs to have an IP assigned to it which will be the Exchange server IP address..
Next: I will add a database copy and see how it’s improved and do I need to restart the IS service as in Exchange 2013.
I will leave all the default values and add the second server for the database to be copied on. Unlike Exchange 2013 in most of the times the database would fail first and gives an error ..
In 2016 it starts directly seeding the database to the second Exchange server that’s member of the DAG.
On the second Server where the database has been copied to, I checked the Logs and Fastsearch was throwing errors as usual since database logs are not copied … as soon as the database logs finished copying the fastsearch will return ok and the database will appear as Healthy in EAC.
Fastsearch finally reported that indexing started on the newly copied DB.
The database copy should now report healthy in the EAC.
Hope you find this useful. In the next article I will publish the Exchange server online to check the rest of the functionalities.


![clip_image001[4]](http://www.moh10ly.website/wp-content/uploads/2016/03/clip_image0014.png)


![clip_image001[4]](http://lh3.googleusercontent.com/-tkkirEGtFK0/VcTCztUG_FI/AAAAAAAAQqg/p87NajYZcL4/s1600-h/clip_image001%25255B4%25255D%25255B2%25255D.png)
![clip_image002[4]](http://lh3.googleusercontent.com/-8qnRdArokQc/VcTC1Gps8wI/AAAAAAAAQqs/trt0STVFN90/s1600-h/clip_image002%25255B4%25255D%25255B2%25255D.png)
![clip_image003[4]](http://lh3.googleusercontent.com/-m-2u00_nLGs/VcTC2SKhXDI/AAAAAAAAQq8/3s9OXUk1npo/s1600-h/clip_image003%25255B4%25255D%25255B2%25255D.png)
![clip_image004[4]](http://lh3.googleusercontent.com/-BAM40H7TDqM/VcTC3Y9_ezI/AAAAAAAAQrM/XtwBgpjE0dA/s1600-h/clip_image004%25255B4%25255D%25255B2%25255D.png)
![clip_image005[4]](http://lh3.googleusercontent.com/-x9SooSP4njs/VcTC4xs109I/AAAAAAAAQrc/x7eGOX-nOGI/s1600-h/clip_image005%25255B4%25255D%25255B2%25255D.png)

![clip_image007[4]](http://lh3.googleusercontent.com/-nqJyeMtTbq0/VcTC664bsGI/AAAAAAAAQr8/16kubPj7JyE/s1600-h/clip_image007%25255B4%25255D%25255B2%25255D.png)
![clip_image008[4]](http://lh3.googleusercontent.com/-S3DPinIl_vU/VcTC8FjzqxI/AAAAAAAAQsQ/A5NVke_4Ljk/s1600-h/clip_image008%25255B4%25255D%25255B2%25255D.png)
![clip_image009[4]](http://lh3.googleusercontent.com/-JDO9q3PzSc8/VcTC9eUaJGI/AAAAAAAAQsc/Ub-UXWNmucI/s1600-h/clip_image009%25255B4%25255D%25255B2%25255D.png)
![clip_image010[4]](http://lh3.googleusercontent.com/-BtRFeRibyBc/VcTC-0Yr27I/AAAAAAAAQss/xciwuOhnuac/s1600-h/clip_image010%25255B4%25255D%25255B2%25255D.png)
![clip_image011[4]](http://lh3.googleusercontent.com/-AZlryqhxOkk/VcTC_zVufMI/AAAAAAAAQs8/VXQQhlfZ3ik/s1600-h/clip_image011%25255B4%25255D%25255B2%25255D.png)
![clip_image001[6]](http://lh3.googleusercontent.com/-t_MeWLx3CrQ/VcTDBF_DbLI/AAAAAAAAQtM/5_Uq36S2U40/s1600-h/clip_image001%25255B6%25255D%25255B2%25255D.png)
![clip_image002[6]](http://lh3.googleusercontent.com/-zocECvQh7ME/VcTDCDX-rjI/AAAAAAAAQtc/WqKpdHxtYY4/s1600-h/clip_image002%25255B6%25255D%25255B2%25255D.png)
![clip_image003[6]](http://lh3.googleusercontent.com/-6qs_vZQTzco/VcTDDZA-KqI/AAAAAAAAQtw/UoN-t3-i8HQ/s1600-h/clip_image003%25255B6%25255D%25255B2%25255D.png)
![clip_image004[6]](http://lh3.googleusercontent.com/-J9CN-nRD2vQ/VcTDH3mPPKI/AAAAAAAAQuA/2nBm48ARMSw/s1600-h/clip_image004%25255B6%25255D%25255B2%25255D.png)
![clip_image005[6]](http://lh3.googleusercontent.com/-p97LerOGvsw/VcTDJWj13mI/AAAAAAAAQuQ/1XFC_PmsYUA/s1600-h/clip_image005%25255B6%25255D%25255B2%25255D.png)
![clip_image006[4]](http://lh3.googleusercontent.com/-7wLY52_Dw7c/VcTDKpQygXI/AAAAAAAAQuc/LsTIUTUpSVA/s1600-h/clip_image006%25255B4%25255D%25255B2%25255D.png)
![clip_image007[6]](http://lh3.googleusercontent.com/-RQPFadMc1ss/VcTDL_m8UfI/AAAAAAAAQuw/XtXOh6d6LRA/s1600-h/clip_image007%25255B6%25255D%25255B2%25255D.png)
![clip_image008[6]](http://lh3.googleusercontent.com/-DOMFSF7xR90/VcTDM4E022I/AAAAAAAAQvA/TR96EY8FUd0/s1600-h/clip_image008%25255B6%25255D%25255B2%25255D.png)
![clip_image009[6]](http://lh3.googleusercontent.com/-esCxN6IaFDM/VcTDOCJG7KI/AAAAAAAAQvM/1D-3_Lb4-XY/s1600-h/clip_image009%25255B6%25255D%25255B2%25255D.png)
![clip_image010[6]](http://lh3.googleusercontent.com/-0TBV5c5L3FE/VcTDPX9y3LI/AAAAAAAAQvg/lX9Xn6a5fQ0/s1600-h/clip_image010%25255B6%25255D%25255B2%25255D.png)
![clip_image011[6]](http://lh3.googleusercontent.com/-zew_4ZsSA8c/VcTDQj6YSjI/AAAAAAAAQvw/2wuNd_IPAk0/s1600-h/clip_image011%25255B6%25255D%25255B2%25255D.png)


