Tag Archives: Windows Server

Secure Your DNS Traffic with the outside world

DoH in Microsoft Windows OS

Until this moment Microsoft Windows OS doesn’t support DNS over HTTPS, The feature will most likely be implemented in future builds but no body knows when is that however, You can still take a peak into the feature which is in preview mode/

No alt text provided for this image

Benefit of using DoH on an OS level

The benefit of using DoH on an Operating System level would provide more certainty that your DNS queries leave your computer without being read by any other party even if that is your ISP.

A simple DNS nslookup query using Wireshark on your computer would show you how serious this topic is. After installing Wireshark you’ll be able to see that all of your dns queries are in clear text and can be read by anyone until it gets to the destination website/server.

Demonstration of DNS lookup without DoH

After installing Wireshark, I fire up Powershell or CMD and try to nslookup google.com and it’ll show what I just queried for.

No alt text provided for this image

So how to make sure that your DNS queries don’t leave your computer in clear text format? and since Microsoft OS is not DoH ready yet what can you do?

In my case, I am already using encrypted DNS on firewall level as I have Pfsense acting as a router and it already supports DoH but still not pretty satisfied :).

DNSCrypt as a solution

Since the foundation of DoH I have been looking for a solution that would work on Microsoft Windows OS and luckily someone already created this great project called Simple DNSCrypt which not just enables the encryption of DNS queries on your OS but also enables this to work as a service.

No alt text provided for this image

Installing DNSCrypt would create a Windows based Service which would start automatically when your OS boots and logs into Windows.

The service is called DNSCrypt Client Proxy

Add alt textNo alt text provided for this image

DNSCrypt has a simple interface, You can pick up the DNS Server where to forward queries to and it works with proof.

Right after the installation of this tiny app, launch it as an administrator and configure it as in the below screenshot. You can choose to install the service or not.

Add alt textNo alt text provided for this image

Right after you enable it (By clicking on your Network Card box) that will start protecting your DNS queries. Let’s go ahead with a little demo

I am going to start Wireshark after enabling DnsCrypt and do a google dns lookup , As you can see below on wireshark it’s not returning any dns queries.

No alt text provided for this image

When you install Simple DNSCrypt it changes your Preferred DNS configuration to localhost so that all queries is passed through the app in DNS over HTTPS which doesn’t allow even Wireshark to see it as DNS.

So that makes it pretty secure and not even your firewall will see it.

If you have any question please don’t hesitate to ask me

Official DNScrypt website https://simplednscrypt.org/

Support the project founder https://github.com/bitbeans/SimpleDnsCrypt
Microsoft exposes a security issue that affects millions of Windows 10 computers, RDP and DHCP on win2008R2

Windows 10 Crypto API Spoofing

Microsoft has released a new security patch for a vulnerability that could affect millions of Windows 10 Users world wide.

A decades old API

The decades old CryptoAPI tool validates and signs packages/software which could be utilized by hackers/developers to sign and execute illegitimate software thus would allow users to run anything without user’s nor Antivirus/Internet Security software’s notice.

Microsoft mentioned that the vulnerability could also allow hackers to change or modify encrypted communications.

It’s important to mention that CryptoAPI is a legacy API that’s being replaced by a new CNG (Cryptography Next Generation API) which also supports CryptoAPI.

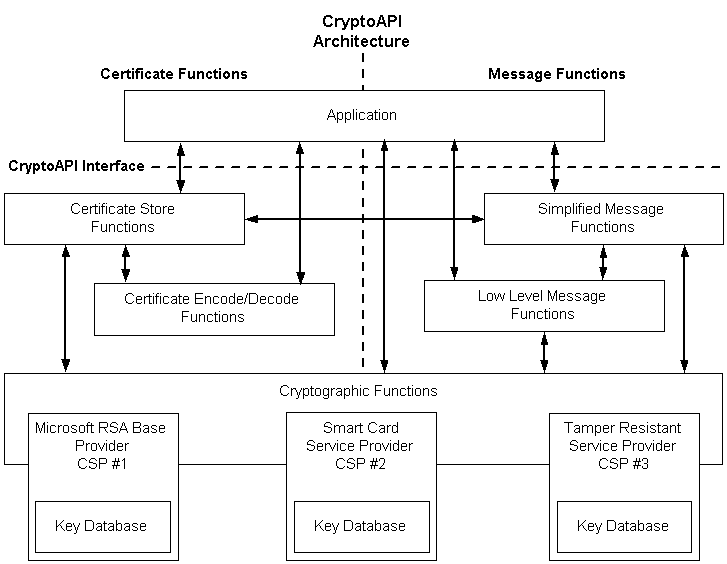
CryptoAPI Key Storage Architecture

cryptoapi architecture

Download Patch

Direct Download

https://www.catalog.update.microsoft.com/Search.aspx?q=KB4528760

CVE

https://portal.msrc.microsoft.com/en-US/security-guidance/advisory/CVE-2020-0601

Windows 2008 R2, Windows 7 RDP

A day ago Microsoft released two very important security patches on May 14, 2019.

One of these patches has been detected in the RDP service (CVE-2019-0708) which affects Windows 7 and Windows 2008 R2.

According to MS’s Article a remote code execution vulnerability exists in Remote Desktop Services – formerly known as Terminal Services – when an unauthenticated attacker connects to the target system using RDP and sends specially crafted requests.

No Authentication or Interaction needed

This vulnerability is pre-authentication and requires no user interaction. An attacker who successfully exploited this vulnerability could execute arbitrary code on the target system.

An attacker could then install programs; view, change, or delete data; or create new accounts with full user rights.

When look at CVE-2019-0708, which is related to the RDP service, we see that attackers are able to run code on systems by sending specially produced packages without any user interaction and authentication and manage to install malware like Ransomware or other execution files.

Download Patch

https://portal.msrc.microsoft.com/en-US/security-guidance/advisory/CVE-2019-0708

Windows 2008R2, 2012R2, 2016 and 2019 DHCP

The other one is in the DHCP service (CVE-2019-0725), and both vulnerabilities are very critical.

A memory corruption vulnerability exists in the Windows Server DHCP service when processing specially crafted packets. An attacker who successfully exploited the vulnerability could run arbitrary code on the DHCP server.

Download Patch

https://portal.msrc.microsoft.com/en-US/security-guidance/advisory/CVE-2019-0725

Sources:

Microsoft, NSA, Other Security Researchers

Upgrade FRS (File Replication Service) to DFSR (Distributed File System Replication) Guide through

Upgrade FRS to DFSR:

You might be searching on how to do this due to many reasons, Migrating your DCs to Windows 2016 or Windows 2019, The steps to do this type of migration is pretty easy and straightforward.

First Let’s explain a bit about what does FRS and DFSR do and what is the difference?

Windows Server 2003 and 2003 R2 uses File Replication Service (FRS) to replicate SYSVOL folder content to other domain controllers.

SYSVOL is a folder shared by domain controller to hold its logon scripts, group policies and other items related to AD.

All the domain controllers in the network will replicate the content of SYSVOL folder. The default path for SYSVOL folder is %SystemRoot%\SYSVOL. This folder path can be defined when you install the active directory.

How does DFS Works?

In Windows server 2008 and later Active Directory uses Distributed File System (DFS) for the replication.  DFS Replication uses a compression algorithm known as remote differential compression (RDC). RDC detects changes to the data in a file and enables DFS Replication to replicate only the changed file blocks instead of the entire file.

Although FRS has been deprecated Since Windows server 2008 most people still looking to migrate to latest version.

Migration Starts Here

In this guide, I am going to explain how to do this kind of migration step by step.

I am going to run the migration on Windows 2008 R2 Servers. however the process is exactly the same on Windows 2012 R2.

To start, I need to check the service console to see which services are running the replication. From run type services.msc and enter

As you can see there, File Replication Service is running

clip_image001

In the same manner DFS service is also started and functioning, But that doesn’t mean that RFS is not being used.

clip_image002

Health Check

Before starting any migration, I prefer to do a check on Eventviewer just to make sure nothing critical is being reported. In the same way I would like to see if there any warning being reported.
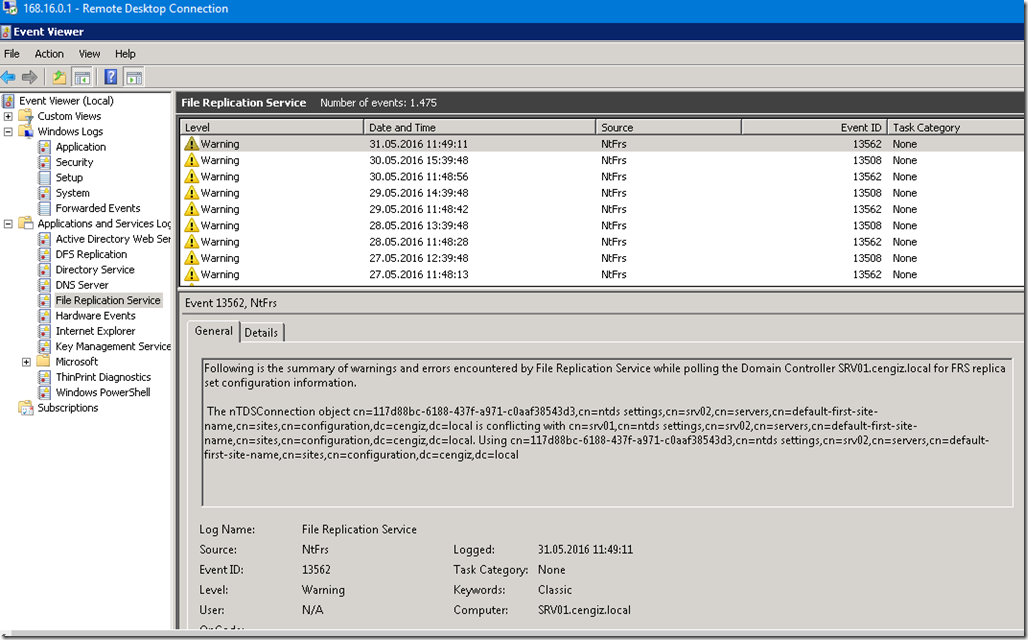
Below you can see errors are being reported from File Replication Service by the Domain Controller SRV01, So the time is convenient to start this kind of migration as this would fix the errors being reported.

clip_image003

Prerequirements:

The first part of the process for migrating SYSVOL replication from File Replication Service (FRS) to Distributed File System (DFS) Replication is to raise the functional level of the domain to Windows Server 2008 and to set the global migration state to Prepared.

Make sure your Domain Function Level is raised to 2008 at least for this process to work.

Migration:

To start migration, Run Powershell as an administrator from the DC And type the following command to prepare DCs for the migration.

dfsrmig /getglobalstate

clip_image004

Preparing to migrate

dfsrmig /setglobalstate 1

When this is done, you might have to wait sometime (5 mins or less for small environments). When done waiting type dfsrmig /getglobalstate to verify that the global migration state is Prepared. The following output appears if the global migration state is Prepared.

clip_image005

clip_image006

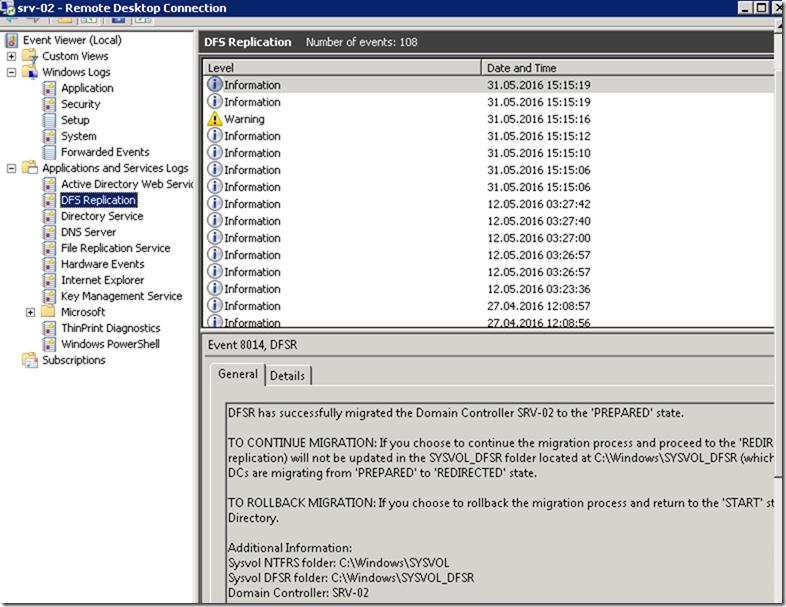
You will be able to see an event ID 8014 showing you the success of this command.  Which means you can move to the next stage.

clip_image007

clip_image008

Migrate the domain to the Redirected state

From a command prompt or PowerShell window on a writeable domain controller (not a read-only domain controller) in the domain that you want to migrate, type dfsrmig /setglobalstate 2 to set the global migration state to Redirected.

clip_image009

2. Type dfsrmig /getglobalstate to verify that the global migration state is Redirected. The following output appears if the global migration state is Redirected.

clip_image010

After doing this, Checking event viewer you can see event ID 8017 showing you the current state, in my case it’s showing DFSR has successfully Migrated the DC to “Redirected” state. so it means we are good to go to the next step.

clip_image011

clip_image012

Migrating to the Eliminated State

Log on to a writeable domain controller (if you are not logged on already).

Open a command prompt window and then type dfsrmig /setglobalstate 3 to set the global migration state to Eliminated.

clip_image013

2. At a command prompt, type dfsrmig /getmigrationstate to verify that all the domain controllers are at the Redirected state. The following output appears when all domain controllers are at the Redirected state.

clip_image014

In the event viewer you can see the state of the DCs reporting that DC will now migrate to the “Eliminated” state. with event ID 8018

clip_image015

clip_image016

Once everything is finished, You will be able to confirm by two things, First on the Service console the File Replication Service should be disabled since it’s no longer going to be used.

clip_image017

Second thing is by using Command line or Powershel, Type Net Share an you can see the new Shares being published with new names “Sysvol_DFSR”.

clip_image018

Ref:

https://docs.microsoft.com/en-us/windows-server/storage/dfs-replication/migrate-sysvol-to-dfsr

https://docs.microsoft.com/en-us/windows/win32/win7appqual/file-replication-service–frs–is-deprecated-in-windows-server-2008-r2

Migrating DFS from 2000 Mode to 2008 step by step

The Story

Few months ago I have got a request from one of my clients regarding migrating DFS from 2012R2 to 2016.

2012R2 was migrated from 2008r2 and was based on 2000 Mode. To do this you’ve got a list of requirements as it can be migrated but certain features won’t be supported if you continue to use the 2000 Mode in DFS on Windows 2016 server.

How to Start

In this tutorial I will explain how to do this migration by doing a demo step by step and guide you through this Migration with screenshots and the required commands.

I have added a tiny comparison also to make it clear why are we going to use this particular method of migrating DFS mode and Server.

clip_image001[4]

To migrate a domain-based namespace to Windows Server 2008 mode

  1. Open a Command Prompt window and type the following command to export the namespace to a file, where \\ domain \ namespace is the name of the appropriate domain and namespace and path\filename is the path and file name of the export file:
On the source DC/DFS Server

Dfsutil root export \\domain\namespace C:\filename.xml

clip_image002[4]

clip_image003[4]

  1. Write down the path (\\ server \ share ) for each namespace server. You must manually add namespace servers to the recreated namespace because Dfsutil cannot import namespace servers.

clip_image004[4]

clip_image005[4]

  1. In DFS Management, right-click the namespace and then click Delete , or type the following command at a command prompt, where \\ domain \ namespace is the name of the appropriate domain and namespace:
    Copy
    Dfsutil root remove \\domain\namespace

clip_image006[4]

Let’s go refresh the console and see if it’s deleted there

clip_image007[4]

clip_image008[4]

Next remove

clip_image009[4]

clip_image010[4]

I will remove the rest of the name spaces

clip_image011[4]

All have been removed, Now lets remove the name spaces from the display and observe what happens to the replication groups

clip_image012[4]

NOTE:

Replication groups didn’t get affected

clip_image013[4]

  1. In DFS Management, recreate the namespace with the same name, but use the Windows Server 2008 mode, or type the following command at a command prompt, where \\ server \ namespace is the name of the appropriate server and share for the namespace root:
    Dfsutil root adddom \\server\namespace v2
I will use the UI instead of the command

clip_image014[4]

Although we raised the forest and domain function forest but still the 2008 is still greyed out. Lets try to restart the DFS services on the FSMO server

clip_image015[4]

clip_image016[4]

After restarting

clip_image017[4]

clip_image018[4]

Next, I will copy all the xml files to the new server and import them there

My new server is 2016

clip_image019[4]

  1. To import the namespace from the export file, type the following command at a command prompt, where \\ domain \ namespace is the name of the appropriate domain and namespace and path\filename is the path and file name of the file to import:
    Dfsutil root import merge path\filename.xml \\domain\namespace

clip_image020[4]

After the Import

clip_image021[4]

clip_image022[4]

I will continue to import the rest of the namespaces

First we need to create them with their matching namespaces from the GUI

clip_image023[4]

clip_image024[4]

Now I will import and merge the xml file

clip_image025[4]

clip_image026[4]

After adding the NEW folder which has replicating group existing already from the previous mode. First it didn’t show up

clip_image027[4]

but after navigating to the NewFolder and clicking on Replication tab then Navigate to the replication group showed the replication group underneath the Replication

clip_image028[4]

What has changed?

The only noticeable thing which has changed is the NameSpace Servers everything else like ( Folder targets still the same, replication is identical to previous settings)

See this screenshot

clip_image029[4]

Let’s check the access to the new namespace

clip_image030[4]

Finally, Let’s import the latest namespace and its configuration (PublicFolder)

clip_image031[4]

clip_image032[4]

Let’s check the result on GUI

clip_image033[4]

Notice the replication group for the PF didn’t come, so let’s do as we have explained before to show the replication group

Here we go

clip_image034[4]

Right after this process finishes, the command creates some kind of a report with time, importing status and other related settings such as site cost, timeout.. Etc

clip_image035[7]

Note

To minimize the time that is required to import a large namespace, run the Dfsutil root import command locally on a namespace server.

Add any remaining namespace servers to the recreated namespace by right-clicking the namespace in DFS Management and then clicking Add Namespace Server , or by typing the following command at a command prompt, where \\ server \ share is the name of the appropriate server and share for the namespace root:
Copy
Dfsutil target add \\server\share

Note

You can add namespace servers before importing the namespace, but doing so causes the namespace servers to incrementally download the metadata for the namespace instead of immediately downloading the entire namespace after being added as a namespace server.

Ref:

https://docs.microsoft.com/en-us/previous-versions/windows/it-pro/windows-server-2008-R2-and-2008/cc753875(v=ws.11)