Skype for Business Edge server deployment and Hybrid integration with Skype for Business Online
In the last Skype for Business post I have upgraded my Lync 2013 to Skype for Business (Click here to go to that post). in this article I am going to install Edge server for Skype for Business to the same Lync Environment where I have done the Upgrade to Skype for Business.
Configuring Edge Server
Setup NETBIOS
In order to configure Skype 4 Business Edge, we’ll have to change the Netbios to give it the name of our Domain but we won’t join it to the domain.
![clip_image001[8]](http://lh3.googleusercontent.com/-JVkzP-XEz9w/VdYhkuAGs5I/AAAAAAAAQ5Y/DjnZoSDpPx8/clip_image001%25255B8%25255D_thumb.png?imgmax=800)
![clip_image002[8]](http://lh3.googleusercontent.com/-FVMSyPjzqGs/VdYhoTQELrI/AAAAAAAAQ5o/CMEL4EogEss/clip_image002%25255B8%25255D_thumb.png?imgmax=800)
Setup NICs
Edge Server must have 2 NICs, one Local NIC will point out to the Front end server but must not have Default gateway so traffic can only flow through the DMZ out to the internet and back in. but still it must be able to ping to the FE from Edge and vice versa.
The DMZ network could have a single DMZ address (Public Address to be pointing to) or three DMZ addresses for public IP addresses with standard https ports.
![clip_image003[8]](http://lh3.googleusercontent.com/-IXRzI-X9G18/VdYhsrCEunI/AAAAAAAAQ54/W9dkBO8IgX0/clip_image003%25255B8%25255D_thumb.png?imgmax=800)
![clip_image004[8]](http://lh3.googleusercontent.com/-cEe9EaUzjmo/VdYhxQG3qxI/AAAAAAAAQ6I/0gtGN0MSA3E/clip_image004%25255B8%25255D_thumb.png?imgmax=800)
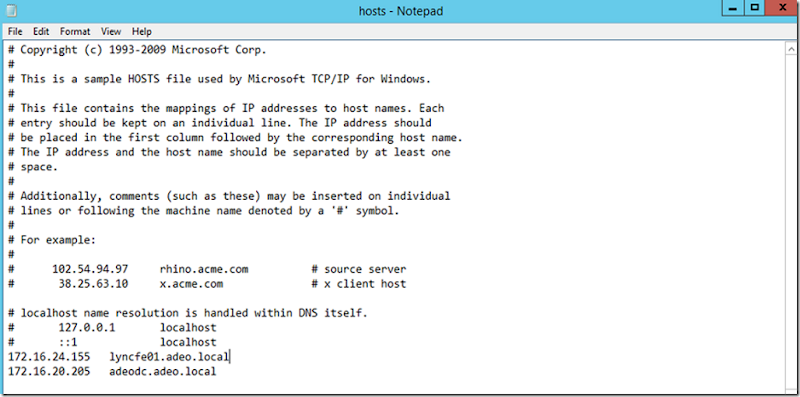
Configure Hostnames
Edit the Edge server’s host file to include Lync FE and DC’s IP addresses and Hostname
Install Prerequisites
- Microsoft .Net Framework 3.5
![clip_image001[10]](http://lh3.googleusercontent.com/-n2NU6FBkm70/VdYh6ekLIxI/AAAAAAAAQ6o/nfVnJwXl2fY/clip_image001%25255B10%25255D_thumb.png?imgmax=800)
Now I will go back to Skype for Business FE server, I’ll launch the topology builder and add new Edge server
I will add the first Edge pool which contains of a single Edge server
![clip_image002[10]](http://lh3.googleusercontent.com/-eLE2NzM2DkM/VdYh_q-EiLI/AAAAAAAAQ64/Hj03Kuovdhs/clip_image002%25255B10%25255D_thumb.png?imgmax=800)
Next, you will have to choose if you want to enable federation with partners or other service providers …e.g. (Google)
![clip_image003[10]](http://lh3.googleusercontent.com/-pWVj4HU7CT8/VdYiEozxHSI/AAAAAAAAQ7I/yxPFOVitglg/clip_image003%25255B10%25255D_thumb.png?imgmax=800)
I am intending to use a single Public IP address with a different ports (nonstandard) since this is a lab. For production use it’s recommended to have 3 public IP addresses, One is for Access Edge, AV and WebConf services.
![clip_image004[10]](http://lh3.googleusercontent.com/-CofvDYhqSE8/VdYiKabZRzI/AAAAAAAAQ7Y/2zW5wCS9rxA/clip_image004%25255B10%25255D_thumb.png?imgmax=800)
Next I will choose the last option which says that the Edge pool is translated by NAT. I will configure my firewall to NAT ports to the Edge’s DMZ IP addresses from the Public so I am choosing this option.
![clip_image005[8]](http://lh3.googleusercontent.com/-eps2XJ1RnJg/VdYiORUPdHI/AAAAAAAAQ7o/jKXTOS0ntls/clip_image005%25255B8%25255D_thumb.png?imgmax=800)
![clip_image006[8]](http://lh3.googleusercontent.com/-Ll6ASulX9wU/VdYiTf62hLI/AAAAAAAAQ74/uKqFwHf-mgI/clip_image006%25255B8%25255D_thumb.png?imgmax=800)
This is the FQDN’s the default configuration .. It’ll only use a single FQDN for all services if you’re going to use a single public IP address with a different ports.
IMPORTANT NOTE
When you use a single IP address with a different ports, the Access Edge port will normally change to 5061 (Not 443 like in the _sip._tls.domain.com) SRV record which will cause failure if you forgot to change this port to match the one in your Topology’s Access Edge settings.
Next I’ll have to enter my Edge server’s Local IP address.
![clip_image007[8]](http://lh3.googleusercontent.com/-LL0I9YnKk4o/VdYiZImKXlI/AAAAAAAAQ8I/a7cizhc7ZCo/clip_image007%25255B8%25255D_thumb.png?imgmax=800)
Next I will be asked to enter the DMZ’s IP address which the wizard calls (Private External IP address)
![clip_image001[12]](http://lh3.googleusercontent.com/-K7Df_zq_eqM/VdYioumjC0I/AAAAAAAAQ8o/UUg2lCwdhLw/clip_image001%25255B12%25255D_thumb.png?imgmax=800)
Here I am going to place the NAT IP address which is my Public IP address.
![clip_image002[12]](http://lh3.googleusercontent.com/-FOmoic6xGO8/VdYitl5tzFI/AAAAAAAAQ84/RQLn2vVE52c/clip_image002%25255B12%25255D_thumb.png?imgmax=800)
Next I’ll have to choose which Lync FE pool will be used as the next hop to the Edge pool. In this case I’ll be choosing my main pool since the second is only for resilience purpose.
![clip_image003[12]](http://lh3.googleusercontent.com/-SVhMM9754yw/VdYi8q2tFXI/AAAAAAAAQ9I/wo5YMGzSW8I/clip_image003%25255B12%25255D_thumb.png?imgmax=800)
Then I’ll associate the mediation pool for Edge server for external media traffic. I can assign both in this case.
![clip_image004[12]](http://lh3.googleusercontent.com/-fbLvjtfoFN4/VdYjGJ1vCqI/AAAAAAAAQ9Y/s6zJzH8bLTw/clip_image004%25255B12%25255D_thumb.png?imgmax=800)
Now I’ll click on Finish and right click on the Site name’s properties to enable the SIP federation and XMPP federation then Publish the topology.
![clip_image005[10]](http://lh3.googleusercontent.com/-C3z9Y6ipqe0/VdYjRmDAcbI/AAAAAAAAQ9o/eiUiUM5b9xc/clip_image005%25255B10%25255D_thumb.png?imgmax=800)
![clip_image006[10]](http://lh3.googleusercontent.com/-9l_igww_DuI/VdYjbi9xoaI/AAAAAAAAQ94/mWH6MtrjcYo/clip_image006%25255B10%25255D_thumb.png?imgmax=800)
![clip_image007[10]](http://lh3.googleusercontent.com/-8F3qp5qucSw/VdYjjTgXXjI/AAAAAAAAQ-I/IwxEYcbtNt4/clip_image007%25255B10%25255D_thumb.png?imgmax=800)
![clip_image008[10]](http://lh3.googleusercontent.com/-Y3nckkNQ-fo/VdYjrQH1uKI/AAAAAAAAQ-Y/ZrJt0AjyYv0/clip_image008%25255B10%25255D_thumb.png?imgmax=800)
Now I will setup Azure Active Directory Sync on my DC server in order to sync the required users for the test purpose.
My domain is adeo.local so I want to change the UPN for users to match the synced domain. (Adeo-office365.ga) and moh10ly.com
![clip_image009[8]](http://lh3.googleusercontent.com/-dXk-iOx6lio/VdYj2zytQyI/AAAAAAAAQ-o/shKzm7feJF4/clip_image009%25255B8%25255D_thumb.png?imgmax=800)
Installing Azure Active Directory Sync
Now I will install the prerequisites which consist of the following
![clip_image010[8]](http://lh3.googleusercontent.com/-FkiEJpRN3lk/VdYkC0F4s6I/AAAAAAAAQ-4/HFqoLAKeNlA/clip_image010%25255B8%25255D_thumb.png?imgmax=800)
Net framework 4.5.2 is required for AADS but it’s already installed on my server
![clip_image011[8]](http://lh3.googleusercontent.com/-F0OJH2Xft1o/VdYkMBMFHaI/AAAAAAAAQ_I/cw3UksQU2B0/clip_image011%25255B8%25255D_thumb.png?imgmax=800)
Next I will install Microsoft Online Service Sign in assistant
![clip_image012[8]](http://lh3.googleusercontent.com/-dyBMGLqyTLI/VdYtdNIIqHI/AAAAAAAAQ_g/Pl0LuF60fls/clip_image012%25255B8%25255D_thumb.png?imgmax=800)
Next I will install Azure AD Module
![clip_image001[14]](http://lh3.googleusercontent.com/--9eT1-XKjjk/VdYthjxiiQI/AAAAAAAAQ_w/dzx42bHFxKE/clip_image001%25255B14%25255D_thumb.png?imgmax=800)
Finally Azure AD Sync
![clip_image002[14]](http://lh3.googleusercontent.com/-HCpFLGYNVMc/VdYtlU4quDI/AAAAAAAARAA/btkogyaiDqM/clip_image002%25255B14%25255D_thumb.png?imgmax=800)
Before moving forward, I’ll have to go to the Office 365 portal and activate DirSync
![clip_image003[14]](http://lh3.googleusercontent.com/-M58J612IJYg/VdYtqCTWdpI/AAAAAAAARAQ/r_4p-4q4sps/clip_image003%25255B14%25255D_thumb.png?imgmax=800)
Then use a global admin credentials from O365.
![clip_image004[14]](http://lh3.googleusercontent.com/-wSI-7mvPMr4/VdYttqXtisI/AAAAAAAARAg/DnGzOrDGnA8/clip_image004%25255B14%25255D_thumb.png?imgmax=800)
Adding the forest using an enterprise admin user account
![clip_image005[12]](http://lh3.googleusercontent.com/-0Ge3CltnB_k/VdYtxh0WWBI/AAAAAAAARAw/J3v24wdlCqk/clip_image005%25255B12%25255D_thumb.png?imgmax=800)
![clip_image006[12]](http://lh3.googleusercontent.com/-suuE6vyARvQ/VdYt1u30PFI/AAAAAAAARBA/myxd7CWA1vY/clip_image006%25255B12%25255D_thumb.png?imgmax=800)
Due to the fact that my domain adeo-office365.ga’s public dns host doesn’t have SRV configuration because it’s hosted by the famous free domain service (Freenom) so I’ll have to add my original domain moh10ly.com as Lync (S4B) requires SRV records to point to the on-premises lync.
![clip_image007[12]](http://lh3.googleusercontent.com/--o4XAN0saAU/VdYt7qmcVZI/AAAAAAAARBQ/3ulUN4mgWG0/clip_image007%25255B12%25255D_thumb.png?imgmax=800)
![clip_image008[12]](http://lh3.googleusercontent.com/-FzGFXha1SzE/VdYt_0g2CDI/AAAAAAAARBg/5NqbbCJh2UY/clip_image008%25255B12%25255D_thumb.png?imgmax=800)
![clip_image001[16]](http://lh3.googleusercontent.com/-YAq1_Li5HLA/VdYuENY4awI/AAAAAAAARBw/ON3X_TtevgM/clip_image001%25255B16%25255D_thumb.png?imgmax=800)
![clip_image002[16]](http://lh3.googleusercontent.com/-OFiNW5iJZ_0/VdYuHu78oAI/AAAAAAAARCA/pSgAJu7PQrE/clip_image002%25255B16%25255D_thumb.png?imgmax=800)
![clip_image003[16]](http://lh3.googleusercontent.com/-o23CbotvIa8/VdYuLBeJItI/AAAAAAAARCQ/H1AQx8NhLLg/clip_image003%25255B16%25255D_thumb.png?imgmax=800)
I will only sync one OU, so I will untick the Sync now box and click on Finish
![clip_image004[16]](http://lh3.googleusercontent.com/-pEdTSxqyp24/VdYuPTUkftI/AAAAAAAARCg/MXF8B5qoogc/clip_image004%25255B16%25255D_thumb.png?imgmax=800)
I will go to the following path
“C:\Program Files\Microsoft Azure AD Sync\UIShell” and create a shortcut for the GUI application of AADS on the desktop
“C:\Program Files\Microsoft Azure AD Sync\UIShell\miisclient.exe”
![clip_image005[14]](http://lh3.googleusercontent.com/-xr7iM7Y99n4/VdYuS3oH9fI/AAAAAAAARCw/Tpqsz9cpxKA/clip_image005%25255B14%25255D_thumb.png?imgmax=800)
To get this GUI app to work, you will have to sign out of your account and sign back in as your username will be added to the local administrators and have the authority to open it
Log off, log back in
![clip_image006[14]](http://lh3.googleusercontent.com/-_clCZutXRJQ/VdYuYZh_5xI/AAAAAAAARDA/pHouOKcBiBU/clip_image006%25255B14%25255D_thumb.png?imgmax=800)
Next I will go to the connectors tab and double click on the ADDS connector (Adeo.local)
![clip_image007[14]](http://lh3.googleusercontent.com/-l2D-du4nIEk/VdYuckIlTcI/AAAAAAAARDQ/6Ij6qtW6sX4/clip_image007%25255B14%25255D_thumb.png?imgmax=800)
I will go to the Configure Directory Partitions and under Credentials I’ll choose “Alternate credentials for this directory partition” then enter my on-premises AD Enterprise admin credentials
![clip_image008[14]](http://lh3.googleusercontent.com/-7lh25ZwGM74/VdYugmuzazI/AAAAAAAARDg/uYa1TVF4deE/clip_image008%25255B14%25255D_thumb.png?imgmax=800)
I’ll click on Containers
![clip_image001[18]](http://lh3.googleusercontent.com/-_Eo1ySRhc7w/VdYulI3X6iI/AAAAAAAARDw/nm7auzI_NdI/clip_image001%25255B18%25255D_thumb.png?imgmax=800)
I’ll untick the DC=Adeo,Dc=Local box and only choose Dirsync OU then click OK and apply
![clip_image002[18]](http://lh3.googleusercontent.com/-7f9VGDbVlqc/VdYupO894vI/AAAAAAAAREA/hKnRU-QNoEI/clip_image002%25255B18%25255D_thumb.png?imgmax=800)
Before I start syncing my AD , I will go to Skype for Business Server and add my domain moh10ly.com as a SIP domain
![clip_image003[18]](http://lh3.googleusercontent.com/-6d3IYHIyLAc/VdYuvBFO7YI/AAAAAAAAREQ/Ley-JsHBKmw/clip_image003%25255B18%25255D_thumb.png?imgmax=800)
Next I am going to change the FQDN of the SIP access edge for public domain to moh10ly.com and the default port for the Access Edge to 443 and publish the topology
![clip_image004[18]](http://lh3.googleusercontent.com/-jE1diCbah_I/VdYuyXXjRgI/AAAAAAAAREg/fTGdJIo7XmE/clip_image004%25255B18%25255D_thumb.png?imgmax=800)
![clip_image005[16]](http://lh3.googleusercontent.com/-12riPotck8Y/VdYu1-k5YkI/AAAAAAAAREw/5Q0VZulSoss/clip_image005%25255B16%25255D_thumb.png?imgmax=800)
I needed to finally check if all my FE servers are replicating. So then I can move to Edge server to install Lync components
![clip_image006[16]](http://lh3.googleusercontent.com/-RFka6Lax6Uo/VdYu6A_b2EI/AAAAAAAARFA/A4Bf-7jcVcs/clip_image006%25255B16%25255D_thumb.png?imgmax=800)
On the Edge server, I’ll use ISO for Skype 4 business to install the setup
![clip_image007[16]](http://lh3.googleusercontent.com/-rT42TujSLcg/VdYu-8T-rPI/AAAAAAAARFQ/ciVPOI7rLxI/clip_image007%25255B16%25255D_thumb.png?imgmax=800)
![clip_image008[16]](http://lh3.googleusercontent.com/-UXl0OP8ELlk/VdYvD2pe5PI/AAAAAAAARFg/57WU9bpLMWs/clip_image008%25255B16%25255D_thumb.png?imgmax=800)
First thing I’ll install the local Configuration Store
I’ll click on Run and then I’ll be asked to import the configuration file which I’ll must export from Lync FE (Skype 4 b FE) server
![clip_image009[10]](http://lh3.googleusercontent.com/-rkCwzJAXkjY/VdYvHtlOI5I/AAAAAAAARFw/d8v0lBhiUEw/clip_image009%25255B10%25255D_thumb.png?imgmax=800)
In this case, I’ll go to Lync FE and open Lync Management shell and enter the following Cmdlet
Export-CsConfiguration -FileName c:\top.zip
![clip_image010[10]](http://lh3.googleusercontent.com/-k86U1B16iFM/VdYvLCaibNI/AAAAAAAARGA/ZpFHQMj8ysE/clip_image010%25255B10%25255D_thumb.png?imgmax=800)
This cmdlet will export a file to the root C drive . I’ll copy this file to the edge server.
![clip_image011[10]](http://lh3.googleusercontent.com/-_ywtt1T7iXA/VdYvQDekWkI/AAAAAAAARGQ/ekMQKbPkRvw/clip_image011%25255B10%25255D_thumb.png?imgmax=800)
I’ll click next to continue, this should start installing the local store
![clip_image012[10]](http://lh3.googleusercontent.com/-WnSYxl4wcJQ/VdYvUBdYqKI/AAAAAAAARGg/svyAMxSfih8/clip_image012%25255B10%25255D_thumb.png?imgmax=800)
![clip_image013[8]](http://lh3.googleusercontent.com/-XYBxx8eiPNw/VdYvaQtFNKI/AAAAAAAARGw/MYy7SWKb_rw/clip_image013%25255B8%25255D_thumb.png?imgmax=800)
![clip_image014[8]](http://lh3.googleusercontent.com/-fE-Bou-7p0k/VdYve2i4AVI/AAAAAAAARHA/3Oi9fhkFXIM/clip_image014%25255B8%25255D_thumb.png?imgmax=800)
Next I’ll request a certificate for Internal NIC For edge server
![clip_image015[8]](http://lh3.googleusercontent.com/-IWDQOZeADZM/VdYviimDQuI/AAAAAAAARHQ/M06O29i46gE/clip_image015%25255B8%25255D_thumb.png?imgmax=800)
![clip_image016[8]](http://lh3.googleusercontent.com/-C_kBbiR8EsM/VdYvmCKBC0I/AAAAAAAARHg/XXDJ1aRZeD8/clip_image016%25255B8%25255D_thumb.png?imgmax=800)
![clip_image017[8]](http://lh3.googleusercontent.com/-KBcrpzsqBE0/VdYvpcE6nGI/AAAAAAAARHw/g_GITksR_K8/clip_image017%25255B8%25255D_thumb.png?imgmax=800)
Configure Certificate
I’ll take the CSR (Certificate sign request) code and get a certificate from my local CA
![clip_image018[8]](http://lh3.googleusercontent.com/-UjquZ6aPLb8/VdYvtJvGKrI/AAAAAAAARIA/hgFf-ybYbd0/clip_image018%25255B8%25255D_thumb.png?imgmax=800)
I’ll open MMC and add Certificates console and import the PKCS certificate
![clip_image001[20]](http://lh3.googleusercontent.com/-_2-TW0r6MQ0/VdYvxgJAaoI/AAAAAAAARIQ/Ivs_jXAZF-8/clip_image001%25255B20%25255D_thumb.png?imgmax=800)
![clip_image002[20]](http://lh3.googleusercontent.com/-7IiMqKkJ9Ok/VdYv2m7xufI/AAAAAAAARIg/PZVaQ-F-SNo/clip_image002%25255B20%25255D_thumb.png?imgmax=800)
After importing the certificate I’ll assign it to the internal NIC by clicking on Assign to the Edge Internal
![clip_image003[20]](http://lh3.googleusercontent.com/-Nzq2BO_Lw6M/VdYv6XqIuuI/AAAAAAAARIw/slgQeBTRoHE/clip_image003%25255B20%25255D_thumb.png?imgmax=800)
![clip_image004[20]](http://lh3.googleusercontent.com/-QjpvYftCPUI/VdYv9oP4MLI/AAAAAAAARJA/WibUlIZDQ2w/clip_image004%25255B20%25255D_thumb.png?imgmax=800)
![clip_image005[18]](http://lh3.googleusercontent.com/-ayenHxH2dPY/VdYwBhallTI/AAAAAAAARJQ/9ednPIvTK10/clip_image005%25255B18%25255D_thumb.png?imgmax=800)
![clip_image006[18]](http://lh3.googleusercontent.com/-8Ir_aw9XeOg/VdYwFLo2ZDI/AAAAAAAARJg/YcE87xZ-s8g/clip_image006%25255B18%25255D_thumb.png?imgmax=800)
Once we assign the certfiicate to the internal edge. The replication service for Edge and FE will start working
![clip_image007[18]](http://lh3.googleusercontent.com/-3X4oKAJzwOk/VdYwJz6S1zI/AAAAAAAARJw/1_Aas9HmseQ/clip_image007%25255B18%25255D_thumb.png?imgmax=800)
Now I’ll import my Public Certificate to Edge Server’s DMZ NIC
I already imported my public certificate, now I’ll go to the S4B wizard and assign it there
![clip_image008[18]](http://lh3.googleusercontent.com/-ock6Aw6XQjo/VdYwNkSKwUI/AAAAAAAARKA/R6vTCITQSA4/clip_image008%25255B18%25255D_thumb.png?imgmax=800)
![clip_image009[12]](http://lh3.googleusercontent.com/-7rgUTq6ZRDQ/VdYwRmNYK6I/AAAAAAAARKQ/gPwPLgfrxuM/clip_image009%25255B12%25255D_thumb.png?imgmax=800)
Unlike IN lync 2013 when you Click on Start service in the Wizard all services start on their own but on Skype for business you ‘ll have to start the services manually by yourself.
![clip_image010[12]](http://lh3.googleusercontent.com/-mmQB2EMXEog/VdYwWfZktcI/AAAAAAAARKg/sVxElj3kQdE/clip_image010%25255B12%25255D_thumb.png?imgmax=800)
So Instead I used the service console to start the services.
Now I’ll go back to the FE And enable remote connectivity to Skype for Business from outside and make sure that replication works fine by checking the Topology or from cmdlet
![clip_image011[12]](http://lh3.googleusercontent.com/--81XceSIe_c/VdYwapyrNwI/AAAAAAAARKw/nJjgRjRECRU/clip_image011%25255B12%25255D_thumb.png?imgmax=800)
![clip_image012[12]](http://lh3.googleusercontent.com/-knPkcwaE_fk/VdYwehFka4I/AAAAAAAARLA/4Pux7LjsL5o/clip_image012%25255B12%25255D_thumb.png?imgmax=800)
After the replication is finished, I was able to login remotely with my Skype for Business on-premises accounts.
—
Setting up Hybrid integration with Skype online for Business (O365)
https://technet.microsoft.com/en-us/library/jj205126.aspx
https://technet.microsoft.com/en-us/library/jj204669.aspx
In order to allow Hybrid environment to function properly, we’ll have to federate our Skype for Business on-premises’s Edge server as Microsoft says below
Federation allows users in your on-premises deployment to communicate with Office 365 users in your organization. To configure federation, run the following cmdlets in the Skype for Business Server Management Shell:
From <https://technet.microsoft.com/en-us/library/jj205126.aspx>
On the front end server, we’ll run the following CMDlet
Set-CSAccessEdgeConfiguration -AllowOutsideUsers 1 -AllowFederatedUsers 1 -UseDnsSrvRouting -EnablePartnerDiscovery $true
![clip_image014[10]](http://lh3.googleusercontent.com/-jGYdAI06rxg/VdYwmXHC-yI/AAAAAAAARLg/r3RHKKg0ufs/clip_image014%25255B10%25255D_thumb.png?imgmax=800)
Next cmdlet will create a new public federated provider for skype for business online.. However it already exists by default as in the below snapshot but just to avoid any issues I will delete the default provider from control panel and recreate it again.
![clip_image015[10]](http://lh3.googleusercontent.com/-d3BghjKBZZI/VdYwqCxJzmI/AAAAAAAARLw/zqvjhDw2l0s/clip_image015%25255B10%25255D_thumb.png?imgmax=800)
I’ll delete the hosted provider “Skype for Business Online”
![clip_image016[10]](http://lh3.googleusercontent.com/-iBHqaOBtxII/VdYwumhIm9I/AAAAAAAARMA/S1mM3RW0A-M/clip_image016%25255B10%25255D_thumb.png?imgmax=800)
I’ll try the cmdlet again after deleting the provider ..
New-CSHostingProvider -Identity SkypeforBusinessOnline -ProxyFqdn “sipfed.online.lync.com” -Enabled $true -EnabledSharedAddressSpace $true -HostsOCSUsers $true -VerificationLevel UseSourceVerification -IsLocal $false -AutodiscoverUrl https://webdir.online.lync.com/Autodiscover/AutodiscoverService.svc/root
![clip_image017[10]](http://lh3.googleusercontent.com/-iXyllKI1qSc/VdYwyLyQ14I/AAAAAAAARMQ/46Xf9Doh1OM/clip_image017%25255B10%25255D_thumb.png?imgmax=800)
Since it worked already, I will go back to the control panel and make sure it is enabled
![clip_image018[10]](http://lh3.googleusercontent.com/-Q6V7rfHjIa4/VdYw1qzGdCI/AAAAAAAARMg/w8XCBhBTl-0/clip_image018%25255B10%25255D_thumb.png?imgmax=800)
Next is : Configure your Skype for Business Online tenant for a shared SIP address space
Note:
To configure a shared SIP address space, establish a remote PowerShell session with Skype for Business Online, and then run the following cmdlet:
We’ll have to download skype for business online powershell
After launching the PowerShell module as an administrator I’ll run the following cmdlet
Import-Module SkypeOnlineConnector
![clip_image019[8]](http://lh3.googleusercontent.com/-r8RrrLaFN5M/VdYw5J_r7sI/AAAAAAAARMw/TRU_Y-J2-Mo/clip_image019%25255B8%25255D_thumb.png?imgmax=800)
Now I’ll connect to my Office 365 tenant
![clip_image020[8]](http://lh3.googleusercontent.com/-GV6K3B-YSg4/VdYw8QbfjCI/AAAAAAAARNA/oZ8ghTMIJIw/clip_image020%25255B8%25255D_thumb.png?imgmax=800)
$cred = Get-Credential
$CSSession = New-CsOnlineSession -Credential $cred
Import-PSSession $CSSession -AllowClobber
![clip_image021[8]](http://lh3.googleusercontent.com/-Ionvc8QzB9U/VdYw_zm5XlI/AAAAAAAARNQ/1VhsAxQz3tY/clip_image021%25255B8%25255D_thumb.png?imgmax=800)
Now I’ll configure the shared sip address
Set-CsTenantFederationConfiguration -SharedSipAddressSpace $true
From <https://technet.microsoft.com/en-us/library/jj205126.aspx>
![clip_image001[22]](http://lh3.googleusercontent.com/---Grd1bS7qs/VdYxDHsm3fI/AAAAAAAARNg/uTscrS8M4sI/clip_image001%25255B22%25255D_thumb.png?imgmax=800)
To double check my configuration I will see if the SharedSipAddresSpace is enabled or not
Get-CsTenantFederationConfiguration
![clip_image002[22]](http://lh3.googleusercontent.com/-FoixBJkeY40/VdYxHItXTwI/AAAAAAAARN0/XwiQ6OH9lUg/clip_image002%25255B22%25255D_thumb.png?imgmax=800)
To double check that the hybrid configuration is setup properly we can use the Skype for business on-premises Hybrid UI wizard from the Home Menu under “Connection to Skype for Business Online”
![clip_image003[22]](http://lh3.googleusercontent.com/-uZUGh6ELGeo/VdYxLUZG2PI/AAAAAAAAROE/dJhtJsAR0wQ/clip_image003%25255B22%25255D_thumb.png?imgmax=800)
Using the Skype for Business 2015 User interface to setup Hybrid configuration:
After you sign in it does automatically logs you in and configure the three following options
- Federation for the Edge server
- Federation with Office 365.
- Shared SIP address space.
![clip_image004[22]](http://lh3.googleusercontent.com/-FMxX7lOOUUY/VdYxPg7i0mI/AAAAAAAAROU/8V4mYBOdFfQ/clip_image004%25255B22%25255D_thumb.png?imgmax=800)
![clip_image005[20]](http://lh3.googleusercontent.com/-x-HJjsgZJEA/VdYxTU3kEkI/AAAAAAAAROk/ZL34fjKWIVo/clip_image005%25255B20%25255D_thumb.png?imgmax=800)
Now I will configure my DNS Settings as recommended by Microsoft for the Hybrid Integration scenario
DNS Settings
When creating DNS SRV records for hybrid deployments, the records, _sipfederationtls._tcp.<domain> and _sip._tls.<domain>, should point to the on-premises Access Proxy.
From <https://technet.microsoft.com/en-us/library/jj205403.aspx>
- Update some DNS records to direct all SIP traffic to Skype for Business on-premises:
- The lyncdiscover.contoso.com A record to point to the FQDN of the on-premises reverse proxy server.
- Update the _sip._tls.contoso.com SRV record to resolve to the public IP or VIP address of the Access Edge service of Skype for Business on-premises.
- Update the _sipfederationtls._tcp.contoso.com SRV record to resolve to the public IP or VIP address of the Access Edge service of Skype for Business on-premises.
- If your organization uses split DNS (sometimes called “split-brain DNS”), make sure that users resolving names through the internal DNS zone are directed to the Front End Pool.
According to Microsoft’s configuration of the Public DNS, you will have to configure only the SRV records to point to your edge server however, running a simple wireshark on your Skype for business client machine you can notice the following:
![clip_image006[20]](http://lh3.googleusercontent.com/-iKDAe0GfahY/VdYxYS6H3QI/AAAAAAAARO0/2dqvH-0itc4/clip_image006%25255B20%25255D_thumb.png?imgmax=800)
Microsoft Lync / Skype client first requires the Lyncdiscover / Lyncdiscoverinternal record in order to see where the user is located… then gets redirected to webdir.online.lync.com which is the Cname value to the Lyncdiscover Cname in the public DNS and tries to login the user through Login.microsoftonline.com then finds no user there and logs in using the SRV eventually in the end as in the below snapshot which I’ve used Wireshark for to monitor the DNS traffic that the Lync Client requests upon login request.
![clip_image007[20]](http://lh3.googleusercontent.com/-499mJtyVASU/VdYxeZTyojI/AAAAAAAARPE/3vx3xctVbaM/clip_image007%25255B20%25255D_thumb.png?imgmax=800)
NOTE:
What have me confused here is that Microsoft says only SRV records must be pointing to your On-premises Lync/Skype for Business Edge server.. So you must enter something else other than SIP.domain.com (Which in normal cases might be the common name of your Edge certificate) for the value of the SRV Record since the SIP.domain.com and Lyncdiscover.domain.com must be pointing to Office 365.
I tried using the Public IP address of my Edge server just to check if my on-premises user will connect without any issue however I did have an issue with the Certificate saying “There was a problem verifying the certificate from the server”.
![clip_image008[20]](http://lh3.googleusercontent.com/-lGvrY3uhL7c/VdYxhk3qfvI/AAAAAAAARPU/Zk-Unt1BIPY/clip_image008%25255B20%25255D_thumb.png?imgmax=800)
Luckily the Public certificate that I had on my edge server had multiple SANs (Subject Alternative Names) and one of them was WAC.moh10ly.com which I was intending to use for the WAC Server (Office Web Apps Server) and then I created an A record on my public DNS WAC.moh10ly.com that points to my Edge server’s Public IP address…. although the Wac.moh10ly.com is not a common name but it worked and I was able to federate with Office 365 users and was able to move users from on-premises to office 365 and back to on-premises as demonstrated later in the article.
“When creating DNS SRV records for hybrid deployments, the records, _sipfederationtls._tcp.<domain> and _sip._tls.<domain>, should point to the on-premises Access Proxy.”
![clip_image009[14]](http://lh3.googleusercontent.com/-bjBLMPH3R1o/VdYxl5vfZYI/AAAAAAAARPk/6Kc0nUw9Q5c/clip_image009%25255B14%25255D_thumb.png?imgmax=800)
Now I have changed all the SRV records to direct to the new A record
![clip_image010[14]](http://lh3.googleusercontent.com/-6aB0cJA7h60/VdYxpN8RomI/AAAAAAAARP0/s1m3JI9QIFM/clip_image010%25255B14%25255D_thumb.png?imgmax=800)
And finally deleted the A sip record and created a new CNAME record that points to sipdir.online.lync.com
![clip_image011[14]](http://lh3.googleusercontent.com/-4joLGL8vaJ4/VdYxsjswwXI/AAAAAAAARQE/-Gr-StC06go/clip_image011%25255B14%25255D_thumb.png?imgmax=800)
![clip_image012[14]](http://lh3.googleusercontent.com/-fL6sGB14vK8/VdYxvy17c1I/AAAAAAAARQU/FRMpJxT4iuM/clip_image012%25255B14%25255D_thumb.png?imgmax=800)
I have already a user synced from my local AD to the cloud (office 365) that’s not enabled for Skype for business on-premises .. Once this user is synced and have been assigned a license it should be directly enabled for Skype for Business Online and I should be able to sign in to it without any issue.
Note:
In order for both users (homed online and On-premises) to see eachother’s presence the synced user must be enabled on the On-premises Server before moved to the cloud or else the presence and M will fail.
Time to test, I was able to sign in to the Online homed user (admin) and now I’ll be adding the on-premises homed user to the list to check the presence, IM ..etc
![clip_image001[24]](http://lh3.googleusercontent.com/-ykz2SQr8sGY/VdYx5DWr7iI/AAAAAAAARQk/48zwtMZjjWA/clip_image001%25255B24%25255D_thumb.png?imgmax=800)
Here I added the user admin to my other account Mohammed.hamada and vice versa.
![clip_image002[24]](http://lh3.googleusercontent.com/-INonbG-RYTQ/VdYx-N8_fnI/AAAAAAAARQ0/aiTHcXo9-5g/clip_image002%25255B24%25255D_thumb.png?imgmax=800)
The Presence appears to be working fine for user homed on-premises as it shows when I changed it to “busy, be right back..etc” on the cloud user’s Client however the Office 365 homed user’s presence takes time to change on the on-premises user’s list and the IM doesn’t seem to work properly as messages sometimes doesn’t go through and fail.
Sending a message from the on-premises User (Mohammed Hamada) to (ADMIN)
![clip_image003[24]](http://lh3.googleusercontent.com/-qa1xKJbYFRE/VdYyDtMvU6I/AAAAAAAARRE/_fH1iMkNB3I/clip_image003%25255B24%25255D_thumb.png?imgmax=800)
Now sending an IM from Admin to Mohammed Hamada
![clip_image004[24]](http://lh3.googleusercontent.com/-DJVgWbJd-sE/VdYyHK_2OYI/AAAAAAAARRU/i1d-M_ngRYI/clip_image004%25255B24%25255D_thumb.png?imgmax=800)
To make sure that the issue is not within my on-premises server, I will use a different Skype for Business online account and see if IM work both ways.
This is my other user.. The presence information seems to work properly and now I’ll test the IM
![clip_image005[22]](http://lh3.googleusercontent.com/-wyppRre3Ch0/VdYyM4c__OI/AAAAAAAARRk/UURRTjLtBCI/clip_image005%25255B22%25255D_thumb.png?imgmax=800)
IM between my On-premises and another user on another Office 365 tenant seems to be working fine back and forth as in the below snapshots so the issue might be related to Office 365 tenant which I am using for this test (could be related to trial version)
I am going to open a case with MS and see why this issue happens since my on-premises work fine with other tenants.
![clip_image006[22]](http://lh3.googleusercontent.com/-dx4lvmcMDpM/VdYyRv6jHOI/AAAAAAAARR0/ny5Oubvg7B4/clip_image006%25255B22%25255D_thumb.png?imgmax=800)
![clip_image007[22]](http://lh3.googleusercontent.com/-FcKRl1xeL84/VdYyVUYuPQI/AAAAAAAARSI/IDplqROIUOo/clip_image007%25255B22%25255D_thumb.png?imgmax=800)
Now It’s time to move users from and to cloud and on-premises to check how easy, flexible or hard this process is.
I currently have 2 users, one on cloud and one synced and homed online (Office 365)
![clip_image008[22]](http://lh3.googleusercontent.com/-MojC5Pnp7Ec/VdYyZM7EIfI/AAAAAAAARSY/g_lRXSDxkNA/clip_image008%25255B22%25255D_thumb.png?imgmax=800)
In order to move users, you can go to Users tab after the hybrid config is finished and find the user you want to move then click on Actions and chose to move the users to the Skype for Business Online as in the below snapshot
Note:
Before you move the user to Office 365, you must assign license to the user or else the move will fail.
![clip_image009[16]](http://lh3.googleusercontent.com/-vj4sDjWXbLY/VdYyddfdM-I/AAAAAAAARSo/6GaIXKkt9Q8/clip_image009%25255B16%25255D_thumb.png?imgmax=800)
![clip_image010[16]](http://lh3.googleusercontent.com/-TtlHi6ukXok/VdYyhPQa1UI/AAAAAAAARS4/miZAvJOXHFA/clip_image010%25255B16%25255D_thumb.png?imgmax=800)
![clip_image011[16]](http://lh3.googleusercontent.com/-L-__7dks3nI/VdYykgpQuII/AAAAAAAARTI/d-I2eDfCOlI/clip_image011%25255B16%25255D_thumb.png?imgmax=800)
![clip_image012[16]](http://lh3.googleusercontent.com/-Lv2ffy8xH88/VdYyoAd1OhI/AAAAAAAARTY/MjVrWM8LF1s/clip_image012%25255B16%25255D_thumb.png?imgmax=800)
![clip_image013[12]](http://lh3.googleusercontent.com/-X4IpS04KceY/VdYyrWhTOPI/AAAAAAAARTo/dVDkIzhtBGQ/clip_image013%25255B12%25255D_thumb.png?imgmax=800)
You can move the user back from Office 365 to your on-premises Skype for Business server with the same process exactly except that you’ll have to choose which pool you need to move the user to.
Checking where the user is hosted from Skype for business Management shell
The Hosting Provider will show you where the user is working from now.
![clip_image014[12]](http://lh3.googleusercontent.com/-6iUvN0I4D84/VdYyvRtvC3I/AAAAAAAART4/1dYRAK4REbE/clip_image014%25255B12%25255D_thumb.png?imgmax=800)
![clip_image015[12]](http://lh3.googleusercontent.com/-qMyDa4Y7In0/VdYyy5Vx7BI/AAAAAAAARUI/_HH4uuiiLPA/clip_image015%25255B12%25255D_thumb.png?imgmax=800)
![clip_image016[12]](http://lh3.googleusercontent.com/-U1NYvxtHvy0/VdYy2NCq_4I/AAAAAAAARUY/yzsw5P091pY/clip_image016%25255B12%25255D_thumb.png?imgmax=800)
Hope this has been helpful
References:
https://technet.microsoft.com/en-us/library/jj204967.aspx
https://technet.microsoft.com/en-us/library/jj205403.aspx
https://technet.microsoft.com/en-us/library/jj205126.aspx
https://technet.microsoft.com/en-us/library/jj204669.aspx
https://channel9.msdn.com/Events/Ignite/2015/BRK4129
Hi Mohammed,
Interesting article… .
I was wondering since you mention Lync 2013 FE as next hop pool for the Skype Edge: is this actually working?
I’m considering to temporarily use this kind of setup before migrating a Lync Front-End to a Skype Front-End.
Thx,
Vincent
UC Consultant
Hi Vincent,
Normally it should point to Skype For business Frontend (The new FE) since this will proxy the connection for non-migrated users to the old Lync FE however, in my case when I did the migration it also worked if you set the next hop as the old Lync FE server.
God bless you