Category Archives: Microsoft

Messaging and Collaboration, Sharepoint.. etc

Microsoft Exchange Vulnerability affects all Exchange versions

image

CVE-2020-0688 | Microsoft Exchange Validation Key Remote Code Execution Vulnerability

Security Vulnerability

Date of Publishing: February/11/2020

Microsoft has announced a vulnerability has been found in all Exchange Server 2010 through 2019 versions, The vulnerability allows an attack to send a specially crafted request to the affected server in order to exploit it.

When could this happen?

A remote code execution vulnerability exists in Microsoft Exchange Server when the server fails to properly create unique keys at install time.

Knowledge of a the validation key allows an authenticated user with a mailbox to pass arbitrary objects to be deserialized by the web application, which runs as SYSTEM.

The security update addresses the vulnerability by correcting how Microsoft Exchange creates the keys during install.

Affected Versions:

  • Microsoft Exchange Server 2010 Service Pack 3 Update Rollup 30
  • Microsoft Exchange Server 2013 Cumulative Update 23   
  • Microsoft Exchange Server 2016 Cumulative Update 14   
  • Microsoft Exchange Server 2016 Cumulative Update 15   
  • Microsoft Exchange Server 2019 Cumulative Update 3   
  • Microsoft Exchange Server 2019 Cumulative Update 4

image

Solution:

Until now Microsoft has not provided any solution or work around to cover this vulnerability.

Mitigations

Microsoft has not identified any mitigating factors for this vulnerability.

Workarounds

Microsoft has not identified any workarounds for this vulnerability.

NOTE:

Keep an eye on the below link for any change

https://portal.msrc.microsoft.com/en-US/security-guidance/advisory/CVE-2020-0688

Microsoft Windows 10 security updates KB4532695 and KB4528760 causes TPM driver to fail and results in windows 10 BSOD

Update: For the solution scroll to the end of the page.

Windows 10 Update :

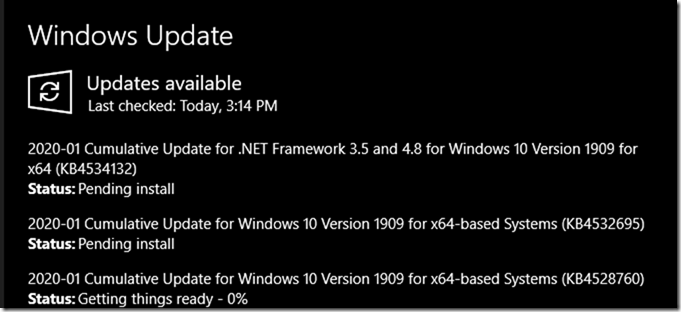
Yesterday and today Microsoft released KB4532695 and KB4528760 causes TPM 2.0 driver to stop functioning and causes BSOD with error “Memory Management” Issue.

clip_image001

image

Windows Hello Face Authentication

In the first KB Microsoft says they have improved the accuracy of Windows Hello Face authentication however this would cause your PIN to be reset, TPM driver stop functioning and BitLocker to change in Pause state.

Check KB Article here

clip_image001[4]

image

The BSOD will generate an event ID 1001 stating the bugcheck code and saves a dump. ( I haven’t analyzed that yet).

clip_image001[6]

After Uninstalling the updates it was a no go but at least the Memory Management BSOD stopped..

Interesting thing is that not just TPM stopped, now even Virtual Box says no Virtualization Capabilities supported on my Device which I had over 20 VMs on it and was working fine also before these updates.

The TPM is indeed firmware as it’s fixed on the board..

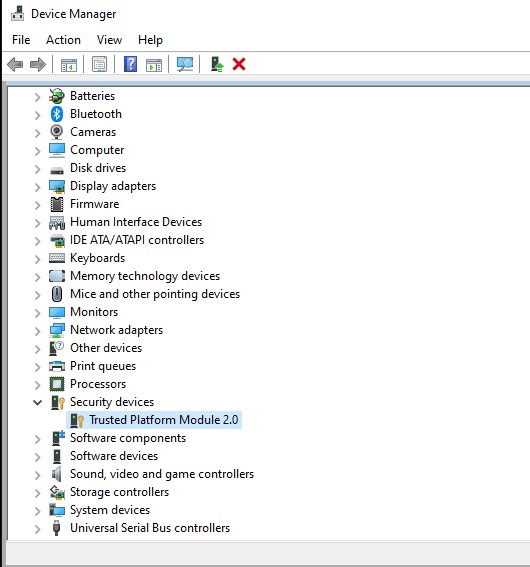
In the event viewer related to Device Manager (Trusted Platform Module 2.0) I see couple of errors sourced from Kernel-PnP and UserPnp

KernelPnp error

Device ACPI\MSFT0101\1 had a problem starting.

Driver Name: tpm.inf
Class Guid: {d94ee5d8-d189-4994-83d2-f68d7d41b0e6}
Service: TPM
Lower Filters:
Upper Filters:
Problem: 0xA
Problem Status: 0xC0000001

—-

Device ACPI\MSFT0101\1 was configured.

Driver Name: tpm.inf
Class Guid: {d94ee5d8-d189-4994-83d2-f68d7d41b0e6}
Driver Date: 06/21/2006
Driver Version: 10.0.18362.267
Driver Provider: Microsoft
Driver Section: Tpm2BaseInstall
Driver Rank: 0xFF0002
Matching Device Id: *MSFT0101
Outranked Drivers: tpm.inf:ACPI\MSFT0101:00FF0001
Device Updated: true
Parent Device: ACPI_HAL\PNP0C08\0

—-

UserPnp (Informational event) happens after Kernel-Pnp fail

Driver Management concluded the process to install driver tpm.inf_amd64_aaaa339206cb706e for Device Instance ID ACPI\MSFT0101\1 with the following status: 0x0.

Solution:

After two days of struggling I managed to find the solution.

Disable Device Guard from Group Policy and PowerShell.

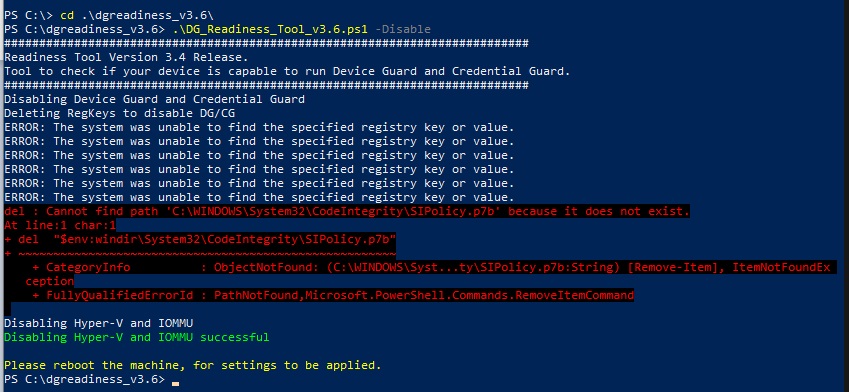
  • To disable from PowerShell you’ll need to download the Device Guard and Credential Guard hardware readiness tool which contains a script that would disable/enable Device Guard.
  • Use the following cmdlet .\DG_Readiness_Tool_v3.6.ps1 -Disable after extracting the the DG readiness tools from the link below

https://www.microsoft.com/en-us/download/details.aspx?id=53337

  • From Run type gpedit.msc and launch Group Policy then navigate to Computer Configuration > Administrative Templates > System > Device Guard and set “Turn On Virtualization Based Security” To Not Configured.

Once this is done, Restart your Computer and Press F3 to disable Device Gaurd twice. When restarting the Computer will restart again and you’ll see that your TPM is back to normal.

Upgrading Exchange Online PowerShell to V2 Module

Managing Exchange Online

If you have Exchange Online and your users are MFA enabled then you most likely will be using Exchange Online’ s ECP (Exchange Control Panel or Admin Center) to connect to Exchange Online PowerShell through the Hybrid Windows since this is the only supported way with MFA.

image

Clicking on Configure would install the PowerShell Module of Exchange Online which looks like the below screenshot.

image

New PowerShell with MFA support

If you have launched Exchange Online PowerShell today then you most likely have noticed there’s a red line stating the possibility to try the new (Preview Version) of Exchange PowerShell V2 .

Microsoft has recently released a new version of Exchange Online PowerShell Module which supports MFA and can be run directly from your computer without the need to login to Exchange Online Admin Center and download any files from there.  Check details in this link

As stated in the article, the Module is just in preview so it has some known and maybe unknown bugs as well.

How to Install it?

The installation process is pretty straightforward, Launch Windows PowerShel as an Administrator (It’s required for the installation).

Run these 4 cmdlets

Set-ExecutionPolicy RemoteSigned
Install-Module PowershellGet –Force
Update-Module PowershellGet
Install-Module -Name ExchangeOnlineManagement

image

You might get a warning that the Module you’re about to install is from an Untrusted Repository, Accept it by typing Y and hit enter

Type the following cmdlet to ensure that Exchange Online Management module is installed

Import-Module ExchangeOnlineManagement; Get-Module ExchangeOnlineManagement

image

Connecting to Exchange Online

To connect to Exchange Online, Run the following cmdlet along with the new parameter –EnableErrorReporting which gives the ability to record all the cmdlets that you have run along with errors generated as well.

Connect-ExchangeOnline -EnableErrorReporting -LogDirectoryPath e:\ExchOnlineLogs.txt -LogLevel All

image

image

After connecting, I am going to try and run two commands the Old Cmdlets and New Cmdlet and see the difference between them:

Get-CASMailbox -ResultSize 10
Get-EXOCasMailbox -ResultSize 10

image

The new Cmdlet has much more details, although it says that it runs faster but it took few seconds more than the old one to run (Probably first time).

image

After you run those two Cmdlets, There will be two files generated in the log directory which we have pointed the parameter to save files to.

The CSV files have details about the two cmdlets and the HTTP Method they are utilizing in order to connect along the Request and response latency.

imageimage

This new version seems to be extremely useful esp in environments where such deep details are needed for troubleshooting issues.

Stay tuned for more

Reference:

https://docs.microsoft.com/en-us/powershell/exchange/exchange-online/exchange-online-powershell-v2/exchange-online-powershell-v2?view=exchange-ps

Warning for millions of Windows 10 users

The “Windows List” website, which follows the news of the famous operating system “Windows 10“, issued a warning to the users of the Operating system after it monitored a new security update for the operating system, which is “KB4528760” causing serious problems, noting that the problem “appears to be widespread now.”

Related image

In its interpretation of the sequence of events, the site says that this update initially fails to install on the device, issuing “a number of general error messages” that do not provide any indication of the cause of the problem, then the problem escalates as the next time you restart the computer it fails to boot .

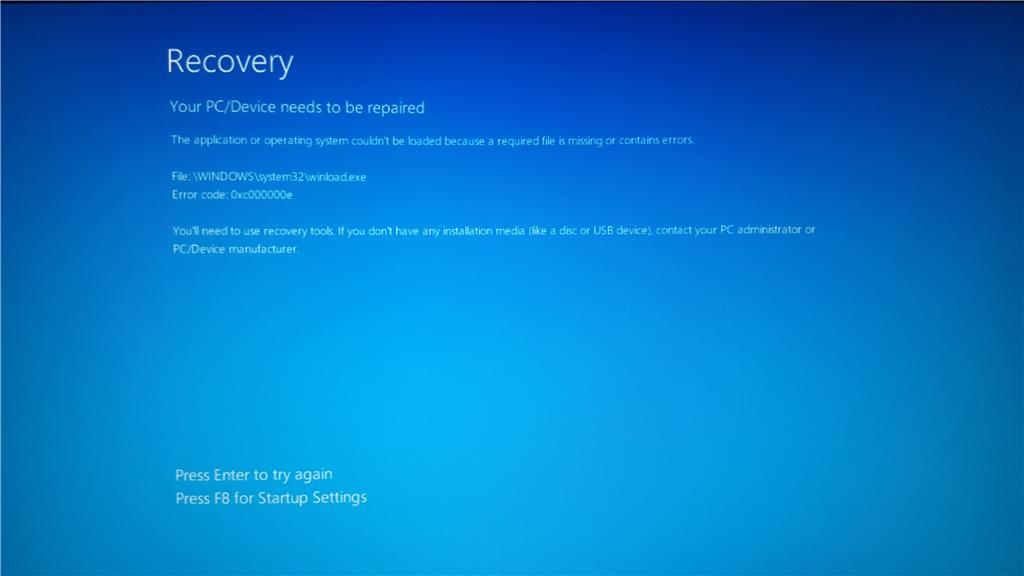
“The recent update KB4528760 for Windows 1909 (the Windows build version number) appears to cause problems with some computers and prevents them from Starting up, causing the oxcooooooe error code. The number of devices affected by this problem has increased after installing this update,” says a user on the official Microsoft Community Forum. .

Image result for windows 10 error code oxcooooooe

Some users attribute the problem to Microsoft’s Connect app, which the company has terminated. Although it is not the only scenario of the cause of the problem, the users who installed the app or had it installed and then uninstalled it, have been particularly severely affected. It is only Windows Vista that completely re-installs the Windows 10 operating system.

What increases the importance of the warning issued by “Windows Light” is precisely that Microsoft is not yet aware of this problem. Indeed, until the moment the company states on the support page of the latest update that it is “currently not aware of any problems with this update.”

This is a recurring series of slow responses in recent years, as Windows 10 users have experienced problems caused by system updates, and this is disappointing because it encourages users to continue to download the update that might harm their computers

The good thing here is that Microsoft is working on substantive modifications to improve the updates of “Windows 10”, but the bad thing is that the process of testing the modifications in its entirety is fundamentally flawed, according to the site mentioned

Deploy Azure Linux and Windows servers in 10 mins via cli

This is a step by step guide about deploying Linux or Windows servers on Azure via CLI.

Why Cli?

Some people prefer using Linux rather than PowerShell and it seems sometimes easier and faster to learn esp if you’re not GUI type of person.

Installation Options

If you’re working on Windows and would like to use CLI, you’ll have two options to install CLI

Option 1

Run Azure CLI installation directly from your Powershell (PowerShell needs to run from a privileged account)

Invoke-WebRequest -Uri https://aka.ms/installazurecliwindows -OutFile .\AzureCLI.msi; Start-Process msiexec.exe -Wait -ArgumentList ‘/I AzureCLI.msi /quiet’

As soon as you run this command, it’ll take about 5 mins or less depending on the connection you have.

clip_image001

Option 2

Download the MSI file directly from MS’s link and install it on your Computer.

https://docs.microsoft.com/en-us/cli/azure/install-azure-cli-windows?view=azure-cli-latest

Connect to Azure CLI from PowerShell

Run PowerShell or CMD and type the following command to connect

Az Login then hit enter

As soon as you type this, a web page will be launched asking you for your Azure Account credentials so open the session for your Cli window.

The moment you verified your account, PowerShell will list your azure plans that you have / had before.
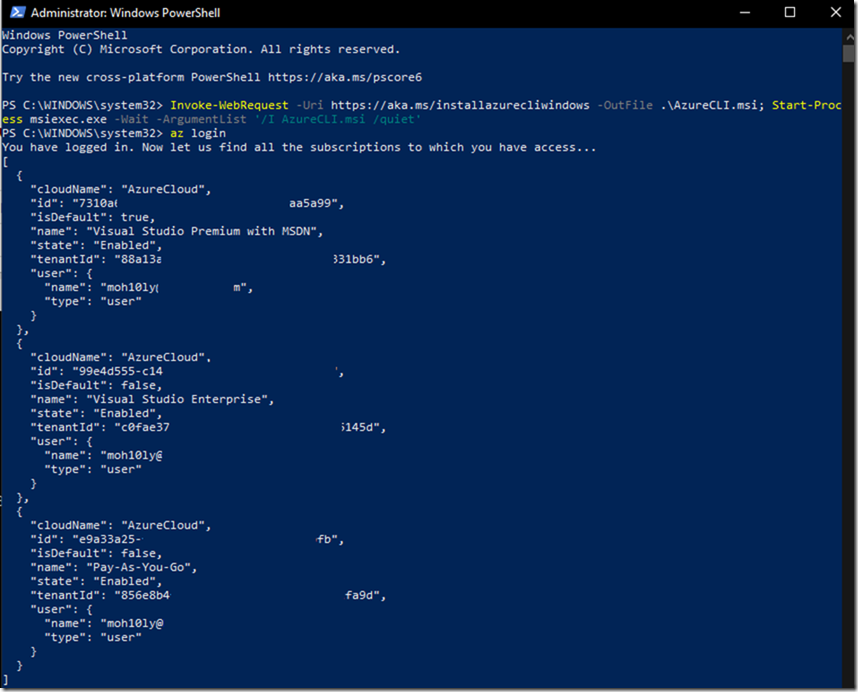
clip_image002

If you’re going to use Linux (Ubuntu, Debian) flavor then you’d have to following the following instructions

Manual install instructions

If you don’t want to run a script as superuser or the all-in-one script fails, follow these steps to install the Azure CLI.

  1. Get packages needed for the install process:

    bash


    sudo apt-get update
    sudo apt-get install ca-certificates curl apt-transport-https lsb-release gnupg
  2. Download and install the Microsoft signing key:

    bash


    curl -sL https://packages.microsoft.com/keys/microsoft.asc |
        gpg --dearmor |
        sudo tee /etc/apt/trusted.gpg.d/microsoft.asc.gpg > /dev/null
  3. Add the Azure CLI software repository:

    bash


    AZ_REPO=$(lsb_release -cs)
    echo "deb [arch=amd64] https://packages.microsoft.com/repos/azure-cli/ $AZ_REPO main" |
        sudo tee /etc/apt/sources.list.d/azure-cli.list
  4. Update repository information and install the

    azure-cli

    package:

    bash


    sudo apt-get update
    sudo apt-get install azure-cli

Run the Azure CLI with the

az

command. To sign in, use the az login command.

  1. Run the

    login

    command.

    Azure CLI

    Try It


    az login

    If the CLI can open your default browser, it will do so and load an Azure sign-in page.

    Otherwise, open a browser page at https://aka.ms/devicelogin and enter the authorization code displayed in your terminal.

  2. Sign in with your account credentials in the browser.

To learn more about different authentication methods, see Sign in with Azure CLI.

Deploying Linux (CentOS):

Creating a Resource Group for Azure Container Instances (ACI)

We will start first by creating a Resource Group for our Machine, calling it a AzureLinuxServersGroup to easily identify that this group contains our Linux Servers

az group create –name AzureLinuxServersGroup –location westeurope

clip_image001[4]

Next we will be creating a container to contain the Linux OS on the resource group which we have just created

First, How we know which Image to use and if that will be proper for our deployment?

To answer that, we will use the following command which will view the available latest edition Linux OS with different flavors.

I would like to use CentOS since its identical to RedHat and used by majority of Enterprises.

To list the Images, Enter the following command

az vm image list –output table

clip_image002[4]

Notice there are many columns, The one which we are going to use in terminal command line is the UrnAlias. It’s important to remember this.

az vm create \

–resource-group AzureLinuxServersGroup \

–name AzureCentOSWP \

–image CentOS \

–admin-username Moh10lyUser \

–generate-ssh-keys

clip_image003

Since we are using Bash, It’s a case sensitive and it complained about user having capital letters. So we’ll go ahead and use small letters

clip_image004

After running the command with small letters, it’s telling us where we can find the keys in order for us to reach and get them to use later to login to this newly created machine.

SSH key files ‘/home/moh10ly/.ssh/id_rsa’ and ‘/home/moh10ly/.ssh/id_rsa.pub’ have been generated under ~/.ssh to allow SSH access to the VM. If using machines without permanent storage, back up your keys to a safe location.

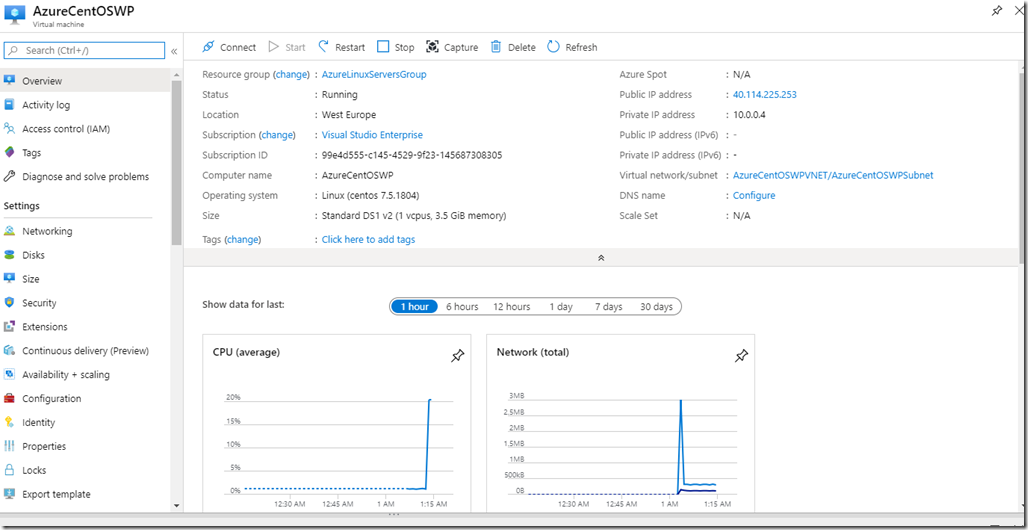
The deployment of the machine takes about 3 mins, and it’ll be created with the default minimum resources. Let’s view

clip_image005

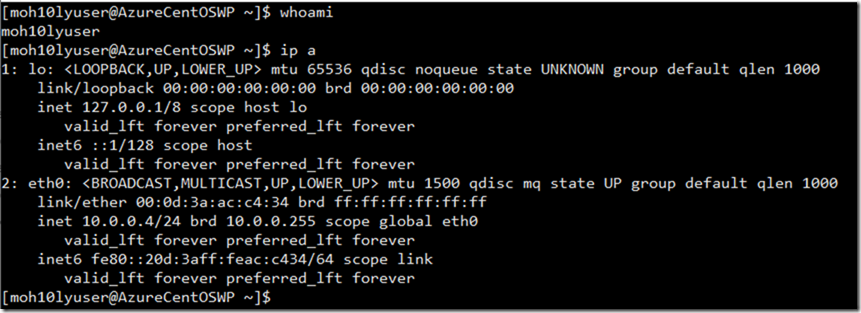
Our machine is ready to be accessed now

clip_image006

In order for you to get the SSH Keys, you’ll have to have a bit of knowledge

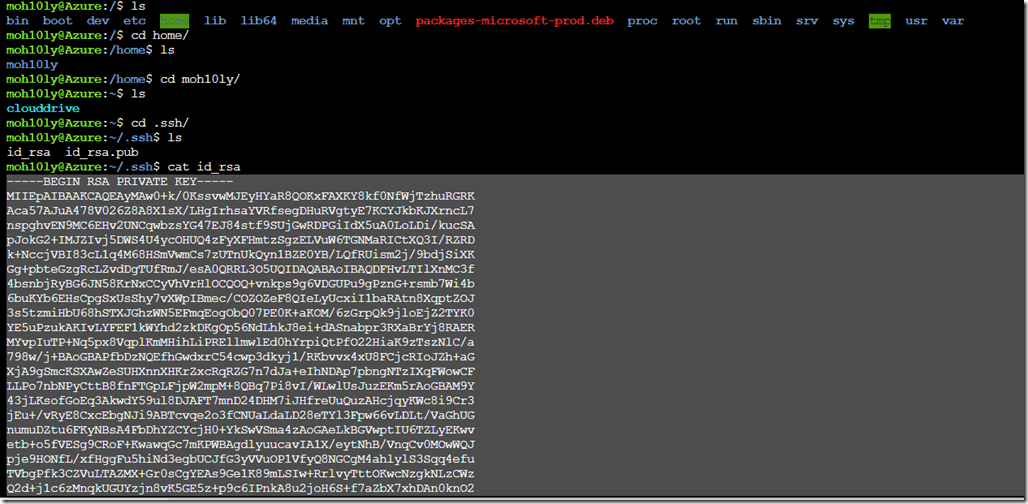
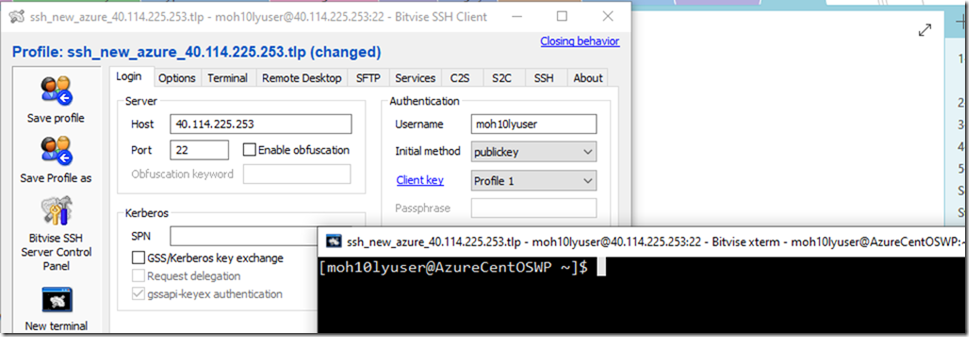
I am going to go the location mentioned previously after creating a machine and copy the keys from the bash screen into a file. Save the file and Import it into SSH client which I will be using (Bitvise in my case).

From the bash screen goto cd /

Cd /home/user/.ssh/

Cat id_rsa hit enter and copy the key and save it into notepad.

Cat id_rsa.pub and copy/save into a notepad as the public key.
clip_image007

After loading both keys, I was able to successfully login to the Server
clip_image008

clip_image009

clip_image010

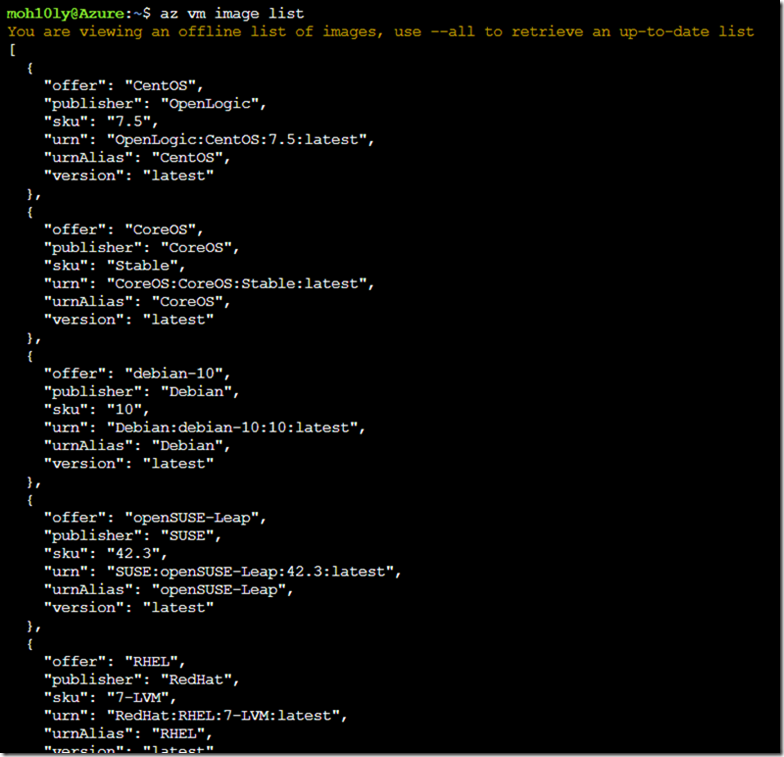
Get a list of Azure VMS

az vm image list
clip_image011

Let’s List and deploy a WordPress on CentOS

To view the list of available CentOS images, we’ll use the following cli command

az vm image list -f CentOS –all

The image needs to be grabbed from dockerhub URL

cognosys:wordpress-with-centos-77-free:wordpress-with-centos-77-free:1.2019.1008

az container create –resource-group mohazbackupgroup –name mohcontainer –os-type Linux –image cognosys:wordpress-with-centos-77-free:wordpress-with-centos-77-free:1.2019.1008 –dns-name-label azmohlinux –ports 22

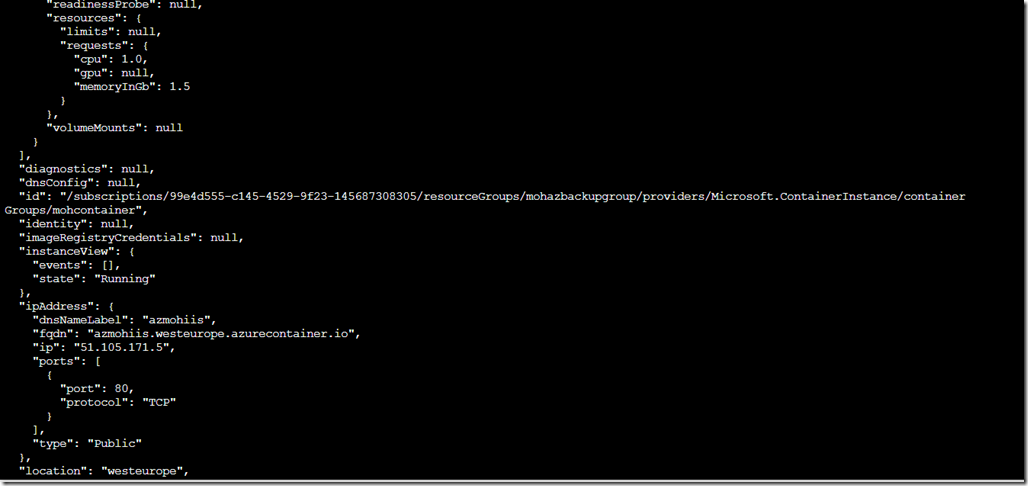
Create Windows Server core with IIS

az container create –resource-group mohazbackupgroup –name mohcontainer –os-type windows –image mcr.microsoft.com/windoervercore/centos –dns-name-label azmohlinux –ports 22ws/servercore/iis:nanoserver –dns-name-label azmohiis –ports 80

clip_image012

Here we go I got a machine ready (took about 5 mins)
clip_image013

azmohiis.westeurope.azurecontainer.io

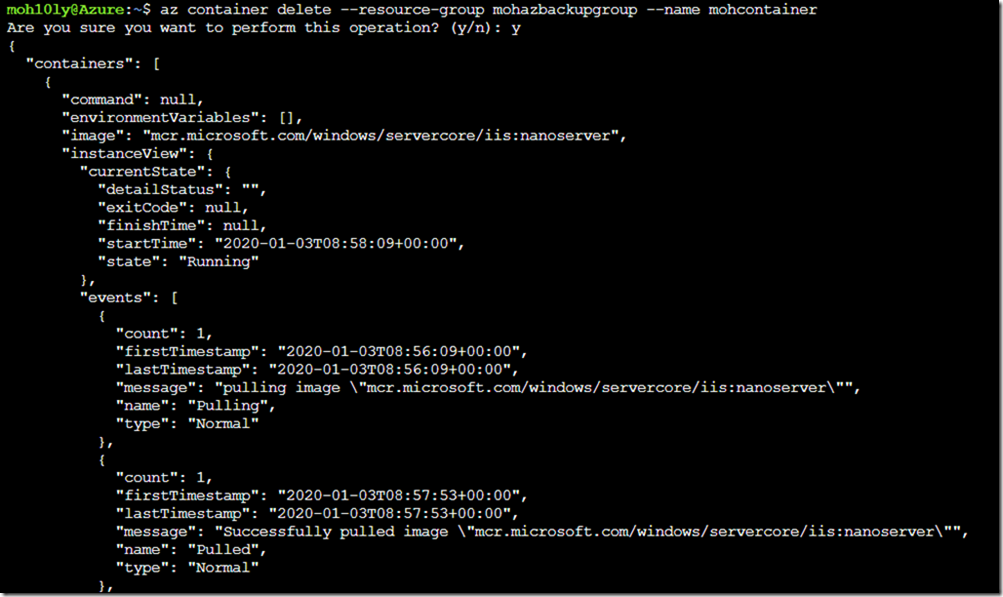
To delete the container, you can write the following

az container delete –resource-group mohazbackupgroup –name mohcontainer

clip_image014

clip_image015

Stay tuned for more articles about Azure.

Microsoft exposes a security issue that affects millions of Windows 10 computers, RDP and DHCP on win2008R2

Windows 10 Crypto API Spoofing

Microsoft has released a new security patch for a vulnerability that could affect millions of Windows 10 Users world wide.

A decades old API

The decades old CryptoAPI tool validates and signs packages/software which could be utilized by hackers/developers to sign and execute illegitimate software thus would allow users to run anything without user’s nor Antivirus/Internet Security software’s notice.

Microsoft mentioned that the vulnerability could also allow hackers to change or modify encrypted communications.

It’s important to mention that CryptoAPI is a legacy API that’s being replaced by a new CNG (Cryptography Next Generation API) which also supports CryptoAPI.

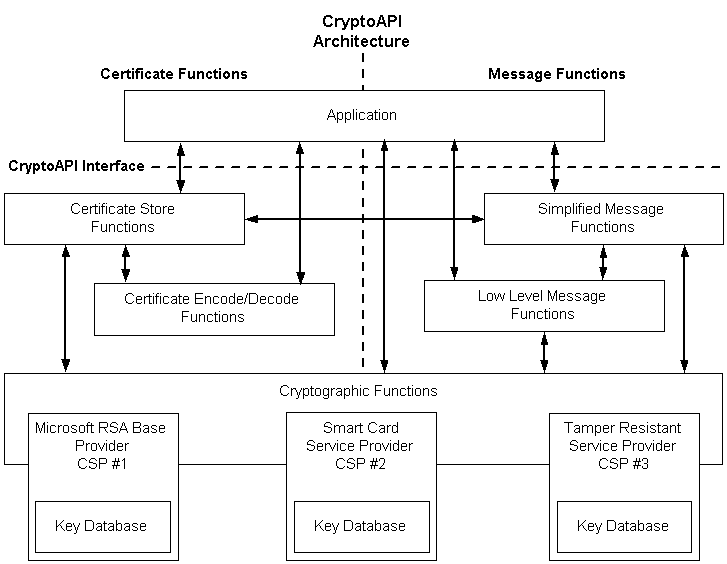
CryptoAPI Key Storage Architecture

cryptoapi architecture

Download Patch

Direct Download

https://www.catalog.update.microsoft.com/Search.aspx?q=KB4528760

CVE

https://portal.msrc.microsoft.com/en-US/security-guidance/advisory/CVE-2020-0601

Windows 2008 R2, Windows 7 RDP

A day ago Microsoft released two very important security patches on May 14, 2019.

One of these patches has been detected in the RDP service (CVE-2019-0708) which affects Windows 7 and Windows 2008 R2.

According to MS’s Article a remote code execution vulnerability exists in Remote Desktop Services – formerly known as Terminal Services – when an unauthenticated attacker connects to the target system using RDP and sends specially crafted requests.

No Authentication or Interaction needed

This vulnerability is pre-authentication and requires no user interaction. An attacker who successfully exploited this vulnerability could execute arbitrary code on the target system.

An attacker could then install programs; view, change, or delete data; or create new accounts with full user rights.

When look at CVE-2019-0708, which is related to the RDP service, we see that attackers are able to run code on systems by sending specially produced packages without any user interaction and authentication and manage to install malware like Ransomware or other execution files.

Download Patch

https://portal.msrc.microsoft.com/en-US/security-guidance/advisory/CVE-2019-0708

Windows 2008R2, 2012R2, 2016 and 2019 DHCP

The other one is in the DHCP service (CVE-2019-0725), and both vulnerabilities are very critical.

A memory corruption vulnerability exists in the Windows Server DHCP service when processing specially crafted packets. An attacker who successfully exploited the vulnerability could run arbitrary code on the DHCP server.

Download Patch

https://portal.msrc.microsoft.com/en-US/security-guidance/advisory/CVE-2019-0725

Sources:

Microsoft, NSA, Other Security Researchers

Setting up SoftEther VPN with Most Secure Settings:

Why VPN?

Before reading this article or going through it maybe you want to know why you’re supposed to use VPN wherever you go ?

If you use one of the following on your computer/Phone/Tablet then you must use VPN

  • Online Banking?
  • Paying Bills?
  • Purchasing online Services?
  • Checking Private Emails?
  • Connecting to work Email?

The list goes on and on and won’t probably end with only those, But the most important thing to acknowledge that nowadays there is absolutely nothing safe on the Internet World. Your data could be exposed, hacked at anytime anywhere and esp if you go to public Internet places e.g. (Starbucks, University, Your Friend’s home even).

So what is SoftEther VPN Server/Client?

As introduced by Softether itself, SoftEther VPN (“SoftEther” means “Software Ethernet”) is one of the world’s most powerful and easy-to-use multi-protocol VPN software. It runs on Windows, Linux, Mac, FreeBSD and Solaris.

SoftEther VPN is open source. You can use SoftEther for any personal or commercial use for free charge.

clip_image001

Clients

SoftEther VPN is an optimum alternative to OpenVPN and Microsoft’s VPN servers. SoftEther VPN has a clone-function of OpenVPN Server. You can integrate from OpenVPN to SoftEther VPN smoothly. SoftEther VPN is faster than OpenVPN. SoftEther VPN also supports Microsoft SSTP VPN for Windows Vista / 7 / 8. No more need to pay expensive charges for Windows Server license for Remote-Access VPN function.

Use:

SoftEther VPN can be used to realize BYOD (Bring your own device) on your business. If you have smartphones, tablets or laptop PCs, SoftEther VPN’s L2TP/IPsec server function will help you to establish a remote-access VPN from your local network. SoftEther VPN’s L2TP VPN Server has strong compatible with Windows, Mac, iOS and Android.

Download

Download the Windows Server version of Softether from the following Page:

https://www.softether-download.com/en.aspx?product=softether

Installation Requirements:

  • Windows Server/Windows 10
  • 4GB RAM
  • 100 GB Disk
  • 2 VCPU

These resources are estimated and not calculated, It’s only in case of small amount of users (Max 100 User). If you’re going to use more than that you’ll have to check depending on how many concurrent connections are there going to be.

Installation Steps:

As soon as you start Softether VPN – Create new Connection and set the password for the Administrator

clip_image002

clip_image003

Configure Softether as Remote Access VPN Server

I am going to setup new Remote Access VPN Server:

clip_image004

clip_image005

This will create a new Virtual Hub, Give it whatever name you want.

clip_image006

If you have no Static Public IP address

Set a dynamic DNS function name, This is useful in case the IP you have keeps changing like in the case of ADSL connections at home ..etc

clip_image007

VPN Type:

In the IPSEC/L2TP/EtherIP /L2TPv3 Server settings, you’ll need to choose the most secure VPN connection to allow your users to safely and securely browse the internet. This needs L2TP server function to be enabled along with setting the Ipsec Pre-Shared key to provide the most secure VPN connectivity.

clip_image008

AZURE Settings:

If you don’t have access to Firewall to configure NAT, or configure your firewall access to the Softthere VPN Server you must enable this feature (VPN Azure Cloud VPN Service (Free) by the Japanese University of Subuka.

clip_image009

We have set the Azure hostname previously already so no need to change it unless you wanna use something else.

clip_image010

Creating Users

clip_image011

I will create a user, assign it to my admins group, then Create a Certificate for this user to login to make sure I have the maximum security and authentication methods offered.

Creating Certificate

Since I already have created the root certificate, I Am going to create a client certificate for this particular user from the root certificate.

clip_image012

clip_image013

Finally user is created

clip_image014

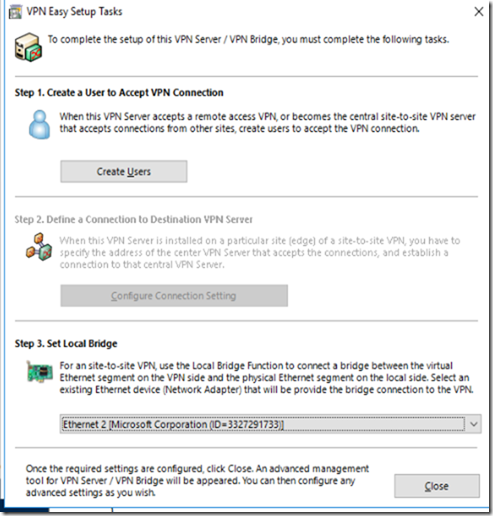
Choosing the right connection to set as Local Bridge

I need to make sure to choose the NIC which reflects my internet outbound NIC in order to connect properly (In my case it’s going to be Ethernet 2)

clip_image015

clip_image016

clip_image017

Using the most secure Encryption Algorithm for our connection

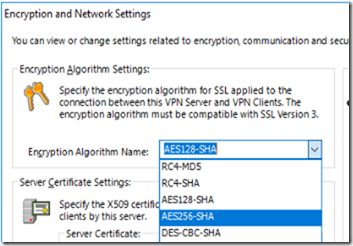
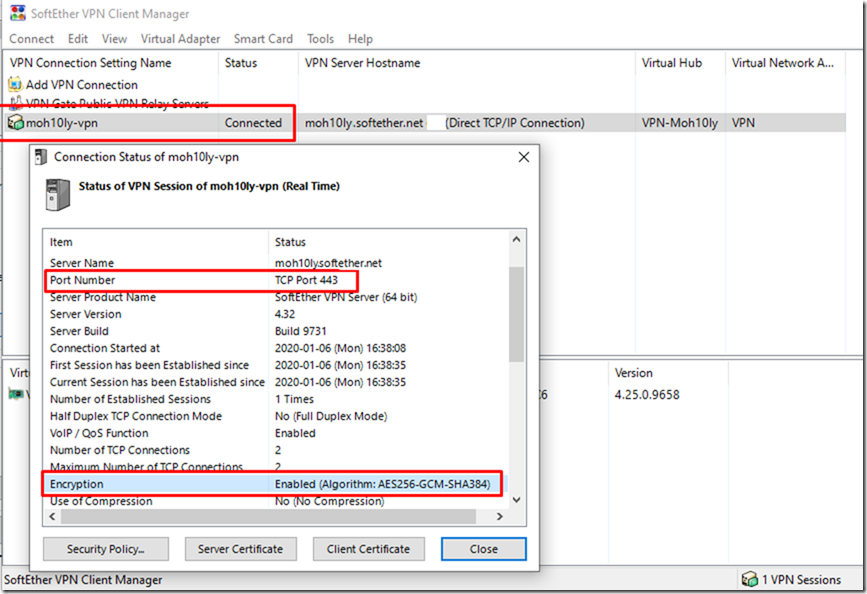
By default Softether uses AES128-SHA, while this is considered secured and used by most common VPN service providers it’s always better to use something that’s level or more secure. So we are going to change the default changes to AES256-GCM-SHA384

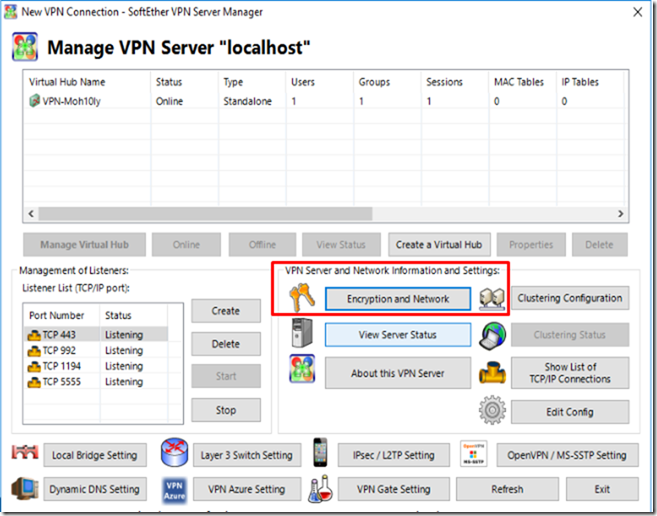
To change those settings, Navigate to the main menu of Softether VPN Server Manager and click on “Encryption and Network”

clip_image018

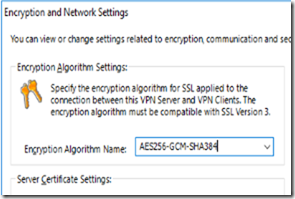
Change the “Encryption Algorithm Name:” to AES256-GCM-SHA384

AES256-GCM-SHA384 is based on the cipher suite TLSv 1.3 which is considered the most recent and secure cipher suite that’s being used right now.

Default Setting:

clip_image019

Change to

clip_image020

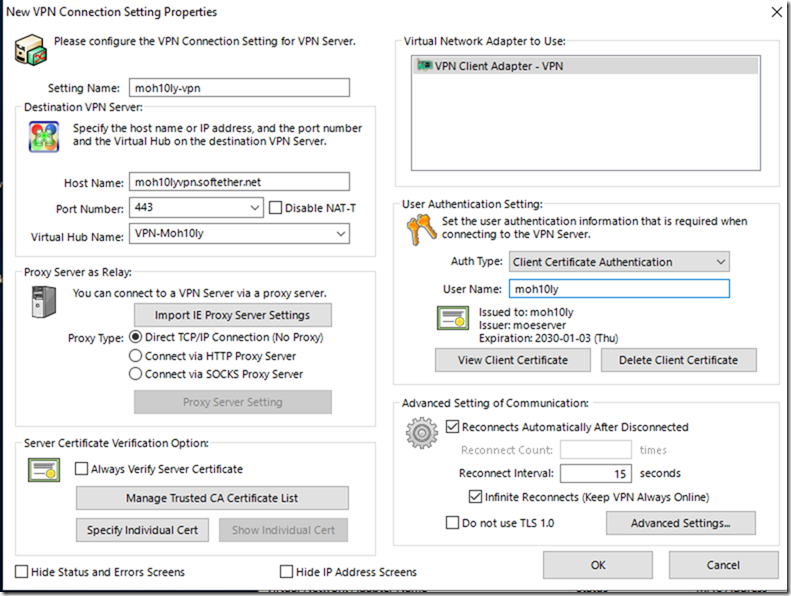
Client Configuration:

  • In the setting name: we are going to enter a random name.
  • The hostname: will be the name which we created previously for Dynamic IP cases. This will be useful to remember even If you have a static Public IP address.
  • User Authentication Setting: We will be using the certificate which I created before (I copied this cert to my client computer where I am going to connect via the VPN client manager).
  • Virtual Hub Name: Here you’ll need to copy the exact name of the Virtual Hub name which you have created on the server side.

clip_image021

clip_image022

Connectivity Test:

After settings everything, I am going to try and connect with my user using Certificate and the Password I set.

clip_image023

Ref:

https://www.softether.org/

https://wiki.mozilla.org/Security/Server_Side_TLS

https://www.softether.org/4-docs/1-manual/3._SoftEther_VPN_Server_Manual/3.3_VPN_Server_Administration#3.3.6_Listener_Ports

https://www.iplocation.net/encryption

kms Server Deployment step by step Guide

So What is KMS ?

KMS stands for the abbreviation (Key Management Service) in which enterprises and big companies manage their Software, End user and Servers licenses keys through a single server (Called KMS) which automates the whole process of activation and eliminates the need for an individual or admin interfering to activate them.

Prerequisites for KMS Host:

In order to use KMS, You will need to install Server version of Microsoft Windows. This server can be installed on a Virtual machine or physical one. But still there are requirements to activate other machines.

  • Server needs to be joined to Domain to activate other machines/products.
  • VLSC (Volume License Service Center) Host Key (Can only be acquired through the VLSC portal.
  • If you’re going to activate any Office products (Office 2016/ Office 2019) then you’ll need to download the Office Volume License Pack for those products from the links attached.
  • Run the License Pack you downloaded and enter the Office Key to activate it.

After deploying Windows 2016/2019 Server you can install the role from Server manager or from PowerShell

KMS Installation

Launch powershell in Admin mode and run the following CMDLET

Install-WindowsFeature -Name VolumeActivation

image

image

Continue to the next window and add the required Features

image

The next window will let give you some information about the automation of the license activation for MS products and how KMS works.

image

There are two options of how activating licenses, One is through using a service or the other through joining server/computer to Active Directory KMS will auto activate products if their relevant KMS licenses are entered in the KMS Host server.

image

Install your Windows 2016/2019 KMS Host Server key to create AD Object for KMS

image

Choose your activation Method in order to activate the KMS server

image

If activation continues successfully you’ll be able to see KMS telling you that continuing will create an AD object . Click Yes to continue

image

We’ll wait until this finishes

image

When this works, The next window will give you a warning that Clicking Next will delete the current activation Object which is the AD object that has been previously created. Click Close since we want to keep that.

image

KMS Host Activation

To view the activation of your KMS Host, You can open CMD on the KMS Server and type

slmg.vbs –dlv

As you can see below, it’ll show summary information about the license you entered and other related info.

image

To make sure your installation has went successfully, you can launch ADSI Editor and see if the AD object has been created or not.

From CMD or Powershell type adsiedit.msc

Navigate to Configuration>Services> Microsoft SPP> You should see the Activation Objects there.

image

Activating Office 2016 / 2019

As we mentioned previously to activate office 2016 or Office 2019 you will need to download the Office License pack from the links attached previously.

– Office 2016 License Package link https://www.microsoft.com/download/details.aspx?id=49164

– Office 2019 License Package Link https://www.microsoft.com/en-us/downloads/details.aspx?id=57342

NOTE:

You should not launch Volume License Manager when activating Office products or when trying to enter a KMS License key for Office products, Instead when executing the Office Package it will launch it for you and all you have to do is Enter the Office license key and restart Microsoft Windows Client to get Office activated.

image

Verifying KMS is Working:

To check if KMS is working on the end user’s side we need to get our hands on one of those clients, restart the user’s PC and then launch one of Office apps and see if it’s activated or not. The condition for the End user is that they need to be domain joined to acquire a license from KMS server.

It gets activated right after a restart!

image

Reference

https://docs.microsoft.com/en-us/deployoffice/vlactivation/configure-a-kms-host-computer-for-office

https://docs.microsoft.com/en-us/deployoffice/vlactivation/activate-office-by-using-active-directory

Upgrade FRS (File Replication Service) to DFSR (Distributed File System Replication) Guide through

Upgrade FRS to DFSR:

You might be searching on how to do this due to many reasons, Migrating your DCs to Windows 2016 or Windows 2019, The steps to do this type of migration is pretty easy and straightforward.

First Let’s explain a bit about what does FRS and DFSR do and what is the difference?

Windows Server 2003 and 2003 R2 uses File Replication Service (FRS) to replicate SYSVOL folder content to other domain controllers.

SYSVOL is a folder shared by domain controller to hold its logon scripts, group policies and other items related to AD.

All the domain controllers in the network will replicate the content of SYSVOL folder. The default path for SYSVOL folder is %SystemRoot%\SYSVOL. This folder path can be defined when you install the active directory.

How does DFS Works?

In Windows server 2008 and later Active Directory uses Distributed File System (DFS) for the replication.  DFS Replication uses a compression algorithm known as remote differential compression (RDC). RDC detects changes to the data in a file and enables DFS Replication to replicate only the changed file blocks instead of the entire file.

Although FRS has been deprecated Since Windows server 2008 most people still looking to migrate to latest version.

Migration Starts Here

In this guide, I am going to explain how to do this kind of migration step by step.

I am going to run the migration on Windows 2008 R2 Servers. however the process is exactly the same on Windows 2012 R2.

To start, I need to check the service console to see which services are running the replication. From run type services.msc and enter

As you can see there, File Replication Service is running

clip_image001

In the same manner DFS service is also started and functioning, But that doesn’t mean that RFS is not being used.

clip_image002

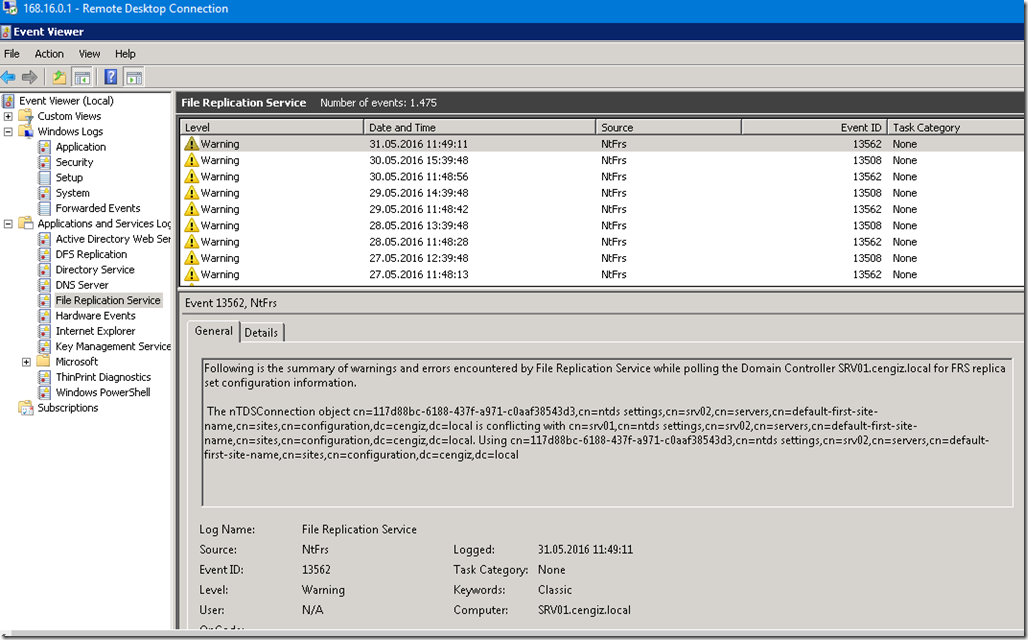
Health Check

Before starting any migration, I prefer to do a check on Eventviewer just to make sure nothing critical is being reported. In the same way I would like to see if there any warning being reported.
Below you can see errors are being reported from File Replication Service by the Domain Controller SRV01, So the time is convenient to start this kind of migration as this would fix the errors being reported.

clip_image003

Prerequirements:

The first part of the process for migrating SYSVOL replication from File Replication Service (FRS) to Distributed File System (DFS) Replication is to raise the functional level of the domain to Windows Server 2008 and to set the global migration state to Prepared.

Make sure your Domain Function Level is raised to 2008 at least for this process to work.

Migration:

To start migration, Run Powershell as an administrator from the DC And type the following command to prepare DCs for the migration.

dfsrmig /getglobalstate

clip_image004

Preparing to migrate

dfsrmig /setglobalstate 1

When this is done, you might have to wait sometime (5 mins or less for small environments). When done waiting type dfsrmig /getglobalstate to verify that the global migration state is Prepared. The following output appears if the global migration state is Prepared.

clip_image005

clip_image006

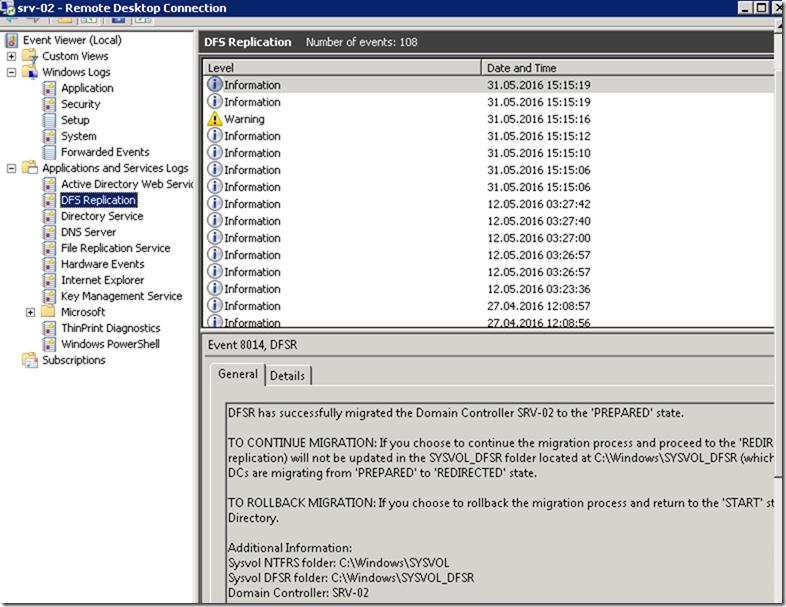
You will be able to see an event ID 8014 showing you the success of this command.  Which means you can move to the next stage.

clip_image007

clip_image008

Migrate the domain to the Redirected state

From a command prompt or PowerShell window on a writeable domain controller (not a read-only domain controller) in the domain that you want to migrate, type dfsrmig /setglobalstate 2 to set the global migration state to Redirected.

clip_image009

2. Type dfsrmig /getglobalstate to verify that the global migration state is Redirected. The following output appears if the global migration state is Redirected.

clip_image010

After doing this, Checking event viewer you can see event ID 8017 showing you the current state, in my case it’s showing DFSR has successfully Migrated the DC to “Redirected” state. so it means we are good to go to the next step.

clip_image011

clip_image012

Migrating to the Eliminated State

Log on to a writeable domain controller (if you are not logged on already).

Open a command prompt window and then type dfsrmig /setglobalstate 3 to set the global migration state to Eliminated.

clip_image013

2. At a command prompt, type dfsrmig /getmigrationstate to verify that all the domain controllers are at the Redirected state. The following output appears when all domain controllers are at the Redirected state.

clip_image014

In the event viewer you can see the state of the DCs reporting that DC will now migrate to the “Eliminated” state. with event ID 8018

clip_image015

clip_image016

Once everything is finished, You will be able to confirm by two things, First on the Service console the File Replication Service should be disabled since it’s no longer going to be used.

clip_image017

Second thing is by using Command line or Powershel, Type Net Share an you can see the new Shares being published with new names “Sysvol_DFSR”.

clip_image018

Ref:

https://docs.microsoft.com/en-us/windows-server/storage/dfs-replication/migrate-sysvol-to-dfsr

https://docs.microsoft.com/en-us/windows/win32/win7appqual/file-replication-service–frs–is-deprecated-in-windows-server-2008-r2

How to Sync Cloud User to On-premises AD ?

The Story:

I have got this client who constantly keeps on making the mistake of create user from Cloud and provision them with a license in an Exchange Hybrid environment.

Although this is not difficult to fix but it’s not the recommended approach when creating a new user especially in a Hybrid environment since Exchange on-premises won’t recognize this user and most likely will consider any incoming emails from it as spoof or spam.

How to Create a Cloud user from Exchange On-premises?

From Exchange on-premises ECP Admin panel you have the option to directly create user on-cloud which will also create a user object on on-premises AD.

image

Second option – Using Powershell

It’s not that much different than the Web UI option but it’s just for people who prefer using PowerShell than GUI

Enable-RemoteMailbox –Identity User –RemoteRoutingAddress user@yourTenant.mail.onmicrosoft.com

The reason to follow those two methods is due to the need of Exchange on-premises being aware of each of those users so mail flow between Exchange on-premises and Online would not get affected and route this users mail to the wrong place or flag it as spammed or spoof …etc.

The Real Question now is: How to Sync Cloud User to On-premises AD ?

If by mistake we created a user on Cloud (Office 365) and we forgot to create an AD User for this account, that user might already have started using his account on Office 365 (Sharepoint, Exchange, Teams) etc.

There also might be the intention of moving users from Cloud to On-premises Exchange in case the company wanted to decrease their spending on cloud users and in this case when Migrating a cloud user to on-premises you will get the following errors:

image

test3@domain.com

Status: Failed

test3@domain.com Skipped item details

User status

Data migrated:

Migration rate:

Last successful sync date:

Error: MigrationPermanentException: Cannot find a recipient that has mailbox GUID ‎’03c9764e-8b8e-4f33-94d1-ef098c4de656‎’. –> Cannot find a recipient that has mailbox GUID ‎’03c9764e-8b8e-4f33-94d1-ef098c4de656‎’.

So how do we overcome this situation since syncing a user might require you to delete the cloud user and recreate it on AD?

Solution:

To sync the user from the Cloud to on-premises you will need to follow these steps :

1- Create an on-premises Mailbox where the following attributes would be matching the cloud user

  • UserPrincipalname
  • ProxyAddresses
  • SamAccountName
  • Alias

2- The Location of the OU where the On-premises user is going to be created must be provisioned by ADConnect (Azure AD Connect)

You can look which of these OU are provisioned by Starting AD Connect Sync Manager

image

By verifying the user you created in the AD is in the right OU, You can now start AD Sync from PowerShell to speed up the process.

image

Below, You can see the user has been successfully synchronized to the cloud without any issue.

image

Now we’ll see it from the portal to confirm the user is synced with AD

image

Depending on the Source anchor being used in ADConnect there might be a GUID conflict or not, You will get an error similar to when trying to migrate the user in the beginning however you can solve this by replacing the cloud user’s GUID (ImmutableID) with the on-premises user which will force the user to merge with the On-prem user.

Let’s confirm in our case if the user on-cloud has a matching GUID with the one on-premises.

From AD run CMD or Powershell you can use the following command to get the user’s ImmutableID (ObjectGUID) .

ldifde -f c:\Test.txt -d “cn=Test3,DC=Domain,DC=com”

image

From Notepad checking the user we just exported you can see the Immutable ID on AD for the User test3 is IkTni9mw7Ee4YefeGpz7IA==

image

To be able to see the user on Office 365, We need to logon to MSOL through Exchange Online PowerShell

Connect to Exchange Online’s powershell using your Online ECP.

image

Once you click on Configure this should download an executable file that will launch PowerShell Online which allows you to use the Modern Authentication (MFA) to use PowerShell safely.

image

Connect-Msoluser will connect you to Office 365 and you’ll be able to get the user’s properties and see if the Immutable ID is matching to the user’s GUID.

Once you’re connect you can use the following cmdlet to get the user’s properties.

Get-MsolUser -UserPrincipalName test3@domain.com |fl DisplayName,ImmutableID

image

You can see they are matching each other, In case there’s a conflict then you can simply set the online user’s Immutable ID to match the on-premises user’s ImmutableID.

Once done, Go and force ADConnect to sync the user and you’ll see if the problem has been resolved. The command for changing the Immutableid is as follows:

Set-MsolUser -UserPrincipleName test3@domain.com -ImmutableID IkTni9mw7Ee4YefeGpz7IA==

Ref:

https://support.microsoft.com/en-us/help/2956029/migrationpermanentexception-cannot-find-a-recipient-that-has-mailbox-g

https://docs.microsoft.com/en-us/exchange/hybrid-deployment/create-cloud-based-archive