A good and detailed documentation is everything we need to implement any kind of project especially if it’s an integration between two different servers that perform different roles.
And with PKI involved the complications multiply thus a good article write up is what we need.
Previously I have tried a test lab with Skype for Business 2015/2019 IM Integration with Exchange 2016/2019 and the result was a complete failure and endless search for what’s missing to get IM to work from OWA?
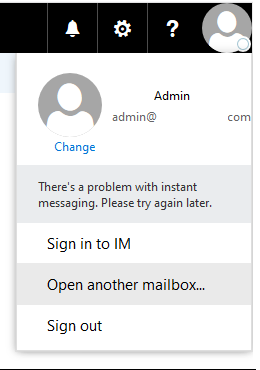
Upon completion of the steps mentioned in Microsoft’s Official documentation and after restarting Exchange IIS or OWAAppPool you will see this when you try to login to OWA with your user
There’s a problem with instant messaging. Please try again later.
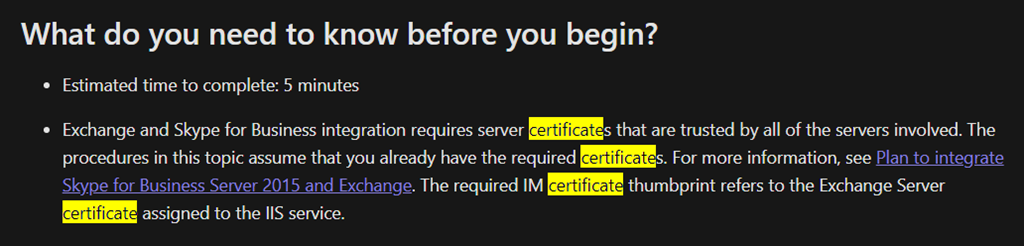
In their Official documentation Microsoft says that the certificate in question must be trusted by all the servers involved meaning Skype for Business Frontend and Mailbox Servers.
Meanwhile this is true, it still would not get the IM to login/work although it might drop the initialize event ID 112 in the event log.
Exchange and Skype for Business integration requires server certificates that are trusted by all of the servers involved. The procedures in this topic assume that you already have the required certificates. For more information, see Plan to integrate Skype for Business Server 2015 and Exchange. The required IM certificate thumbprint refers to the Exchange Server certificate assigned to the IIS service.
To do things the way that should get this to work, I will detail steps one by one so we can be sure to get the positive results we are all waiting for when dealing with Exchange and Skype for Business.
Exchange IM URL 1: mail.domain.com
Skype for Business Pool FQDN: SBG-Pool01.domain.com
Autodiscover URL : Autodiscover.Domain.com
7. On Exchange: Enable OWA VD Instant Messaging
8. On Exchange: Enable Messaging on OWA Policy
9. On Exchange: Create Enterprise Application for Skype Pool.
10. On Exchange: Create new SettingOverride for Skype for Business.
11- Generate a new Certificate for Exchange IM
12. Assign the newly imported certificate to IIS Exchange Back End site
13. On Exchange: Restart the WebAppPool
14. Log out and sign back in to OWA to Check
15. Troubleshooting methods
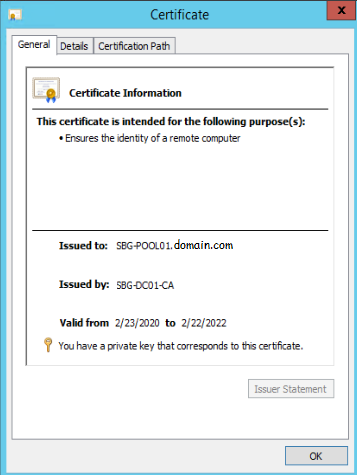
The certificate installed on the Skype for Business Pool Frontend servers must be generated from a local Certification Authority which can be trusted by Exchange Server services.
The Certificate generated for Skype for Business pool as in the below screenshot is generated from my CA and includes the names of the servers:
On both Exchange and Skype for Business servers I already have UCMA 4.0 version installed, but if you don’t have it or have an older version then you can’t continue without it.
For Skype for Business Server to find Exchange Autodiscover Service point and to be able to authenticate servers we’ll be using the below cmdlet
This enables both servers to authenticate and share information when needed and without user’s interference.
Set-CsOauthConfiguration -ExchangeAutodiscoverUrl https://autodiscover.domain.com/autodiscover/autodiscover.svc
Ref:
https://docs.microsoft.com/en-us/powershell/module/skype/set-csoauthconfiguration?view=skype-ps
Getting a site ID will be useful for later use to setup the Trusted Application Pool.
On Skype for Business Management shell. Type the following
Get-CsSite
So the Site ID is 1. I will keep this for later use
Specify the AutodiscoverServiceInternalURI for internal Autodiscover service. Make sure it points to your public URL and certificate not the internal one otherwise your users will get a certificate error through Outlook and might cause IM chat not to work.
The Cmdlet would be
Get-ClientAccessService | Set-ClientAccessService –AutoDiscoverServiceInternalUri https://autodiscover.domain.com/autodiscover/autodiscover.xml
On Skype for Business Server, Launch Management Shell and use this cmdlet to add Exchange as a trusted Application to the SfB topology.
New-CsPartnerApplication -Identity Exchange -ApplicationTrustLevel Full -MetadataUrl “https://autodiscover.domain.com/autodiscover/metadata/json/1”
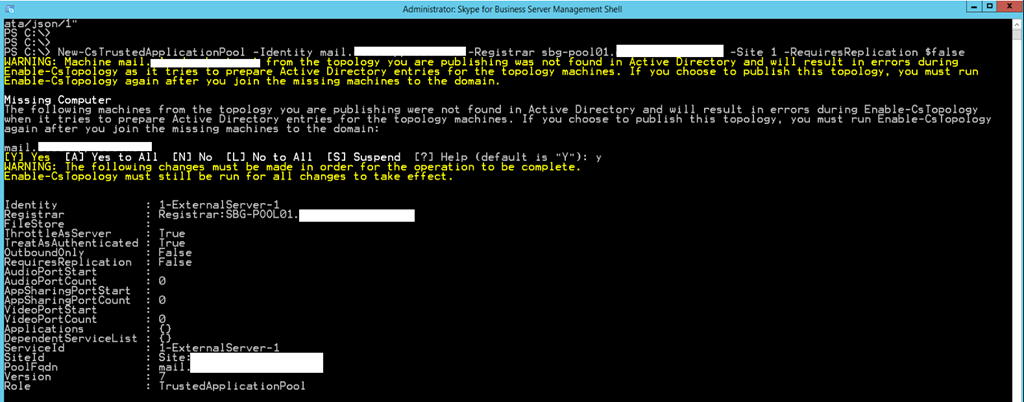
New-CsTrustedApplicationPool -Identity mail.domain.com -Registrar sbg-pool01.domain.com -Site 1 -RequiresReplication $false
From SfB Management Shell run the following cmdlet .
New-CsTrustedApplication -ApplicationId OutlookWebAccess -TrustedApplicationPoolFqdn mail.domain.com -Port 5199
Finally
Click on the link below for Part 2
Skype for Business IM integration with Exchange 2016 OWA–Part 2
Reset and manage your Active Directory users' Passwords Active Directory is one of the most…
Finding Exchange Database hidden mailboxes. Story:Maybe you have been in this situation before, trying to…
If you're using a Proxy server in your firewall or in your network and have…
Story:I got some clients that have reported some of their users being locked out and…
Delegate Permissions This is a code that I have wrote recently to check if an…
Story: I got a request from a client who constantly gets CVs and have to…
View Comments