Before Starting the process of Deploying Dirsync, you must consider using some tools to see if your environment has no issues.
First you must use this tool IdFix check the active directory for any possible issues when installing Dirsync and synchronizing users and their objects to the cloud.
IdFix is used to perform discovery and remediation of identity objects and their attributes in an on-premises Active Directory environment in preparation for migration to Office 365. IdFix is intended for the Active Directory administrators responsible for DirSync with the Office 365 service.
Install ADFS (Optional) for SSO (To authenticate users from Local AD)
Note about ADFS:
ADFS can be the reason of so much headache and it’s always better to avoid installing it, instead of using ADFS to use the same password for users on a large scale deployments, the Dirsync can Synchronize local Passwords to Azure AD and same password can be used for both users local and online.
Create an enterprise admin user account on the domain for DirSync service
Installation of Dirsync with Password synchronization: We prepare a separate server for the DirSync tool that is windows 2008 R2 SP1 or 2012 R2 installed and the server
should be domain joined in order to reach Active Directory.
The account used with Dirsync should be member of the domain admin. Also you need to have the admin credentials for the tenant that you signed up to on O365.
While installing I had an error saying that current user was not member of the Synchronization Engine FIMSyncAdmins group.
I tried uninstall DirSync but it it gives the same error message
The FIMSyncAdmins group is a local group on the server. Your user is not a member of that group locally. Try adding your user to the group.. after adding the user to the required group the installation were completed successfully.
First you need to make sure that your customized (personal) domain is active.
Now we need to enable Dirsync from the portal, next to Active Directory ® Synchronization Click on Set up and activate DirSync.
Now click on Activate
Now after we made sure that our domain is active and we activated Dirsync on Office 365 portal let’s Go back to DirSync server to complete the steps and check if we can start syncing your Active Directory.
Type your enterprise admin user which you have prepared for Dirsync, for my case I’m just going to use the domain admin user since it’s a Lab.
Make sure you Enable Hybrid Deployment since Azure active directory will modify objects in your on-premises AD.
In case you would want to have your On-premises AD password for users synchronized with users on Office 365
then you must tick the option as in the below snapshot.
Here, When I click next I get an error as following:
Error:
The new version of Dirsync doesn’t accept the domain admin account.
Solution:
In order to resolve the problem you have to create a new user account with enterprise admin privileges
Use this account to connect to AD during config.
Here I created the new user and added the required groups.
After using the new account there was no issue with the setup and I could complete the configuration successfully.
Once the configuration finished you will be able to find event ID 611 in the logs.
Now checking Office 365 portal, I can see that users have been synced to the Office 365 portal:
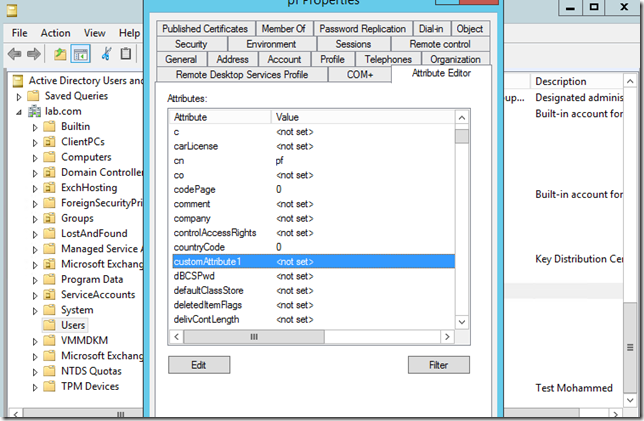
Creating Custom Attributes on On-Premises AD for Exchange Online Users
I have came across some interesting scenario where Exchange Server doesn’t exist however some attributes might be still required or used on Office 365 for Exchange online users which are Synced with Azure Active Directory Sync tool.
The attributes might be used for different purposes but sometimes it’s very necessary so I will go ahead and demonstrate how to create a custom attribute which is normally created by default with Exchange servers deployed on-prem.
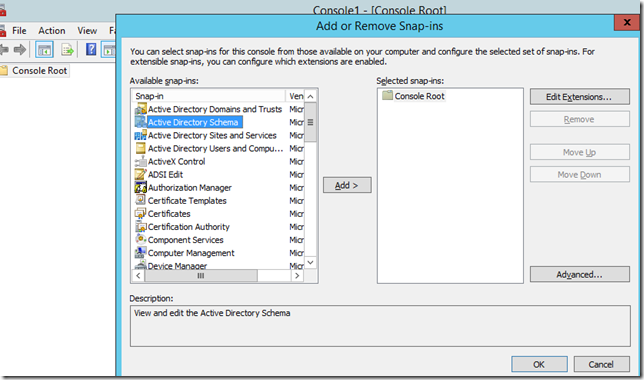
First I will run the Schema console
On one of the DC servers which are synced with Office 365 Launch CMD as Administrator
Run the following Command
regsvr32 schmMgmt.dll
Run MMC
Click on File -> ADD /Remove Snap in
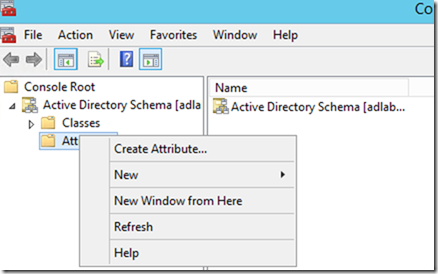
Right Click on Attributes -> Create Attribute…
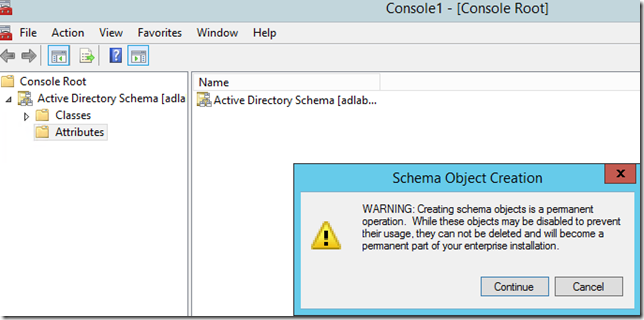
Click on Continue
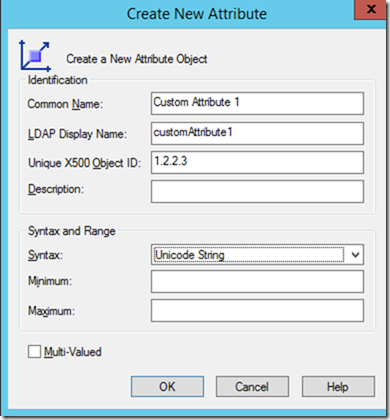
Click OK
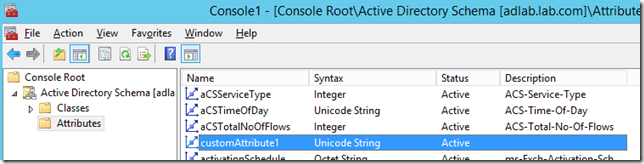
Go to Attributes, Navigate to Custom attributes and double click on it and tick the boxes below then click apply
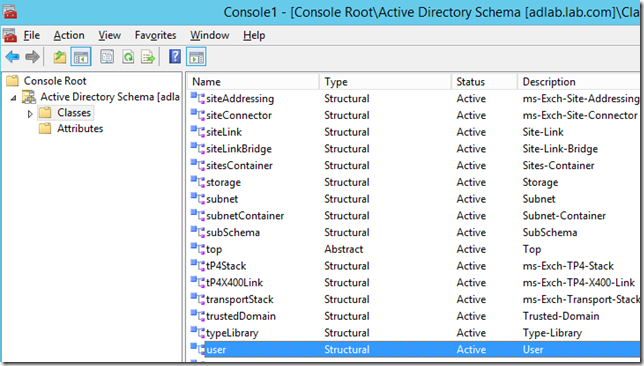
Now go to Classes
Find and double click on User
Now go to Attributes tab
Click on Add and add the Custom Attribute
Click Apply
Now go back to CMD on DC Server and replicate changes across all DC servers
Matching Users after migrating to new Active Directory Forest
Installing ADConnect in a new forest for the same users which have been migrated to a new Active Directory forest
In order to do so you will have to launch Azure powershell in admin mode and connect to MSOL service as in the following snapshot
$cred = get-credential After connecting then type/copy the following Get-MsolUser -ReturnDeletedUsers -All | Out-GridView
Once you type enter a GUI will come up showing you all the deleted users list, you should delete any old non-usable account that has similar attributes to the ones that you’re about to Sync from the AD to O365.
Once you’re sure about what do you want to delete you can go ahead with the following Command to delete the users
Note: You must be sure that when you run this command, you will no longer be able to restore any deleted item or object later on.
To prepare Azure Active Directory Sync Server, you will need to download the following tools to check for users attributes on your local AD:
Mirosoft Windows Server 2008R2/2012R2
NetFramework 4 (For IDFIX tool to work)
IDFIX (to Check if there’s any issue on AD with DirSync)
Note:
One of the new features that came with AADSync is that it can be installed on the DC server as well. but some may choose to have it on a separate server to avoid any risk.
Software Prerequisites
Install required tools for Azure Active Directory Connector (Dirsync)
NOTE: Effective October 20, 2014, the 32-bit version of Azure Active Directory Module for Windows PowerShell is discontinued. Support for the 32-bit version will no longer occur, and future updates to the Azure Active Directory Module will be released only for the 64-bit version. We strongly recommend you install the 64-bit version to ensure future support and compatibility. Refer to “Install the Azure AD Module” in Manage Azure AD using Windows PowerShell.
If DirSync is to be installed on a server with Windows 2008 R2, beginning with version 1.0.6765.0006, PowerShell 3.0 is required and can be installed from Windows Management Framework 3.0; AND beginning with version 1.0.6985.000, .NET Framework 4.5.1 is a prerequisite.
Once you download IDFIX, you have to unzip and run the exe tool
Right click on Idfix and run it as administrator to give it the required privileges to access AD users and groups.
After you run it, it must look like the following
After running the tool you will have to click on Query to get the problematic users/groups and solve the ones that you want them to be synced to Office 365 Azure AD.
Top Level Domain:
The most common issue that occurs when preparing for AADSYNC is the Top Level domain users related errors (If .local is used)
To Fix this issue for all the users/groups which will be synced to O365 you will have to open Active Directory Domains and Trusts:
Right click on Active directory domains and trusts and click properties then add your public domain to the Alternative UPN Suffixes:
Next open Active directory users and computers to change the UPN to the correct one that matches your public domain.
Note:
Changing the domain suffix for your users suffixes won’t affect their login to their machines or any other application server.
Select the users in which OU that you want it to be synced and right click and choose Properties.
Proxy Address:
You might as well face another issue with users that you intend to sync to Office 365 which is the SMTP proxy address. in some Exchange Organizations the e-mail policy might be set wrong and therefore the user might have an invalid domain value in his proxyaddress attribute e.g. user@domain.local
To solve this, there are 3 ways to solve it. First would be to use Exchange on-premises Email policy to delete the .local SMTP proxy and set the public domain one.
The other two ways would be that you delete the proxyaddress manually or with a powershell script . I personally prefer to do this manually due to avoid any risk that it may impose on the users objects.
Another method would be the IDFIX it self or Admodify.
In the below snapshot I used IDFIX to fix the proxyaddress of the problematic users.
Installation of ADDSYNC
First we’ll install Microsoft Online Services Sign-In Assistant for IT Professionals RTW…
Next Windows Azure AD powershell module
Installing AADirsync
In the next step you will have to enter an Office 365 Global administrator user (preferably not onmicrosoft.com user) and I would recommend that you create a cloud user on Office 365 with global admin privileges to use with AADSYNC.
Next before you continue, you should open your O365 portal and Enable ADSync there.
When you click on Set up the following page should come to you. you should click on Activate AD Sync.
Now you may continue to config AADSYNC, below I am going to use a different user that’s dedicated only to “AADSYNC” tool. I will calll it Dirsynccloud@domain.com
Next On Active directory on-premises I will configure a new user called (Dirsync) that’s member of enterprise admins. this user will have access to all the OUs that will be synced in order to sync their attributes and passwords..etc
Once you enter your Enterprise domain account below and click add forest, it will be enlisted below and you can add additional number of forests if you have more.
Next you may choose to have Hybrid deployment if you have Exchange on-premises (At least Exchange 2010 SP3) but if not then no need to tick the box. The password write-back is a feature that requires an Azure premium AD subscription so if you don’t have this subscription then you don’t really need to tick this box.
The Azure AD app and attribute filtering is a feature that allows you to pick a certain application attribute you want to sync back and forth to Azure AD e.g. (Exchange, SharePoint..etc). If you don’t tick this box the normal standard attributes will be synced which will include (Exchange and user’s basic info) you can find it as soon as the setup finished and you open ADDSync UI.
Password writeback is an Azure Active Directory Sync component that can be enabled and used by the current subscribers of Azure Active Directory Premium. For more information, see Azure Active Directory Editions. It allows you to configure your cloud tenant to write passwords back to you on-premises Active Directory. It obviates you from having to set up and manage a complicated on-premises self-service password reset solution, and it provides a convenient cloud-based way for your users to reset their on-premises passwords wherever they are. Read on for some of the key features of password writeback:
You can enable filtering in AADSync at any time. If you have already run the default configurations of directory synchronization and then configured the filtering, the objects that are filtered out are no longer synchronized to Azure AD. As a result, any objects in Azure AD that were previously synchronized but were then filtered are deleted in Azure AD. If objects were inadvertently deleted because of a filtering error, you can re-create the objects in Azure AD by removing your filtering configurations, and then synchronize your directories again.
Next I will not tick Synchronize now because this will sync All local AD objects and OUs to the cloud, in my case I just want to choose particular OUs to sync to the cloud.
In order to configure AADSYNC to choose which on-premises Active directory Organization Unit you want to change you will have to navigate to the following path on the server which you installed AADSYNC.
PATH:
C:\Program Files\Microsoft Azure AD Sync\UIShell\miisclient.exe
Right click on domain.local and click properties
Next Click on “Configure Directory Partitions” and Under “Credentials” Click on Containers and enter your new on-premises enterprise admin account.
Next select the OU you want to sync to the cloud and click OK
Next you will want to open “Task Scheduler” on the server and Enable the task that was created by AADSYNC installation to enable every 3 hours sync..
In order to Force the sync you will have to run a separate command that Microsoft has brought along with AADSYNC called “DirectorySyncClientCmd” the command can be run from Powershell or made a shortcut on a desktop and directly run.
Path:
c:\Program Files\Microsoft Azure AD Sync\Bin\DirectorySyncClientCmd


![clip_image001[5]](http://lh6.ggpht.com/-bTsYbCoyBDE/VSe6tby9vwI/AAAAAAAAORQ/7oMFwn6XVWs/clip_image001%25255B5%25255D_thumb.png?imgmax=800)
![clip_image002[4]](http://lh4.ggpht.com/-Tc_IjdCkie4/VSe6vTh70nI/AAAAAAAAORg/DaVeYIKS1F4/clip_image002%25255B4%25255D_thumb.png?imgmax=800)
![clip_image003[4]](http://lh4.ggpht.com/-5paj8WsOWZs/VSe6xkWuhKI/AAAAAAAAORw/ZkFYGWVxNeM/clip_image003%25255B4%25255D_thumb.png?imgmax=800)
![clip_image004[4]](http://lh4.ggpht.com/-dn2f9cdUKEo/VSe60bcnjYI/AAAAAAAAOSA/du-W37Jv-jM/clip_image004%25255B4%25255D_thumb.png?imgmax=800)
![clip_image005[4]](http://lh6.ggpht.com/-pnvgRPt6_n4/VSe62yUPVgI/AAAAAAAAOSQ/P5WUuU98X90/clip_image005%25255B4%25255D_thumb.jpg?imgmax=800)
![clip_image006[4]](http://lh5.ggpht.com/-lg6fVFgFc8o/VSe65oCP2kI/AAAAAAAAOSg/8ouI0xFaxPY/clip_image006%25255B4%25255D_thumb.jpg?imgmax=800)


