Category Archives: Exchange Online

Setting up signature or disclaimer for all users in Office 365 Exchange online.

The Story

In order to setup a signature for all office 365 Exchange Online users without manually going after each client and set it up, you can do so by using mail flow rules to append the signature along within each and every out going email.
To do so, you will have to go to Office 365 Exchange admin portal, then navigate to Mail flow –> choose Rules and click on the + sign

image

 Click on “Apply disclaimers…”

image

When the new rules opens up, you will have to give it a name and apply condition for the rule. an empty form looks like this one

image

but here’s what mine looks like,
I choose the sender address includes “Specific domain” then in the append the disclaimer part, I have entered an HTML code which includes all user details

image

after applying the disclaimer I choose to wrap it up. and then in the exception part I added a rule that excludes adding the disclaimer and signature to any reply message by reading the “RE” word in the subject field.

image

Now the disclaimer code is as following and you may want to configure it or customize it according to your needs. 

Code:

HTML CODE</br> 
</br> 
<div style=”font-size:9pt; font-family: ‘Calibri’,sans-serif;”> 
%%DisplayName%%</br> 
%%Department%%</br> 
%%Email%%</br> 
</br> 
<div><img alt=”Logo” src=”http://s11.postimg.org/jjdha41wv/mynigga.jpg“><p><p><p>Tel: %%PhoneNumber%%</br> 
Gsm: %%MobileNumber%%</br> 
Fax: %%FaxNumber%%</br> 
Address:%%Street%%</div> 
</div> 
<span style=”font-size:12pt; font-family: ‘Cambria’,’times new roman’,’garamond’,serif; color:#100101;”>Disclaimer</span></br> 
<p style=”font-size:8pt; line-height:10pt; font-family: ‘Cambria’,’times roman’,serif;”> ________________________________________ 
</br> 
<span style=”padding-top:10px; font-weight:bold; color:#CC0000; font-size:10pt; font-family: ‘Calibri’,Arial,sans-serif; “><a href=”http://www.companywebsite.com”>http://www.companywebsite.com</a></span></br></div></br>
________________________________________</br> 
<span style=”font-size:10pt; font-family: ‘Cambria’,’times new roman’,’garamond’,serif; color:#928E8E;”>This e-mail and any information included within any attached document are private and confidential and intended solely for the addressee. Company name does not accept any legal responsibility for the contents of this message and any attached documents. If you are not the intended addressee, it is forbidden to disclose, use, copy, or forward any information within the message or engage in any activity regarding the contents of this message. In such case please notify the sender and delete the message from your system immediately. Company name also denounces any legal responsibility for any amendments made on the electronic message and the outcome of these amendments, as well as any error and/or defect, virus content and any damage that may be given to your system.</span> 
</p> 
<span style=”padding-top:10px; font-weight:bold; color:#CC0000; font-size:10pt; font-family: ‘Calibri’,Arial,sans-serif; “><a href=http://www.companywebsite.com>Company Name </a></span></br></br> 
</div>

 I have highlighted the customizable part of the code in Yellow and red so you can change it or configure it according to how you want it to fit for you. 
The Display name, Department, Email ….etc are all variables for users attributes and they are being pulled from the Microsoft Azure AD, so if your users don’t have any information filled in there then users will likely won’t show anything 

Note for the red highlighted link you will have to import only “HTTP” link for the uploaded logo of your company. HTTPS won’t be acceptable or read.

If you’re an HTML noob , you can use the following links for testing and changing colors..etc 

http://www.w3schools.com/html/tryit.asp?filename=tryhtml_basic_document
For color changing 
http://html-color-codes.info/

Using the w3schools.com website, you can copy the code on the left pane and click on see results and it’ll show you the result on the right pane

See how it looks like

image

Once you’re done with the code, you will have to copy and paste the link in the disclaimer part on the right pane. next click Save and probably this will take about 10 minutes to be applied or less.

image

To test if this is going to work, I will go on one of the users that I applied the rule for and fill out their details like display name, e-mail, street ..etc and try to send out an email with this user. 

image

Mail is empty as you can see 

image

del.icio.us Tags: Exchange Online,ExchangeOnline,Office365,Office 365,Signature

Reference: 
https://technet.microsoft.com/en-us/library/dn600437(v=exchg.150).aspx

Importing PST to Office 365 Exchange online mailboxes through the new Import Service

Note:

Microsoft has decided to charge for this service (8$ for each GB) … 

Microsoft has launched a new feature that allows administrators to import PST to Exchange online directly through the portal.

In this article I’ll guide you through the steps of uploading one PST file and import it to a user’s mailbox. Although the steps are identical to Microsoft’s TechNet article but it’s more detailed and with screenshots.

So to achieve this, you’ll have to first sign in to your Office 365 portal. Open Exchange admin center and follow the below steps:

  1. Granting Permission

Grant your self-importing PST permission to users by navigating to Exchange admin center -> Permissions> Double click on Compliance Management

Under Roles: click on + and add Mailbox Import Export role

Click on + Under Members and add your user account

clip_image001[5]

2. `Copy Secure URL and secure storage account key

To get the Azure secure storage account key and URL you will have to go back to the Office 365 portal and then click on Import tab on the left pane

Then click on the Key sign below

clip_image002[4]

When you click on it, you will be able to retrieve the key and the URL by clicking on Copy Key and URL .

clip_image003[4]

The secure storage account key is pretty long and you’ll have to notice that sometimes you might get confused and copy only the appearing portion of it in the field… if you do so and copied that in the Azcopy command or Azure storage explorer you might get an error …

Here’s my Secure Storage account key that I am using on a trial version of Office 365.

KA9Z00rEYa1JlqGE4wO222MnsN5ywT0elOgLeNht/fSMIJPe2134hEChuuDJ5mfdknq8ts0+cez6uUvFzcQd6g==

Next: Copying the URL.

The URL has an important part which you will be using in Azure Storage Explorer tool in order to login and browse your Tenant’s storage which you’ll use to upload PST to.

The URL will appear as following.. You will need to copy the part in bold

https://d49d7ae0e38a4d8e9c93565.blob.core.windows.net/ingestiondata/

You have to copy this in to the storage account name

d49d7ae0e38a4d8e9c93565

3. Copying PST files to Azure Folder using Azcopy command or Azure Storage Explorer (You can use Azure Storage Explorer too)

In order to upload PST files to Azure, you have two methods. The first is using Azcopy command which is pretty easy and straightforward (but still CMD dependent) or you can use the GUI Application which is Azure Storage explorer

To download azcopy, you can use the following link

http://az635501.vo.msecnd.net/azcopy-3-2-0/MicrosoftAzureStorageTools.msi

Or download them from the Import page as well under Resources:

clip_image004[4]

Once the tool is installed. Right click on it and open it as administrator

The following command will take all the files inside my local folder path C:\Users\Mohammed\Desktop\upload

It will create a folder in Azure’s default folder ingestiondata called “Server01/PSTshareR1/”

It will use the destkey that I have retrieved from Office 365 Import window. And will leave all the logs in your local drive c:\PSTupload\Uploadlog.log

AzCopy /Source:C:\Users\Mohammed\Desktop\upload /Dest:https://d49d7ae0e38a4d8e9c93565.blob.core.windows.net/ingestiondata/SERVER01/PSTshareR1/ /Destkey:KA9Z00rEYa1JlqGE4wO222MnsN5ywT0elOgLeNht/fSMIJPe2134hEChuuDJ5mfdknq8ts0+cez6uUvFzcQd6g== /S /V:C:\PSTUpload\Uploadlog.log

clip_image005[4]

To make sure that files are uploaded. I will open Azure Storage Explorer 6 (Preview) and click Add Account on top

On add storage account window I will use the blob name that I have got from the URL earlier and storage secure key in the storage account key below and click on save.

clip_image006[4]

Once I click that I will get a list of directories, The default directory which is used by Office 365 is the “Ingestiondata” folder, There our files will be uploaded.

clip_image007[4]

https://azure.microsoft.com/en-us/documentation/articles/storage-use-azcopy/

4. Create CSV File to import PST

Assuming you have 150 PST files that you want to upload and import into users which already have been enabled on Exchange online … In order to do so you will have to prepare a CSV file that looks like the below sample

To provide an explanation of what each column stands for .. Microsoft has written a table that clears the dust but some parts were not even clear for me like the FilePath as in the TechNet article it gets you confused with the “Ship data on Physical hard drives” since it uses your drive to upload data directly to Azure through the Import tool on Office 365 portal.

image

From <https://technet.microsoft.com/library/ms.o365.cc.IngestionHelp.aspx?v=15.1.166.0&l=1&f=255&MSPPError=-2147217396>

Note:

The friendly path here is the path of the folder you have created in Azure through the Azcopy command

AzCopy /Source:C:\Users\Mohammed\Desktop\upload /Dest:https://d49d7ae0e38a4d8e9c93565.blob.core.windows.net/ingestiondata/SERVER01/PSTshareR1/

/Destkey:KA9Z00rEYa1JlqGE4wO222MnsN5ywT0elOgLeNht/fSMIJPe2134hEChuuDJ5mfdknq8ts0+cez6uUvFzcQd6g== /S /V:C:\PSTUpload\Uploadlog.log

CSV Sample

clip_image008[4]

So the CSV File is ready.

In Azure Storage Explorer I doubled check if the PST files has finished uploading and it’s there.

clip_image009[4]

5. Using the Upload Files over the network

Back to Office 365 portal, go to Import and click on the + Sign and select Upload files over the network

clip_image010[4]

Select I have access to the mapping file as well

clip_image011[4]

Click on + and upload the CSV file that you have prepared for the mapping

Next File is imported, Click on “By checking this box, you agree to the terms and conditions of this service.

clip_image012[4]

As soon as you accept and click next the Import is going to check path, email, folder and will start the import process.

clip_image013[4]

clip_image014[4]

Email before importing

clip_image015[4]

Imported started, folder has been created

clip_image016[4]

Importing is done

clip_image017[4]

clip_image018[4]

Importing is done

Reference

https://technet.microsoft.com/library/ms.o365.cc.IngestionHelp.aspx?v=15.1.166.0&l=1&f=255&MSPPError=-2147217396#BKMK_CreateAnewMappingtoupload

https://azure.microsoft.com/en-us/documentation/articles/storage-use-azcopy/

Export Office 365 users from specific domain and change their passwords

First of all you will need to connect to your tenant with your global admin account using the following script

Import-Module MSOnline

$O365Cred = Get-Credential

$O365Session = New-PSSession –ConfigurationName Microsoft.Exchange -ConnectionUrihttps://ps.outlook.com/powershell -Credential $O365Cred -Authentication Basic -AllowRedirection

Import-PSSession $O365Session

Connect-MsolService –Credential $O365Cred

After connecting you will need to type the following command line which will export all users in a specific domain that’s added to your portal if you have more than one domain added there.

Get-MsolUser -DomainName Domain.com | Select UserPrincipalName | Export-Csv C:\users.csv –NoTypeInformation

clip_image001

Change passwords for those users by using the following command and pressing enter you’ll be giving a line to enter your new password that you wanna set for all users in the exported file.

$PASS = Read-Host

clip_image002

Run this command to change the passwords

Import-Csv C:\Users.csv | % {Set-MsolUserPassword -userPrincipalName $_.UserPrincipalName -NewPassword $PASS -ForceChangePassword $True}

clip_image003

That’s it. Now users inside the exported csv file have the new password which you have just set.

Note that users will be prompted to reset their passwords upon login, if you don’t want this to happen you can remove the -ForceChangePassword $True parameter.

del.icio.us Tags: Office365,Office 365,Exchange Online,Azure

Exchange: Cannot process command because of one or more missing mandatory parameters

Symptoms:

After you Synchronize users from Local Active Directory to Office 365 Directory using dirsync and try to enable users licenses on Office 365 portal you get the following error.

Error:

Exchange: Cannot process command because of one or more missing mandatory parameters: ArchiveGuid.Exchange: An unknown error has occurred. Refer to correlation ID: dfd8cc2d-e6a4-4b47-8e1e-2059031893c1

According to the error message, it indicates that parameter ArchiveGuid is missed, please refer to the following steps to narrow down this issue:

1.Please Connect Windows PowerShell to Exchange Online and run the command below to compare this parameter of users have errors with normal users:

$LiveCred = Get-Credential

$Session = New-PSSession -ConfigurationName Microsoft.Exchange -ConnectionUri https://ps.outlook.com/powershell/ -Credential $LiveCred -Authentication Basic -AllowRedirection

Import-PSSession $Session

Get-Mailbox <username_with_errors> | fl archive* 

Get-Mailbox <username_no_erros>  | fl archive*

Apparently the commands above didn’t work. And so I had to check something else.!

In order to solve the problem first

  1. I had to assign License to the user synced on O365.
  2. Check User’s Proxy target attribute using ADSI. (Which was correct)
  3. Checking Archiving Attributes since the error is mentioning the Archiving option.
  4. After checking the Archiving attributes it turns that the admin of Exchange has changed the below attributes before he assign user the license on o365 and migrate the user. 

                    5. So deleting the value below msExchArchiveName and setting up msExchRemoteReceipeintType back to 4                             have solved the problem                    6. Of course DirSync needs to be applied in order to sync changes to AD on O365.

Note:

The migration for the User should be “continued” from previous migration batch in the portal otherwise if you start any new batch for the same user the result will be completed but migration won’t take place.

If you used DirSync to sync users from local to online, please try to restart the DirSync to check whether this issue persists or not.

Creating Custom attributes on On-Prem AD for Exchange Online users on O365

Creating Custom Attributes on On-Premises AD for Exchange Online Users

I have came across some interesting scenario where Exchange Server doesn’t exist however some attributes might be still required or used on Office 365 for Exchange online users which are Synced with Azure Active Directory Sync tool.

The attributes might be used for different purposes but sometimes it’s very necessary so I will go ahead and demonstrate how to create a custom attribute which is normally created by default with Exchange servers deployed on-prem.

First I will run the Schema console

On one of the DC servers which are synced with Office 365 Launch  CMD as Administrator

Run the following Command

regsvr32 schmMgmt.dll

clip_image001

Run MMC

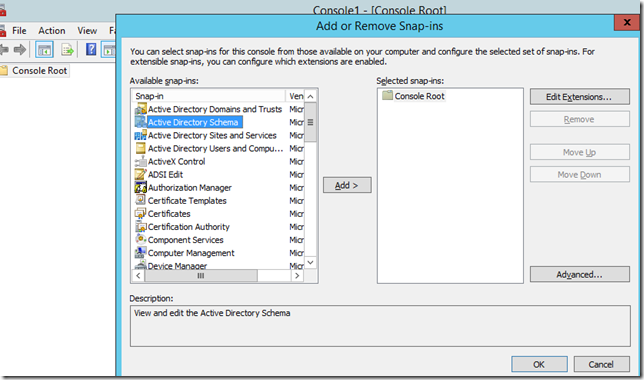
Click on File -> ADD /Remove Snap in

clip_image002

clip_image003

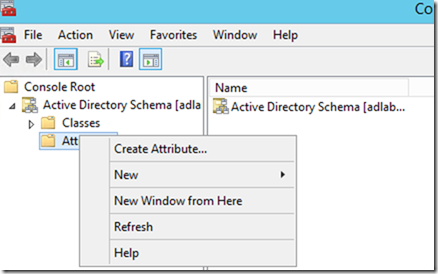
Right Click on Attributes -> Create Attribute…

clip_image004

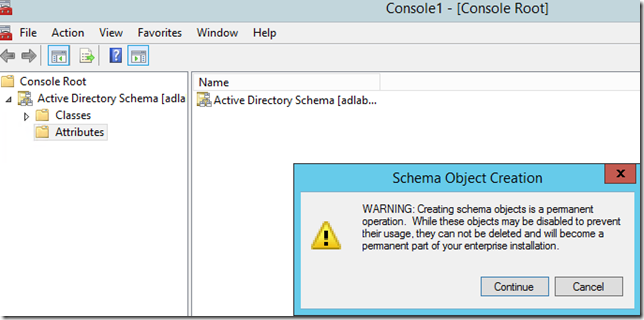
clip_image005

Click on Continue

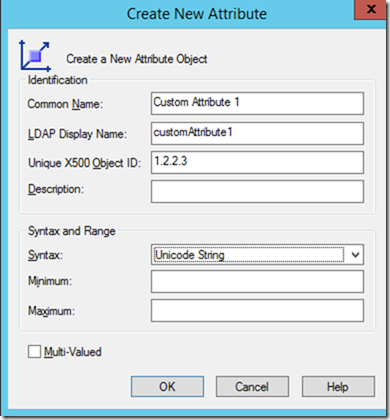
clip_image006

Click OK

Go to Attributes, Navigate to Custom attributes and double click on it and tick the boxes below then click apply

clip_image007

clip_image008

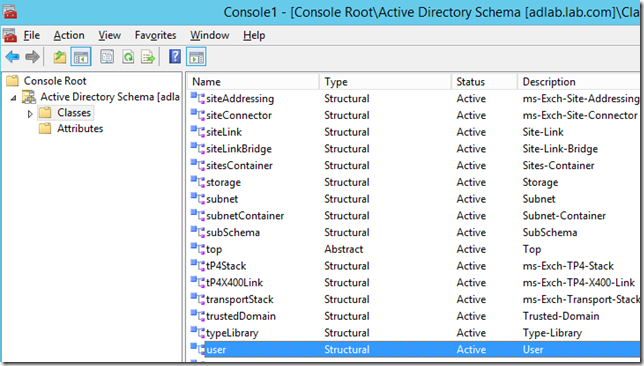
Now go to Classes

Find and double click on User

clip_image009

Now go to Attributes tab

clip_image010

Click on Add and add the Custom Attribute

clip_image011

clip_image012

Click Apply

Now go back to CMD on DC Server and replicate changes across all DC servers

clip_image013

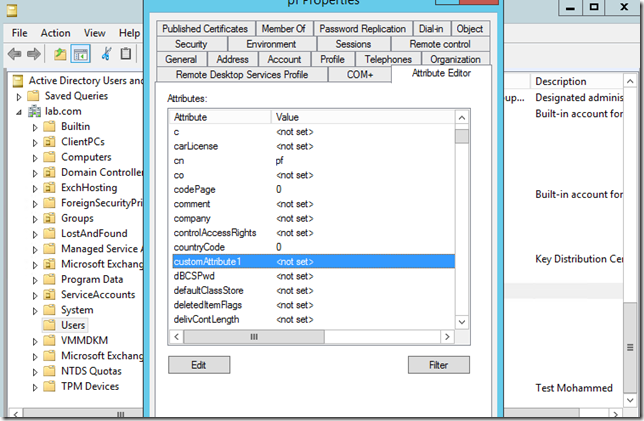
Open ADUC and check users attributes

clip_image014

Hope this helps