As I was preparing for Exchange migration from 2010 to 2013 I had two DCs, one of those two DCs was off for about 8 months and has already passed the default tomb stone life so it was not authorized for replication in the forest.
Whenever I try to replicate the server I get the following error
Active Directory Sites and Services Error
“The following error occurred during the attempt to syncronize naming context CN=Configuration,DC=Domain,DC=Local from Domain Controller AD to Domain Controller AD2; The directory service cannot replicate with this server because the time since the last replication with this server has exceeded the tombstone lifetime. This operation will not continue.”
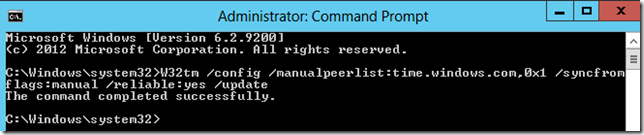
My FSMO roles holder and PDC is the demotesas.local domain so on this DC I will run the following command
If you’re planning to Install Active directory on multiple DCs for backup, you can speed up this process by using the following script which is provided by Microsoft. but you’ll have to copy and paste it in notepad and save it in .ps1 extension after editing the Domain Name and Domain Netbios name.
You may also wanna change the forest mode to match the one in your environment if you already have an old DC.
# Windows PowerShell script for AD DS Deployment
#
Import-Module ADDSDeployment
Install-ADDSForest `
-CreateDnsDelegation:$false `
-DatabasePath “C:\Windows\NTDS” `
-DomainMode “Win2012” `
-DomainName “moh10ly.com” `
-DomainNetbiosName “Moh10ly” `
-ForestMode “Win2012” `
-InstallDns:$true `
-LogPath “C:\Windows\NTDS” `
-NoRebootOnCompletion:$false `
-SysvolPath “C:\Windows\SYSVOL” `
-Force:$true
Note: If you want to have a different Computer name, you will need to change that manually before you start the process below and restart after changing the computer name.
You will need to install the AD Domain Service management tools before you are able to run the powershell
When the management tools are installed you can drag and drop the powershell file to powershell window and press Enter and as soon as you do that it will ask you for the SafeModeADministratorPassword.
After you press Enter it will start the installation process
When finished it will let you know that server is going to be restarted automatically.
After restarting the server, this is how the Full computer name became.
To configure Outlook autodiscover in Active directory we’ll have to do the following
First open Group Policy Management from Administrator tools, After you have opened GPO you will want to create a new GPO for this purpose then follow the steps down to continue with the configuration:
1- Create a new GPO under any OU “Organization unit” you want to apply the GPO on. Then right click on it and click on Edit…
Under User configuration -> policies -> Administrative templates: Policy right click and click “add/remove templates…”
Click Add… and browse to the Office 2010 template (I’m attaching these files below) or you can just google them.
4- Under Administrative Templates: Policy Definitions – > Classic Administrative Templates (ADM) click on MS Outlook 2010 -> Exchange and on the right pane.
Enable Automatically configure profile based on AD Primary. And Enable Configure outlook anywhere user interface options.
These steps are optional but they’ll force opening outlook in order to configure it after the Client’s PC restarts.
5- When done go to User Configuration –> Windows Settings –> Scripts -> double click on Logon on the right pane
Click on Add
Browse then
Copy the below batch file to this location and attach it ” \\domain.com\SysVol\domain.com\Policies\{34E9C6C2-FCCF-45DA-908D-65A452D049F3}\User\Scripts\Logon”
When PCs restart they’ll take the new configuration.
Note:
The Outlook.txt file is the script that will be launching the Outlook configuration panel, you will need to rename the extension file from .txt to outlook.bat before uploading it to the location in the article.
If your Exchange users have problem with Active Sync’s Autodiscover configuration or you’re intending to configure a Hybrid configuration with Microsoft office 365 Exchange Online or Your Lync/Skype for business users are having troubles signing in right after you enable users from the Lync/SfB Panel then this article is for you.
Note: For Lync you’d want to change Account (UPN) Instead of the Proxy Address Attribute for users. For each scenario it might be a different case.
Assuming that I have the following domain list, and I want to add them to my AD user’s proxy address attribute so they can use it as SMTP address
%’sAMAccountName’%@Domain1.com
%’sAMAccountName’%@Domain2.com
%’sAMAccountName’%@Domain3.com
%’sAMAccountName’%@Domain4.com
%’sAMAccountName’%@Domain5.com
%’sAMAccountName’%@cardtekcloud.onmicrosoft.com
First to add main SMTP address we’ll use the attribute %’sAMAccountName’%@Domain.com
Next to add alternative Proxy addresses we’ll use
%’sAMAccountName’%@domain.com
I’ll open ADModify.net app and select the organization that I would like to apply the changes for
I’ll select Domain from the domain list. Then choose the Domain controller and choose only to show users
Click on the green Next button then click Add to List then click Next under the user to continue
I’ll navigate to Email addresses tab to do the changes and place the domain that I would like to use.
I’ll enter whatever domain and use sAMAccountName since it matches the user’s Email address .
IMPORTANT NOTE:
It’s very important to notice that if you’d like to change the domain in the Proxy Address . You ‘ll need to choose an attribute that matches the user’s existing Proxy address username ..
To add the other domains e.g. domain2, domain3 ..etc I’ll follow the exam same steps just change the end @domain2.com.
That should be all. If you have any questions please don’t hesitate to contact me or comment.
To change the password policy we’ll have first to open Group policy management which is located in “Administrative Tools” on your DC
Right click on “Default Domain Policy” in order to change the password policy for all users within a domain.
This will open the Group Policy Management editor as you can see below where you will have to navigate to “Computer configuration -> Security Settings -> Password Policy” and there you can disable the password complexity, adjust it or change any other settings.
Next when the Group policy opens up the configuration I will go to “Account Policies” and disable the “Password must meet complexity requirements” since this is what I simply want do in my case.
After changing the policy you will need to force updating the policy on all the domain joined clients by using the command line GPupdate /force
When this is finished, all clients must be restarted in order for the group policy change to take effect.
While I was doing a cross forest migration in a customer’s environment I had to make sure that of some computers’ logged in users before starting the migration process due to the customer’s policy how Computer hostnames are used.
There was about 500 computers, most of these computers don’t use their users’s names but company’s name and then a number e.g. (PC5123).
Luckily Mark Russinovich has provided the great PSTOOLS for administrators to work remotely and find out everything about user’s computers in domain without having to go physically or interact with the users.
So I had to download the tools from this link and use the following command to get the logged in user.
wmic /node:”smart0498″ ComputerSystem GET UserName
The server where you install ADMT can run any supported version of Windows Server, including Windows Server 2012 R2 and Windows Server 2012.
The source and destination domain controllers must be writeable, but they can run any supported version of Windows Server with a user interface (not Server Core), including Windows Server 2012 R2 and Windows Server 2012.
The source and destination domains must be at Windows Server 2003 domain functional level or higher.
The computers that can be migrated can run any supported version of Windows, including Windows 8.1.
You can use any version of SQL Server for the ADMT database.
The account you run ADMT under will need to have administrative rights in both the source and destination domain. You may decide to create a user specifically for the ADMT Migration, or you may use an existing user e.g. the default administrator account. I will create a user called ADMT and assign this user the correct permissions. This is the account we will use for the entire migration.
It is recommended that you make the user account in the destination domain and make it a member of the domain administrators group.
destination Domain:
In the source domain add the same user to the builtin administrators group (you will be unable to add it to the domain administrators group).
Source Domain:
Installing ADMT
You should install ADMT and SQL onto a member server in the destination forest. Use the ADMT service account explained in the previous post to install SQL and ADMT.
ADMT requires a preconfigured instance of SQL Server for its underlying data store, so we’ll go ahead and install SQL 2008 SP1 Express on ADMT.contoso.com
This error is purely within SQL Express 2008 and is not really to do with ADMT 3.2. The issue is fixed in “Cumulative update package 4 for SQL Server 2008”.
Unhelpfully, this error is identified in KB975055 as being only for Windows 7 and that it was fixed by SP1 – both incorrect. The issue does affect Win2008 R2 and is only fixed by the cumulative update.
Resolution
Before installing SQL Server Express 2008 with SP1 (which will fail), first install:
Set an account for the SQL service to run under (use your ADMT Service Account).
Set a SQL administrator, choose the user account you plan to run ADMT under- be aware that this user account will need to have local administrative rights in the source domain (this will be discussed further in the series).
For this series I will be using ADMT 3.2, which is the supported version for Server 2008 R2. Use ADMT 3.1 for installation on a Server 2008 non-R2 server, or ADMT 3.0 for Server 2003. If you need to migrate a 2000 Domain Server, you will need to use ADMT version 3.1 or earlier.
Update Junes 2014 – ADMT 3.2 now supports Windows Server 2012 / 2012 R2.
Next you can leave the default value be used for the SQL installation.
Since this is a new installation then I won’t need to be importing any data from a previous database and will continue with the normal options.
The Installation of the ADMT tool is finished and next we’ll be preparing Permission in the next series and starting migration of users, Groups, Computers and i’ll talk about the issues that I had during the migration.
In the second part of this series (DC cross forest migration) I will demonstrate some major required steps for the migration from the old DC (lab.com) to the new DC (Contoso.com)
NOTE:
SQL Servers and their applications can’t be migrated due to SQL permissions and Schema mismatch.
Requirements are :
Destination DC Forest Function and domain function level must be set to at least 2008 R2 for ADMT3.2 to work
And a health check must be performed on the FSMO roles to make sure everything is functioning properly on the Source DC.. PDC, SchemaMaster..etc
The checks I will perform are
Check replication (In case there’s more than one DC In the source forest).
DC health (DCDiag tool)
Check the reachability of the PDC.
Netdom query FSMO ( this command will show you which DC in the source forest holds the roles exactly)
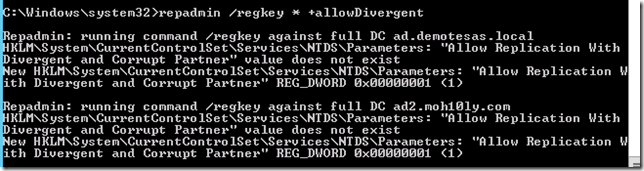
1- For Checking replication you can use the repadmin command line which checks replication between sites, DCS and reports any errors in between. in case you have one server in pace the following outcome should be printed for you.
Repadmin.exe helps administrators diagnose Active Directory replication problems between domain controllers running Microsoft Windows operating systems.
as they are multiple types of tests that can be applied with dcdiag depending on the parameter used. I will start with the DNS.
If the DNS is healthy then it should show as following. and we can continue to the next test.
For an extensive test, you can use the parameter /v along with this sign >c:\dcdiag.txt to export the test to a file and look at it line by line.
If everything sounds good and healthy we shall move on to the next step which is DNS configuration
DNS Configuration
Preparation:
DNS replication between both domains
Installing Windows 2008 R2 for ADMT 3.2
Setting up domain trust between forests.
DNS replication between the source and target domain
In order for the trust to be created between both forests, you either have to create a conditional forwarders that will copy the source zones to the destination DNS server and vice versa or you can create a secondary forwarder zone in destination DC for the source DC and vice versa.
In my case I will go for creating a secondary zone and to do this I will go to each DNS server and allow Zone to be transferred.
Note:
You can include only the IPs of the Source and Destination servers in the zone transfer and any additional DNS servers.
Now I a have created a secondary zone DNS and trying to resolve FQDNs from the source server as in the below snapshot.
Same will be done on the destination server.
Checking Name Resolution for both domains:
Once the nslookup works as expected from both servers then we’ll ahead with creating forest trust between both DCs.
Creating Forest trust between Source and Destination Domain.
NOTE:
In order for the trust to be created between both source and destination domains the PDC on the Destination Domain must be available.
1. Open the Active Directory Domains and Trusts, right click on the domain and click properties.
We will have to validate trust after creating it to make sure that trust in both ways are validated.
Now since trust is created and already validated both ways, we’ll have to add a GPO policy to update all clients with the new Domain name in the DNS suffix search list to resolve netbios names.
Updating DNS Suffix Search list:
DNS suffix search list:
In order to add the source and destination domains suffix to the dns suffix search list we will have to open GPO on the destination Domain (Contoso.com)
On the target domain (contoso.com) we’ll have to open GPO .
Right Click on default domain policy / Edit
Go to (Computer Configuration \ Policies \ Administrative Templates \ Network \ DNS client
Double click on the DNS Suffix Search list to open it and enable it.
Click ok and apply the police and see how it should show in the report.
Once this is done and policy is applied among all clients you should have no problem and it should show first on the DC where you applied the policy.
In this series of articles I will demonstrate the Cross forest migration for Microsoft Windows Active directory 2012 R2.
Before starting any step, I will have to do a revision for the current environment and check what is there, what can be migrated and what can not be.
Revisions:
Check if the environment is using an old cryptographic algorithms that’s not supported during the migration .e.g. (SHA-1 1024bit Certification authorities).
Notice that Group Policy user profile folder redirection might have a bug from SCCM. To fix this the SCCM needs to be checked for one option needs to be disabled
Under the SCCM Configuration manager,
– Select Administration
– Select Client Settings
– Pull up PROPERTIES of Default Client Settings configuration and click on Compliance Settings
– Enable User Data and Profiles mentioned above is the setting which drives the control of Folder Redirection and Remote User Profiles.
The above configuration by Default is set to NO. Once enabled (set to YES), it passes the control of Folder Redirection, Offline Files, and Remote User Profiles to WMI and stores this configuration under the registry path: HKEY_LOCAL_MACHINE\SOFTWARE\Microsoft\Windows\CurrentVersion\UserState\UserStateTechnologies\ConfigurationControls
TCP/IP crashes and errors: Hotfix released to correct a crash in TCP/IP.
• Prerequisite checks for Azure RMS integration (such as any required hotfixes, registry key settings, Microsoft Online Sign-In Assistant)
• Ability to collect trace logs to capture real-time problems
• Diagnostics and remediation for Office 2013 and Office 2010
• Basic diagnostics for federation services
• Group membership check, based on groups and policy templates
• Display of your RMS configuration settings and verification tests to validate service health for RMS
• Ability to monitor multiple servers and find all RMS servers in trusted forests
By installing and using the software you accept the License terms which are located in the zip folder download. If you do not accept the terms, do not install or use the software.


![clip_image001[7]](http://lh3.googleusercontent.com/-jUR4i3662kY/VUips4Fp8_I/AAAAAAAAOdE/nWFdsqp9gio/s1600-h/clip_image001%25255B7%25255D%25255B4%25255D.png)
![clip_image002[6]](http://lh3.googleusercontent.com/-cGUjb6Glxuc/VUipvBS7M3I/AAAAAAAAOdU/-ztAr98K_Jg/s1600-h/clip_image002%25255B6%25255D%25255B4%25255D.png)
![clip_image002[4]](http://lh3.googleusercontent.com/-HinCnqzNgD4/VUip2d_65vI/AAAAAAAAOdk/naMQT-39LJQ/s1600-h/clip_image002%25255B4%25255D%25255B4%25255D.png)
![clip_image001[5]](http://lh3.googleusercontent.com/-D62bTSy6s3g/VUip4OocCOI/AAAAAAAAOd0/5joXBw72HSc/s1600-h/clip_image001%25255B5%25255D%25255B2%25255D.png)


![clip_image003[7]](http://lh3.googleusercontent.com/-WLSZ5LO3CmE/VUiqFZF3Z6I/AAAAAAAAOfE/vgM7nU2XxE0/s1600-h/clip_image003%25255B7%25255D%25255B3%25255D.png)
![clip_image004[7]](http://lh3.googleusercontent.com/-5LyS38qnXIE/VUiqIxvoFyI/AAAAAAAAOfU/O5dDz0-ZkSQ/s1600-h/clip_image004%25255B7%25255D%25255B3%25255D.png)
![clip_image005[7]](http://lh3.googleusercontent.com/-ydzGudpCVJM/VUiqMGO5nhI/AAAAAAAAOfk/vZ5V5XGnAsg/s1600-h/clip_image005%25255B7%25255D%25255B3%25255D.png)
![clip_image006[7]](http://lh3.googleusercontent.com/-lktGGTPu_GM/VUiqP_l4NhI/AAAAAAAAOf0/QKvgeuHONrg/s1600-h/clip_image006%25255B7%25255D%25255B3%25255D.png)
![clip_image011[4]](http://lh3.googleusercontent.com/-q5FwrV3qHSA/VUiqSWxcu4I/AAAAAAAAOgE/wU1ovPIjIGI/s1600-h/clip_image011%25255B4%25255D%25255B2%25255D.png)
![clip_image012[4]](http://lh3.googleusercontent.com/-YiVGSQNFWnA/VUiqUbAc7vI/AAAAAAAAOgU/ni-2t6ik-Ns/s1600-h/clip_image012%25255B4%25255D%25255B2%25255D.png)
![clip_image013[4]](http://lh3.googleusercontent.com/-MTgEmtsoyUE/VUiqWKTnDuI/AAAAAAAAOgk/hlrItpMmUO4/s1600-h/clip_image013%25255B4%25255D%25255B2%25255D.png)
![clip_image014[4]](http://lh3.googleusercontent.com/-qjLdS6BdrZw/VUiqYBOmDuI/AAAAAAAAOg0/vqgaGgX4kKQ/s1600-h/clip_image014%25255B4%25255D%25255B2%25255D.png)
![clip_image015[4]](http://lh3.googleusercontent.com/-9nTIQUlUnTo/VUiqaNd2III/AAAAAAAAOhE/a6Fb-jk4DIc/s1600-h/clip_image015%25255B4%25255D%25255B2%25255D.png)
![clip_image016[4]](http://lh3.googleusercontent.com/-4zVMH637p-U/VUiqcsF-rzI/AAAAAAAAOhU/_mvUWDS0KZA/s1600-h/clip_image016%25255B4%25255D%25255B2%25255D.png)
![clip_image017[4]](http://lh3.googleusercontent.com/-lBlogjr-VvE/VUiqe7bKJSI/AAAAAAAAOhk/mj4fUg9Ks7E/s1600-h/clip_image017%25255B4%25255D%25255B2%25255D.png)
![clip_image018[4]](http://lh3.googleusercontent.com/-2NY2kxh0nP0/VUiqhCNw8SI/AAAAAAAAOh0/TFIgkvM681A/s1600-h/clip_image018%25255B4%25255D%25255B2%25255D.png)
![clip_image019[4]](http://lh3.googleusercontent.com/-N2GKNk5qqEU/VUiqjo3D9BI/AAAAAAAAOiE/kIlNVqRGzvM/s1600-h/clip_image019%25255B4%25255D%25255B2%25255D.png)
![clip_image020[4]](http://lh3.googleusercontent.com/-nIdBCp_55fs/VUiqlaOYvTI/AAAAAAAAOiU/1pNVsK9Ethg/s1600-h/clip_image020%25255B4%25255D%25255B2%25255D.png)
![clip_image021[4]](http://lh3.googleusercontent.com/-vXT8BwpFFhk/VUiqnoFc2DI/AAAAAAAAOik/QzhdrOEazqA/s1600-h/clip_image021%25255B4%25255D%25255B2%25255D.png)
![clip_image022[4]](http://lh3.googleusercontent.com/-YLr-tPjl7lU/VUiqpjEa0fI/AAAAAAAAOi0/QOAhzdbkWEA/s1600-h/clip_image022%25255B4%25255D%25255B2%25255D.png)
![clip_image023[4]](http://lh3.googleusercontent.com/-xrzjpZACKDU/VUiqrcVNQqI/AAAAAAAAOjE/qRGfnmYT_Nw/s1600-h/clip_image023%25255B4%25255D%25255B2%25255D.png)
![clip_image024[4]](http://lh3.googleusercontent.com/-oF1vvNOAuGs/VUiqtdETDuI/AAAAAAAAOjU/YwKezARopbY/s1600-h/clip_image024%25255B4%25255D%25255B2%25255D.png)
![clip_image025[4]](http://lh3.googleusercontent.com/-OQYL-maYY9Y/VUiqvSsxzeI/AAAAAAAAOjk/kSNvvypQG00/s1600-h/clip_image025%25255B4%25255D%25255B2%25255D.png)
![clip_image026[4]](http://lh3.googleusercontent.com/-JLF040Ut4kg/VUiqxY4stkI/AAAAAAAAOj0/3i3eqWKEmAY/s1600-h/clip_image026%25255B4%25255D%25255B2%25255D.png)
![clip_image027[4]](http://lh3.googleusercontent.com/-pdl5wGq-HOs/VUiqzZc5HvI/AAAAAAAAOkE/IDfZOIB1L78/s1600-h/clip_image027%25255B4%25255D%25255B2%25255D.png)
![clip_image028[4]](http://lh3.googleusercontent.com/-lgx1-C1hcos/VUiq1aVu0nI/AAAAAAAAOkU/-SfJOZ662Iw/s1600-h/clip_image028%25255B4%25255D%25255B2%25255D.png)
![clip_image029[4]](http://lh3.googleusercontent.com/-IAiLTjEdG64/VUiq3TvDkcI/AAAAAAAAOkk/v4Jngn3Mkgs/s1600-h/clip_image029%25255B4%25255D%25255B2%25255D.png)
![clip_image031[4]](http://lh3.googleusercontent.com/-E5d1WbJNx8o/VUiq6IwZO7I/AAAAAAAAOk0/44kw3wZMces/s1600-h/clip_image031%25255B4%25255D%25255B2%25255D.png)

![clip_image033[4]](http://lh3.googleusercontent.com/-DPqbaN1ZHfY/VUiq_PbguRI/AAAAAAAAOlU/lbn13GmAcqE/s1600-h/clip_image033%25255B4%25255D%25255B2%25255D.png)
