All posts by moh10ly

Installing “Only” Trend Micro 11.0 on Exchange 2013 server

This guide will show you how to installing order to Install “Only” Trend Micro 11.0 on Exchange 2013 server

You will have to make sure that before you install Trend Micro you have enough resources on the mail servers or Edge servers depending on where you are intending to install it.

Prerequisites:

  1. You will need to install Windows IIS CGI role.
  2. Net Framework 3.5
  3. Trend Micro Setup.

If you did not install CGI you will get the following error, so you must install it

clip_image001

To install it you will need to go to Add Roles and then choose and install it.

clip_image002

If Net Framework 3.5 is not install the setup won’t proceed unless you do so and you will get the following error:

clip_image003

To install Net Framework 3.5 , you can use the wizard or you can use the Powershell but you’ll need to attach Windows Server ISO File to the VM or the physical machine.

clip_image004

Setup will restart from the beginning

NetFrame work fails from the Server Manager

clip_image005

Instead, I imported the Windows 2012 r2 server ISO into the VM and ran the powershell command line

Dism /online /enable-feature /featurename:NetFx3 /All /Source:D:\sources\sxs /LimitAccess

Where D is the ISO drive name where Windows is.

clip_image006

Restarted the Trend Micro Setup and the setup is working

I already have copied the setup files on my mailbox servers, in my scenario I have 2 mail box servers which I am going to install it on.

I will launch the setup and go through the following wizard

clip_image007

As I mentioned earlier, I am planning to install it on Exchange 2013 Mailbox servers, so I will go ahead and choose Mailbox servers

clip_image008

I will click Browse and Add exchange servers and as in the following snapshot it’ll show me total server count

clip_image009

Next I will type the Exchange Admin account which I used to setup Exchange with and login to the admin Center which is also a local admin.

clip_image010

This is set by default so you will need to leave it as it is.

clip_image011

You can keep the following default settings or change the port in case it’s already used or enable SSL.

clip_image012

In my case I will enable SSL as well as it’s more preferable for security purposes.

clip_image013

Trend micro setup will check if there’s any previous instance on the target Mailbox server in order to check if it’s an upgrade or a fresh install.

clip_image014

I have no proxy so I will proceed without it.

clip_image015

I’m planning to ignore this now and register later, so you can provide the key if you already have it and want to register.

clip_image016

When you continue without activating the product you will get the following warning.

clip_image017

Depending on if you wanna be useful or not, you can just to participate with this program or just ignore it.

clip_image018

In case you would like to direct or send all incoming spam messages to the user to take the decision him/her self you can choose to integrate with Outlook junk e-mail or integrate with End user’s quarantine. In this case incoming infected or suspicious mails will be delivered to the user’s Quarantine but can be restored from/with trend micro.

clip_image019

Trend Micro have also a control manager for centralized management, so if you have it you can configure it and manage all those scanmail from one location. If not then just click next

clip_image020

Click browse and choose your domain in order to select the domain admin groups to manage the trend micro scan mail application.

clip_image021

All server details and configuration is going to be listed in the next snapshot.

clip_image022

And now installation should start.

clip_image023
clip_image024
clip_image025

The credentials to login might be standard but you could also try your domain admin which you have assigned during the setup to login to the portal.

clip_image026

Any configuration that you do on the Mailbox server 1, you will have to re-do it on Server 2 since this is not centralized management.

clip_image027

So first thing I’ll do is update the product to the latest version.

clip_image028

After selecting the components to update click on Update and wait for the process to finish.

clip_image029

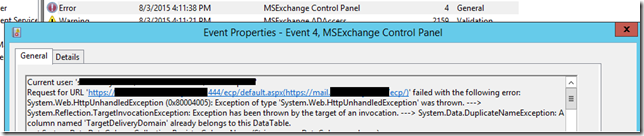
After setting and configuring couple of rules and restarting Exchange transport service on each server . I was able to test It and see that it works as in the following snapshot.

clip_image030

Extend MS Exchange Server’s Certificate life

On the Certification Authority Server open Certification Authority Console (MMC)

Right click on Certificate Templates and click Manage

IN certificate templates console right click on Web Server and click Duplicate template

Select Windows Server 2003 Enterprise

Enable “Allow private key to be exported”

Under security tab Select Enroll for the Authenticated users

Back to the Certificate Authority Console, Right click on Certificate Templates and click New -> Certificate template to issue and add the certificate template you created to the list.

Web Server V2 is on top

Let’s check it on Certserv IIS

Certificate is generated for 5 years. The reason why the certificate is generated for 5 years is because the Certification Authority server’s Certificate is limited to 5 years.

So the CA certificate must be set to longer then the client’s requested Certificate limit.

Certification Authority Issuing Certificate validity period extending

To change the Validity Period for the Root CA you can configure a CAPolicy.inf. To create a CAPolicy.inf file that changes the lifietime of the certificate to 30 years, you would type the following into a text file, and save it with the name CAPolicy.inf in the C:\Windows directory,:

[Version]

Signature= “$Windows NT$”

[Certsrv_Server]

RenewalValidityPeriod=Years

RenewalValidityPeriodUnits=30

After this you will need to renew the CA certificate from the CA console : right click on your certification authority and choose All Tasks -> then choose -> Renew CA Certificate

When you click on Renew CA certificate you will get the following prompt asking you to stop the CA to renew its Certificate, Click Yes

Once you click on Yes the service will stop and you will get this window telling you if you would like to generate new public and private key it’s up to you to use a new or not but if you choose Yes the clients using the old Certificate might be provoked and you might need to install the new CA Certificate on all clients using GPO.

Click Ok

After clicking OK you will see that you were able to generate the new CA Certificate and then you can issue clients certificates

Note: I created another template with 30 years expiration date this time after I created the CA policy for 30 years too.

Now In order to allow the CA to issue certificates that has longer than the default age (2 years) you must run the following command line on the CMD on the CA server.

And here we go, after requesting the certificate from the server I got 30 years valid certificate.

Exporting and Importing PST from Exchange 2003 to Exchange 2013

In order to export mails from Exchange 2003 (should not exceed 2 GB) you will have to copy Administrator user into another user “admin” and give that user the rights to access all other mailboxes.

You will have to navigate to the Mailbox store

clip_image001

Right click the mailbox store and click on Properties

Go to Security tab and add the new user (Admin) and give it full control as below

clip_image002

Apply, then sign out of the windows session to the Exchange machine and use the newly added domain admin to login and then open the Exmerge application

clip_image003

Select the second step (Extract or Import)

clip_image004

Select step1

clip_image005

Select the Exchange name and the DC (They should be set automatically)

clip_image006

Select the users that you want to be exported (shouldn’t exceed 2 GB).

clip_image007

Select the local language

clip_image008

Select the destination folder (In my case I mapped a network drive)

clip_image009

Save settings for later use if you want or just click Next.

clip_image010

Once done, the mailbox will be exported.

clip_image011

Importing into Exchange 2013

In exchange 2013 Open the EMS as administrator

Before you start, you should move all the PST files into a shared folder in the network and add the “Exchange Trusted Subsystem” user to its permission.

clip_image001[5]
clip_image002[5]

The same user should be added to the security tab

clip_image003[4]
clip_image004[4]

Providing import and export permission on Exchange 2013

In order to import the PST files to Exchange 2013 users you will have first to assign the Exchange Admin account the capability of importing these PST files then sign out from the EAC portal and back in

To do so you will have to go to EAC then go to Permissions and double click on the Recipient Management

Click Add and select the Mailbox Import Export and click Add then OK

clip_image005[4]
clip_image006[4]

I will add members to this role group

clip_image007[4]
clip_image008[4]

After signing in back to the EAC with the administrator I got the Import PST options.

clip_image009[4]
clip_image010[4]
clip_image011[4]
clip_image012

For Management shell usage

http://technet.microsoft.com/en-us/library/ff607310(v=exchg.150).aspx

Importing PST using EAC and following up with EMS

clip_image013

Importing Single folder from source PST file into a target folder in email

Importing the folder Sent Items from the file basakc_backup.pst into target folder Sent Items in Mhamada user.

Note:

The parameter -TargetRootFolder will create a folder inside the existing Sent Items folder

clip_image014
clip_image015
clip_image016
clip_image017
clip_image018
clip_image019

Importing large items into mailbox in Exchange

clip_image020

Exchange 2013 not installing due to pending restart on Windows 2012

Error:

A reboot from a previous installation is pending. Please restart the system and then rerun Setup.

For more information, visit

Solution:

Delete the below key from the registry:

HKLM\SYSTEM\CurrentControlSet\Control\SessionManager\PendingFileRenameOperations

Step by Step Installating Exchange server 2013 from scratch (Part 1)

Step by Step Installing Exchange server 2013 from scratch (Part 1)

In this part, I will be demonstrate how to Install exchange 2013 and prepare new Databases along with preparing the servers for high availability (DAG).

Prerequisites:

– Two Microsoft Windows 2012 R2 servers with 16 GB ram and 200GB disk divided unto two partitions.

– Two NIC, one for MAPI and one for replication.

– Exchange 2013 CU8 setup to directly go to the latest available update.

Installing Prerequisites on all exchange servers

Launch Powershell as administrator and copy then paste the following.

Install-WindowsFeature RSAT-ADDS

From <http://technet.microsoft.com/en-us/library/bb691354(v=exchg.150).aspx>

When finished continue with the following Cmdlet on each Exchange server.

  • Install only the Mailbox server role on a computer.
  • Install only the Client Access server role on a computer.
  • Install both the Mailbox and Client Access server roles on the same computer.

Install-WindowsFeature AS-HTTP-Activation, Desktop-Experience, NET-Framework-45-Features, RPC-over-HTTP-proxy, RSAT-Clustering, RSAT-Clustering-CmdInterface, RSAT-Clustering-Mgmt, RSAT-Clustering-PowerShell, Web-Mgmt-Console, WAS-Process-Model, Web-Asp-Net45, Web-Basic-Auth, Web-Client-Auth, Web-Digest-Auth, Web-Dir-Browsing, Web-Dyn-Compression, Web-Http-Errors, Web-Http-Logging, Web-Http-Redirect, Web-Http-Tracing, Web-ISAPI-Ext, Web-ISAPI-Filter, Web-Lgcy-Mgmt-Console, Web-Metabase, Web-Mgmt-Console, Web-Mgmt-Service, Web-Net-Ext45, Web-Request-Monitor, Web-Server, Web-Stat-Compression, Web-Static-Content, Web-Windows-Auth, Web-WMI, Windows-Identity-Foundation

From <http://technet.microsoft.com/en-us/library/bb691354(v=exchg.150).aspx>

First thing we extract the setup file and then from command line as administrator we run Setup as below

Setup /PrepareSchema /IAcceptExchangeServerLicenseTerms

clip_image001

setup /PrepareAd /IacceptExchangeServerLicenseTerms /OrganizationName: Organization Name

clip_image002

Setup /Preparedomain /IAcceptExchangeServerLicenseTerms

clip_image003

Setup /PrepareAllDomains /IAcceptExchangeServerLicenseTerms

clip_image004

You should download and install the following software prerequisites as per Microsoft’s TechNet article regarding the installation. the software is available the link I posted earlier above or through this link Exchange_Prerequesties

clip_image005
clip_image006

After running all the prerequisites , we can start installation of Exchange 2013

clip_image007
clip_image008
clip_image009
clip_image010
clip_image011
clip_image012
clip_image013
clip_image014

Here I am going to change Exchange’s default installation path and place it on a different partition to avoid any data loss in case of Windows server crash or booting issues.

clip_image015
clip_image016
clip_image017
clip_image018
clip_image019

Now we install the second Exchange server, that will hold the same roles on it as the first one (Mailbox and CAS).

The steps are going to be exactly the same except that you won’t have to prepare the schema or AD since it’s already prepared.

Installation has finished for both servers

clip_image020

Creating DATABASES:

NOTE:

It’s better to mount the database upon creation and not restart the IS instantly after that.

Now it’s time to create new Databases and replace them with the default ones that come with the Installation

First we’ll have to start off by creating our targeted databases which we want to use them. Note that for the standard version of Exchange 2013 you can only create up to 5 databases per mailbox server.

In order to demonstrate all benefits of Exchange 2013 and its features including DAG. I will create 2 databases. One database on each server.

The first database will be called DB1SRV1

clip_image021

As soon as we have created the Database, we faced the following error with event ID 106

clip_image022

Then another warnıng from MSExchangeFastSearch wıth event id 1006

clip_image023

This indicates that a database should not be mounted upon creation, you should untick the mount DB option when you create one.

After waiting a bit the following logs should appear and show a healthy indexing start.

clip_image024
clip_image025

Once the DB has been created, Exchange AC will require that you restart the IS (Information store Service) in order for replication to happen without an issue.

clip_image026

Database is showing healthy and no issues so far.

clip_image027

Now we’ll create a new DB on the second server without ticking the mount DB option.

clip_image028
clip_image029

Microsoft Exchange Server Locator Service failed to find active server for database ‘de5f3051-c202-4976-b8e4-65bbbe0c2395’. Error: The database with ID de5f3051-c202-4976-b8e4-65bbbe0c2395 couldn’t be found.

clip_image030

The same exact errors came after creating the Database without mounting it.

clip_image031

Now let’s restart the IS service and mount our database then see what happens..

clip_image032

Upon restarting the service, we get the following error which is related to the MS Exchange replication service . It noticed that the database that we have created has never been mounted in order to start the indexing.

clip_image033

Let’s mount the database and see the changes

clip_image034

Mounting the database have got the AM to report successfully and after couple of seconds the MSExchangeFastSearch will check out if the database have any indexing files.

clip_image035

No indexing state have been found and so the FastSearch service will give you a 1013 warning report. This is a good warning because it reports that the service is working properly and that it will create the indexing folder after couple of minutes as we’ll see later.

It takes approximately 3-5 minutes for the database to start the indexing.

clip_image036

Now on the EAC, the DB should report healthy. Let’s see

clip_image037

Removing Default databases

First step before deleting the default databases is to move any system mailboxes or arbitrary mailboxes in them to the newly created databases…

Paul Cunningham wrote a great article on how to do this using Powershell … in the following link

Get-Mailbox -Database “Mailbox Database 2” | New-MoveRequest -TargetDatabase “Mailbox Database 1”

First we’ll have to copy the default databases’ names in notepad to run the command properly.

Get-Mailbox -Database “Mailbox Database 0043173996” | New-MoveRequest -TargetDatabase “DB1SRV1”

clip_image038

Time to remove arbitrary mailboxes from the default DB to the new DBs

The command is going to look like this

Get-Mailbox -Database “Mailbox Database 0043173996” -Arbitration | New-MoveRequest -TargetDatabase “DB1SRV1”

clip_image039

All mailboxes have already been moved to the new DB, now let’s check if there’s anything left in the Old DB.

clip_image040

To remove the DB, you will have to type the following command in EMC:

Remove-MailboxDatabase -Identity “Mailbox Database 0043173996”

clip_image041

The warning above is apparently due to Exchange permission on AD. It has been described in detail on how to solve this warning by Nuno Mota in the following Link.

From<http://www.msexchange.org/kbase/ExchangeServerTips/ExchangeServer2013/ManagementAdministration/exchange-2013-error-deleting-database.html>

For the second server, You will have to repeat the same steps as on the first deleted MB Database.

clip_image042

Hope you like this, Stay tuned for the second part

Exchange 2013 OWA,Async,And OA error MsExchange BackEndRehydration event id 3002

Users can’t access their mailboxes from anywhere as they get the error in the screenshot.

Related errors are 3002, 3005

Event code: 3005

Event message: An unhandled exception has occurred.

Event time: 7/29/2015 11:10:57 AM

Event time (UTC): 7/29/2015 8:10:57 AM

Event ID: 6f94ea40e3964fb1a05d9fc48ffb4299

Event sequence: 38

Event occurrence: 2

Event detail code: 0

Application information:

Application domain: /LM/W3SVC/1/ROOT/owa-2-130826309519814020

Trust level: Full

Application Virtual Path: /owa

Application Path: C:\Program Files\Microsoft\Exchange Server\V15\FrontEnd\HttpProxy\owa\

Machine name: EX2K1301

Process information:

Process ID: 19348

Process name: w3wp.exe

Account name: NT AUTHORITY\SYSTEM

Exception information:

Exception type: NullReferenceException

Exception message: Object reference not set to an instance of an object.

at Microsoft.Exchange.Clients.Common.UserAgent.HasString(String str)

at Microsoft.Exchange.Clients.Common.UserAgent.get_Layout()

at Microsoft.Exchange.Clients.Common.UserAgent.get_LayoutString()

at ASP.auth_logon_aspx.__Render__control1(HtmlTextWriter __w, Control parameterContainer)

at System.Web.UI.Control.RenderChildrenInternal(HtmlTextWriter writer, ICollection children)

at System.Web.UI.Page.Render(HtmlTextWriter writer)

at System.Web.UI.Control.RenderControlInternal(HtmlTextWriter writer, ControlAdapter adapter)

at System.Web.UI.Page.ProcessRequestMain(Boolean includeStagesBeforeAsyncPoint, Boolean includeStagesAfterAsyncPoint)

Request information:

Request URL: https://mail.Domain.com:443/owa/auth/logon.aspx?url=https://mail.Domain.com/owa/PowerShell-LiveID&reason=0

Request path: /owa/auth/logon.aspx

User host address: 10.16.0.172

User:

Is authenticated: False

Authentication Type:

Thread account name: NT AUTHORITY\SYSTEM

Thread information:

Thread ID: 67

Thread account name: NT AUTHORITY\SYSTEM

Is impersonating: False

Stack trace: at Microsoft.Exchange.Clients.Common.UserAgent.HasString(String str)

at Microsoft.Exchange.Clients.Common.UserAgent.get_Layout()

at Microsoft.Exchange.Clients.Common.UserAgent.get_LayoutString()

at ASP.auth_logon_aspx.__Render__control1(HtmlTextWriter __w, Control parameterContainer)

at System.Web.UI.Control.RenderChildrenInternal(HtmlTextWriter writer, ICollection children)

at System.Web.UI.Page.Render(HtmlTextWriter writer)

at System.Web.UI.Control.RenderControlInternal(HtmlTextWriter writer, ControlAdapter adapter)

at System.Web.UI.Page.ProcessRequestMain(Boolean includeStagesBeforeAsyncPoint, Boolean includeStagesAfterAsyncPoint)

Custom event details:

OWA PAGE

Solution:

On Exchange servers, Make sure that Exchange servers are not members of Organization Management group and if they are then remove them and run this cmdlet anyway on all Exchange Servers then restart the Servers.

Get-ClientAccessServer | Add-ADPermission -AccessRights ExtendedRight -ExtendedRights “ms-Exch-EPI-Token-Serialization”, “ms-Exch-EPI-Impersonation” -User (Exchange Server name)

Make sure you restart Exchange servers after you apply these cmdlet

Exchange 2013 ECP fails with 500 Unexpected error after running Hybrid Configuration Wizard with Office 365

Symptoms

After you attempt to try Hybrid Configuration Wizard between Exchange 2013 SP1 and Exchange online (Office 365), You are unable to login to your OWA/ECP Page and instead you get an 500 unexpected error:

clip_image001

If you go to event viewer You might find Event ID 4 which shows the error:

clip_image002

Cause:

The HCW or “Hybrid Configuration Wizard” In Exchange 2013 (CU6 or 8) might cause some changes to your CAS folder in the following path and file.

“c:\Program Files\Microsoft\Exchange Server\V15\ClientAccess\ecp\DDI”` the file name is RemoteDomains.xaml and multiply some variables which causes ECP to fail and report that error.

Error:


Current user: 'Domain.local/User'

Request for URL 'https://ex2k1301.Domain.local:444/ecp/default.aspx(https://mail.Domain.com/ecp/)' failed with the following error:

System.Web.HttpUnhandledException (0x80004005): Exception of type 'System.Web.HttpUnhandledException' was thrown. ---> System.Reflection.TargetInvocationException: Exception has been thrown by the target of an invocation. ---> System.Data.DuplicateNameException: A column named 'TargetDeliveryDomain' already belongs to this DataTable.

at System.Data.DataColumnCollection.RegisterColumnName(String name, DataColumn column)

at System.Data.DataColumnCollection.BaseAdd(DataColumn column)

at System.Data.DataColumnCollection.AddAt(Int32 index, DataColumn column)

at Microsoft.Exchange.Management.DDIService.AutomatedDataHandlerBase.CreateColumn(DataTable table, Dictionary`2 rbacMetaData)

at Microsoft.Exchange.Management.DDIService.AutomatedDataHandlerBase..ctor(Service profileBuilder)

at Microsoft.Exchange.Management.DDIService.AutomatedDataHandlerBase..ctor(String schemaFilesInstallPath, String schema)

at Microsoft.Exchange.Management.DDIService.WSListDataHandler..ctor(String schemaFilesInstallPath, String resourceName, String workflowName, DDIParameters parameters, SortOptions sortOptions)

at Microsoft.Exchange.Management.DDIService.DDIServiceHelper.GetListCommon(DDIParameters filter, SortOptions sort, Boolean forGetProgress)

--- End of inner exception stack trace ---

at System.RuntimeMethodHandle.InvokeMethod(Object target, Object&#91;] arguments, Signature sig, Boolean constructor)

at System.Reflection.RuntimeMethodInfo.UnsafeInvokeInternal(Object obj, Object&#91;] parameters, Object&#91;] arguments)

at System.Reflection.RuntimeMethodInfo.Invoke(Object obj, BindingFlags invokeAttr, Binder binder, Object&#91;] parameters, CultureInfo culture)

at Microsoft.Exchange.Management.ControlPanel.WebServiceReference.GetList(DDIParameters filter, SortOptions sort)

at Microsoft.Exchange.Management.ControlPanel.OrganizationCache.LoadTargetDeliveryDomain(AddValueHandler addValue, LogErrorHandler logError)

at Microsoft.Exchange.Management.ControlPanel.OrganizationCache.TryGetValue&#91;T](String key, T&amp; value)

at Microsoft.Exchange.Management.ControlPanel._Default.RenderMetroTopNav()

at ASP.default_aspx.__RendermainForm(HtmlTextWriter __w, Control parameterContainer)

at System.Web.UI.Control.RenderChildrenInternal(HtmlTextWriter writer, ICollection children)

at System.Web.UI.HtmlControls.HtmlForm.RenderChildren(HtmlTextWriter writer)

at System.Web.UI.HtmlControls.HtmlContainerControl.Render(HtmlTextWriter writer)

at System.Web.UI.Control.RenderControlInternal(HtmlTextWriter writer, ControlAdapter adapter)

at ASP.default_aspx.__Render__control1(HtmlTextWriter __w, Control parameterContainer)

at System.Web.UI.Control.RenderChildrenInternal(HtmlTextWriter writer, ICollection children)

at System.Web.UI.Page.Render(HtmlTextWriter writer)

at System.Web.UI.Control.RenderControlInternal(HtmlTextWriter writer, ControlAdapter adapter)

at System.Web.UI.Page.ProcessRequestMain(Boolean includeStagesBeforeAsyncPoint, Boolean includeStagesAfterAsyncPoint)

at System.Web.UI.Page.HandleError(Exception e)

at System.Web.UI.Page.ProcessRequestMain(Boolean includeStagesBeforeAsyncPoint, Boolean includeStagesAfterAsyncPoint)

at System.Web.UI.Page.ProcessRequest(Boolean includeStagesBeforeAsyncPoint, Boolean includeStagesAfterAsyncPoint)

at System.Web.UI.Page.ProcessRequest()

at System.Web.UI.Page.ProcessRequest(HttpContext context)

at System.Web.HttpApplication.CallHandlerExecutionStep.System.Web.HttpApplication.IExecutionStep.Execute()

at System.Web.HttpApplication.ExecuteStep(IExecutionStep step, Boolean&amp; completedSynchronously)

System.Reflection.TargetInvocationException: Exception has been thrown by the target of an invocation. ---> System.Data.DuplicateNameException: A column named 'TargetDeliveryDomain' already belongs to this DataTable.

at System.Data.DataColumnCollection.RegisterColumnName(String name, DataColumn column)

at System.Data.DataColumnCollection.BaseAdd(DataColumn column)

at System.Data.DataColumnCollection.AddAt(Int32 index, DataColumn column)

at Microsoft.Exchange.Management.DDIService.AutomatedDataHandlerBase.CreateColumn(DataTable table, Dictionary`2 rbacMetaData)

at Microsoft.Exchange.Management.DDIService.AutomatedDataHandlerBase..ctor(Service profileBuilder)

at Microsoft.Exchange.Management.DDIService.AutomatedDataHandlerBase..ctor(String schemaFilesInstallPath, String schema)

at Microsoft.Exchange.Management.DDIService.WSListDataHandler..ctor(String schemaFilesInstallPath, String resourceName, String workflowName, DDIParameters parameters, SortOptions sortOptions)

at Microsoft.Exchange.Management.DDIService.DDIServiceHelper.GetListCommon(DDIParameters filter, SortOptions sort, Boolean forGetProgress)

--- End of inner exception stack trace ---

at System.RuntimeMethodHandle.InvokeMethod(Object target, Object&#91;] arguments, Signature sig, Boolean constructor)

at System.Reflection.RuntimeMethodInfo.UnsafeInvokeInternal(Object obj, Object&#91;] parameters, Object&#91;] arguments)

at System.Reflection.RuntimeMethodInfo.Invoke(Object obj, BindingFlags invokeAttr, Binder binder, Object&#91;] parameters, CultureInfo culture)

at Microsoft.Exchange.Management.ControlPanel.WebServiceReference.GetList(DDIParameters filter, SortOptions sort)

at Microsoft.Exchange.Management.ControlPanel.OrganizationCache.LoadTargetDeliveryDomain(AddValueHandler addValue, LogErrorHandler logError)

at Microsoft.Exchange.Management.ControlPanel.OrganizationCache.TryGetValue&#91;T](String key, T&amp; value)

at Microsoft.Exchange.Management.ControlPanel._Default.RenderMetroTopNav()

at ASP.default_aspx.__RendermainForm(HtmlTextWriter __w, Control parameterContainer)

at System.Web.UI.Control.RenderChildrenInternal(HtmlTextWriter writer, ICollection children)

at System.Web.UI.HtmlControls.HtmlForm.RenderChildren(HtmlTextWriter writer)

at System.Web.UI.HtmlControls.HtmlContainerControl.Render(HtmlTextWriter writer)

at System.Web.UI.Control.RenderControlInternal(HtmlTextWriter writer, ControlAdapter adapter)

at ASP.default_aspx.__Render__control1(HtmlTextWriter __w, Control parameterContainer)

at System.Web.UI.Control.RenderChildrenInternal(HtmlTextWriter writer, ICollection children)

at System.Web.UI.Page.Render(HtmlTextWriter writer)

at System.Web.UI.Control.RenderControlInternal(HtmlTextWriter writer, ControlAdapter adapter)

at System.Web.UI.Page.ProcessRequestMain(Boolean includeStagesBeforeAsyncPoint, Boolean includeStagesAfterAsyncPoint)

System.Data.DuplicateNameException: A column named 'TargetDeliveryDomain' already belongs to this DataTable.

at System.Data.DataColumnCollection.RegisterColumnName(String name, DataColumn column)

at System.Data.DataColumnCollection.BaseAdd(DataColumn column)

at System.Data.DataColumnCollection.AddAt(Int32 index, DataColumn column)

at Microsoft.Exchange.Management.DDIService.AutomatedDataHandlerBase.CreateColumn(DataTable table, Dictionary`2 rbacMetaData)

at Microsoft.Exchange.Management.DDIService.AutomatedDataHandlerBase..ctor(Service profileBuilder)

at Microsoft.Exchange.Management.DDIService.AutomatedDataHandlerBase..ctor(String schemaFilesInstallPath, String schema)

at Microsoft.Exchange.Management.DDIService.WSListDataHandler..ctor(String schemaFilesInstallPath, String resourceName, String workflowName, DDIParameters parameters, SortOptions sortOptions)

at Microsoft.Exchange.Management.DDIService.DDIServiceHelper.GetListCommon(DDIParameters filter, SortOptions sort, Boolean forGetProgress)

Flight info: Features:&#91;&#91;Global.DistributedKeyManagement, False],&#91;Global.GlobalCriminalCompliance, False],&#91;Global.MultiTenancy, False],&#91;Global.WindowsLiveID, False],&#91;Eac.AllowMailboxArchiveOnlyMigration, True],&#91;Eac.AllowRemoteOnboardingMovesOnly, False],&#91;Eac.BulkPermissionAddRemove, True],&#91;Eac.CmdletLogging, True],&#91;Eac.CrossPremiseMigration, False],&#91;Eac.DevicePolicyMgmtUI, False],&#91;Eac.DiscoveryDocIdHint, False],&#91;Eac.DiscoveryPFSearch, False],&#91;Eac.DiscoverySearchStats, False],&#91;Eac.DlpFingerprint, False],&#91;Eac.EACClientAccessRulesEnabled, False],&#91;Eac.GeminiShell, False],&#91;Eac.ManageMailboxAuditing, False],&#91;Eac.ModernGroups, False],&#91;Eac.Office365DIcon, False],&#91;Eac.OrgIdADSeverSettings, False],&#91;Eac.RemoteDomain, False],&#91;Eac.UCCAuditReports, False],&#91;Eac.UCCPermissions, False],&#91;Eac.UnifiedAuditPolicy, False],&#91;Eac.UnifiedComplianceCenter, False],&#91;Eac.UnifiedPolicy, False],&#91;Eac.UnlistedServices, False],], Flights:&#91;], Constraints:&#91;&#91;LOC, EN-US],&#91;MACHINE, EX2K1301],&#91;MODE, ENTERPRISE],&#91;PROCESS, W3WP],&#91;USER, Username(EditeD)@],&#91;USERTYPE, BUSINESS],], IsGlobalSnapshot: False

Solution:

Looking in the path I have wrote above “\Microsoft\Exchange Server\V15\ClientAccess\ecp\DDI” and opening the file that I have mentioned “RemoteDomains.xaml” you can clearly see there are incorrect format that have been duplicated 3 times.

clip_image003

To make sure that this was the cause, I have another server with CU8 on it so I went and checked the same file which was in the same location to find the result different.

This is the server that works in another environment and doesn’t have any issue.

clip_image004

So, the solution was to remove the two duplicates and correct the format of the variable line… I corrected the first line that includes

<Variable DataObjectName=”RemoteDomain” Name=”TargetDeliveryDomain” Type=”{x:Type s:Boolean}” />

And deleted the other two identical lines.. then I saved the file and closed notepad.

clip_image005

Next: Open IIS on the same server and go to “Application Pools” right click on the affected pools and Recycle them.. You don’t need to reset IIS as the fix should work right away.

Recycle ECP Pool

clip_image006

After recycling checking if the pool is reporting started or not…

clip_image007

Next I open ECP and it works without an issue

clip_image008

Exchange 2010 to 2013 Migration fails with “You cannot have ArchiveDomain set when archive is not enabled for this user”

You cannot have ArchiveDomain set when archive is not enabled for this user.

I have previously done a Hybrid integration with Office 365 with my Exchange 2010 server and enabled Archiving online when I migrated my user to Exchange online but then I finished my demo and decided to bring the user back on-premises.

Now I have deployed Exchange 2013 and wanted to migrate the same user to Exchange 2013 from 2010 but the migration request fails with the following message.

clip_image001

​​​​​​​​​​​​​​​​​​​​​​​​​​​​​​​​​​​​​​​​​​​​​​​​​​​​​​​​​​​​​​​​​​​​​​​​​​​​​​​​​​​​​​​​​​​​​​​​​​​​​​​​​​​​​​​​​​​​​​​​​​​​​​​​​​​​​​​​​​​​​​​​​​​​​​​​​​​​​​​​​​​​​​​​​​​​​​​​​​​​​​​​​​​​​​​​​​​​​​​​​​​​​​6/7/2015 1:23:24 PM [EXCH2K13] ” created move request.6/7/2015 1:23:57 PM [EXCH2K13] The Microsoft Exchange Mailbox Replication service ‘EXCH2K13.demotesas.local’ (15.0.1076.6 caps:1FFF) is examining the request.6/7/2015 1:23:59 PM [EXCH2K13] Connected to target mailbox ‘b6ee5dd7-beab-45a0-9933-8e926a694de3 (Primary)’, database ‘Mailbox Database 0439787427’, Mailbox server ‘EXCH2K13.demotesas.local’ Version 15.0 (Build 1076.0).6/7/2015 1:23:59 PM [EXCH2K13] Connected to source mailbox ‘b6ee5dd7-beab-45a0-9933-8e926a694de3 (Primary)’, database ‘Database1’, Mailbox server ‘EXCH01.demotesas.local’ Version 14.3 (Build 174.0).6/7/2015 1:23:59 PM [EXCH2K13] Request processing started.6/7/2015 1:23:59 PM [EXCH2K13] Source mailbox information:Regular Items: 104, 5.549 MB (5,818,789 bytes)Regular Deleted Items: 0, 0 B (0 bytes)FAI Items: 50, 0 B (0 bytes)FAI Deleted Items: 0, 0 B (0 bytes)6/7/2015 1:23:59 PM [EXCH2K13] Cleared sync state for request b6ee5dd7-beab-45a0-9933-8e926a694de3 due to ‘CleanupOrphanedMailbox’.6/7/2015 1:23:59 PM [EXCH2K13] Mailbox signature will not be preserved for mailbox ‘b6ee5dd7-beab-45a0-9933-8e926a694de3 (Primary)’. Outlook clients will need to restart to access the moved mailbox.6/7/2015 1:24:04 PM [EXCH2K13] Stage: CreatingFolderHierarchy. Percent complete: 10.6/7/2015 1:24:05 PM [EXCH2K13] Initializing folder hierarchy from mailbox ‘b6ee5dd7-beab-45a0-9933-8e926a694de3 (Primary)’: 76 folders total.6/7/2015 1:24:05 PM [EXCH2K13] Folder creation progress: 0 folders created in mailbox ‘b6ee5dd7-beab-45a0-9933-8e926a694de3 (Primary)’.6/7/2015 1:24:10 PM [EXCH2K13] Folder hierarchy initialized for mailbox ‘b6ee5dd7-beab-45a0-9933-8e926a694de3 (Primary)’: 75 folders created.6/7/2015 1:24:10 PM [EXCH2K13] Stage: CreatingInitialSyncCheckpoint. Percent complete: 15.6/7/2015 1:24:10 PM [EXCH2K13] Initial sync checkpoint progress: 0/76 folders processed. Currently processing mailbox ‘b6ee5dd7-beab-45a0-9933-8e926a694de3 (Primary)’.6/7/2015 1:24:12 PM [EXCH2K13] Initial sync checkpoint completed: 66 folders processed.6/7/2015 1:24:12 PM [EXCH2K13] Stage: LoadingMessages. Percent complete: 20.6/7/2015 1:24:14 PM [EXCH2K13] Messages have been enumerated successfully. 154 items loaded. Total size: 5.55 MB (5,819,724 bytes).6/7/2015 1:24:14 PM [EXCH2K13] Stage: CopyingMessages. Percent complete: 25.6/7/2015 1:24:14 PM [EXCH2K13] Copy progress: 0/154 messages, 0 B (0 bytes)/5.55 MB (5,819,724 bytes), 55/76 folders completed.6/7/2015 1:24:58 PM [EXCH2K13] Copying messages is complete. Copying rules and security descriptors.6/7/2015 1:25:04 PM [EXCH2K13] Initial seeding completed, 154 items copied, total size 5.55 MB (5,819,724 bytes).6/7/2015 1:25:04 PM [EXCH2K13] Stage: IncrementalSync. Percent complete: 95.6/7/2015 1:25:05 PM [EXCH2K13] Folder hierarchy changes reported in source ‘b6ee5dd7-beab-45a0-9933-8e926a694de3 (Primary)’: 2 changed folders, 0 deleted folders.6/7/2015 1:25:05 PM [EXCH2K13] Content changes reported for mailbox ‘b6ee5dd7-beab-45a0-9933-8e926a694de3 (Primary)’: Batch 1, New 3, Changed 1, Deleted 0, Read 0, Unread 0, Total 4.6/7/2015 1:25:05 PM [EXCH2K13] Total content changes applied to mailbox ‘b6ee5dd7-beab-45a0-9933-8e926a694de3 (Primary)’: New 3, Changed 1, Deleted 0, Read 0, Unread 0, Skipped 0, Total 4.6/7/2015 1:25:05 PM [EXCH2K13] Incremental Sync ‘b6ee5dd7-beab-45a0-9933-8e926a694de3 (Primary)’ completed: 2 hierarchy updates, 4 content changes.6/7/2015 1:25:05 PM [EXCH2K13] Stage: IncrementalSync. Percent complete: 95.6/7/2015 1:25:07 PM [EXCH2K13] Final sync has started.6/7/2015 1:25:07 PM [EXCH2K13] Folder hierarchy changes reported in source ‘b6ee5dd7-beab-45a0-9933-8e926a694de3 (Primary)’: 0 changed folders, 1 deleted folders.6/7/2015 1:25:07 PM [EXCH2K13] Incremental Sync ‘b6ee5dd7-beab-45a0-9933-8e926a694de3 (Primary)’ completed: 1 hierarchy updates, 0 content changes.6/7/2015 1:25:07 PM [EXCH2K13] Source mailbox information:Regular Items: 108, 5.562 MB (5,832,087 bytes)Regular Deleted Items: 0, 0 B (0 bytes)FAI Items: 50, 0 B (0 bytes)FAI Deleted Items: 0, 0 B (0 bytes)6/7/2015 1:25:07 PM [EXCH2K13] Stage: FinalIncrementalSync. Percent complete: 95.6/7/2015 1:25:09 PM [EXCH2K13] Mailbox store finalization is complete.6/7/2015 1:25:09 PM [EXCH2K13] SessionStatistics updated.6/7/2015 1:25:09 PM [EXCH2K13] Verifying mailbox contents…6/7/2015 1:25:10 PM [EXCH2K13] Mailbox contents verification complete: 66 folders, 157 items, 5.562 MB (5,831,953 bytes).6/7/2015 1:25:10 PM [EXCH2K13] Mailbox ‘Mohammed JA. Hamada’ was loaded from domain controller ‘ad.demotesas.local’.6/7/2015 1:25:18 PM [EXCH2K13] Fatal error UpdateMovedMailboxPermanentException has occurred.

On Exchange 2010, I launched Exchange Management shell and ran the following cmdlet which will show any attribute that has arch in it for the user Mohammed

Get-mailbox User | fl arch*

clip_image002

Since there’s no archive mailbox then the archive domain is invalid and I don’t even own it anymore as it has expired a while ago.

Resolution:

I will try to remove the archive domain object from the user’s properties using the following cmdlet

Set-mailbox mailboxname -ArchiveDomain $null

clip_image003

Using the above cmdlet seems to fail due to this property being administered by Exchange server so it’ll have to be removed manually.

I will open the user’s attribute and delete the value and try to continue the migration again.

clip_image004

I’ll click on Edit then Clear and OK

clip_image005

clip_image006

clip_image007

Migration finished successfully

clip_image008

clip_image009

Exchange 2010 Performance counters for the Client access role is not installed

Performance counters for the Client access role is not installed

To solve the problem

  • Open the Exchange Management Shell
  • Run the following cmd: add-pssnapin Microsoft.Exchange.Management.PowerShell.Setup
  • Run the following cmd: new-perfcounters –definitionfilename “C:\Program Files\Microsoft\Exchange Server\V14\Setup\Perf\RpcClientAccessPerformanceCounters.xml”

By running these cmds we will install the Performance Counters needed for the RPC Client Access Service. Once installed the error won’t be displayed anymore.

Prepare Schema for Exchange 2013 Migration while having Hybrid Integration with Exchange 2010

In a very interesting situation that I came through I had an environment with two DCs and Exchange 2010 that I had previously setup for Hybrid integration with Office 365 for demonstration with a trial subscription but I haven’t removed the integration after I finished my test and the trial expired and the tenant was deleted.

Next I intended to upgrade my existing Exchange 2010 to Exchange 2013 and setup coexistence between them however, I have stumbled in the step of preparation of AD schema for Exchange 2013. While trying to prepare the schema I got the following error

clip_image001

Setup /PrepareSchema /IAcceptExchangeServerLicenseTerms

Welcome to Microsoft Exchange Server 2013 Cumulative Update 8 Unattended Setup

Copying Files…

File copy complete. Setup will now collect additional information needed for

installation.

Performing Microsoft Exchange Server Prerequisite Check

Prerequisite Analysis FAILED

A hybrid deployment with Office 365 has been detected. Please ensure that you are running setup with the /TenantOrganizationConfig switch. To use the TenantOrganizationConfig switch you must first connect to your Exchange Online tenant via PowerShell and execute the following command: “Get-OrganizationConfig | Export-Clixml -Path MyTenantOrganizationConfig.XML”. Once the XML file has been generated, run setup with the TenantOrganizationConfig switch as follows “/TenantOrganizationConfig MyTenantOrganizationConfig.XML”.

If you continue to see this this message then it indicates that either the XML file specified is corrupt, or you are attempting to upgrade your on-premises Exchange installation to a build that isn’t compatible with the Exchange version of your Office 365 tenant. Your Office 365 tenant must be upgraded to a compatible version of Exchange before upgrading your on-premises Exchange installation. For

more information, see: http://go.microsoft.com/fwlink/?LinkId=262888

For more information, visit: http://technet.microsoft.com/library(EXCHG.150

)/ms.exch.setupreadiness.DidTenantSettingCreatedAnException.aspx The Exchange Server setup operation didn’t complete. More details can be found in ExchangeSetup.log located in the <SystemDrive>:\ExchangeSetupLogs folder.

The Office 365 Hybrid setup was still there in my Exchange Console and since I couldn’t follow MS’s recommended steps to connect to O365 tenant and get the XML file then I had to do things manually.

First I connected to the EMC and removed all the instances that were created during the Exchange Hybrid Wizard Configuration

1- Removing Organization Relationships

clip_image001[4]
image

2- Removing Federation Trust

clip_image001[6]
clip_image002

3- Removing Remote Domains

clip_image001[8]
clip_image002[4]

4- Removing Accepted Domains

clip_image001[10]
clip_image002[6]

5- Removing Send and Receive Connectors

clip_image001[12]
clip_image002[8]
clip_image003

6- Lastly the Hybrid Configuration object…

Since remove-hybridconfiguration cmdlet is not supported to remove the hybrid configuration object from AD then we have no choice but to use ADSIEDIT tool to do so.

I will navigate to Configuration > Services > Microsoft Exchange > First Organization > Delete “CN=Hybrid Configuration”

image
image
image

Restart MSExchangeServicehost

clip_image001[14]
image

Now I will try again to prepare AD schema for Exchange 2013 but I got a different error

clip_image001[16]

Extending Active Directory schema FAILED

The following error was generated when “$error.Clear);

install-ExchangeSchema -LdapFileName ($roleInstallPath + “Setup\Data\”+$

RoleSchemaPrefix + “schema0.ldf”)” was run: “Microsoft.Exchange.Configuration.Tasks.TaskException: There was an error while running ‘ldifde.exe’ to import the schema file ‘C:\Windows\Temp\ExchangeSetup\Setup\Data\PostExchange2003_schema0.ldf’. The error code is: 8224. More details can be found in the error file: ‘C:\Users\Administrator.DEMOTESAS\AppData\Local\Temp\2\ldif.err’at Microsoft.Exchange.Configuration.Tasks.Task.ThrowError(Exception exception, ErrorCategory errorCategory, Object target, String helpUrl)at Microsoft.Exchange.Management.Deployment.InstallExchangeSchema.ImportSchem

aFile(String schemaMasterServer, String schemaFilePath, String macroName, StringmacroValue, WriteVerboseDelegate writeVerbose)at Microsoft.Exchange.Management.Deployment.InstallExchangeSchema.InternalPro

cessRecord()at Microsoft.Exchange.Configuration.Tasks.Task.<ProcessRecord>b__b()at Microsoft.Exchange.Configuration.Tasks.Task.InvokeRetryableFunc(String funcName, Action func, Boolean terminatePipelineIfFailed)”.The Exchange Server setup operation didn’t complete. More details can be found

in ExchangeSetup.log located in the <SystemDrive>:\ExchangeSetupLogs folder.

Checking the ldif.err file mentioned in the error above it seems that Exchange is complaining because the changes of the AD schema is not being replicated to the other AD partners which is true since I have another additional DC that’s turned off.

clip_image001[19]

After turning on the other DC we’ll see what happens

The other DC had another issue as I have turned it off for long time and it was not syncing due to expired Tomb stone life so I had to fix this issue as well and I have published it in a different article.

Please click here to see how the replication issue was fixed.

Issue has been fixed

clip_image001[21]
clip_image002[10]

Hope someone finds this useful